
All right, if you read here regularly, then you probably remember the woven wrap bracelet from earlier this month. I promised to make a little easier tutorial. Both versions turned out great, but if you are a beginner this is an easier one to start with. What do you think?
 What you will need:
- Hemp or cotton twine (I used cotton this time) – you will need 6 strands that are 28-30 inches long.
- A ring connector
- Glue-on end caps, a clasp, and jewelry glue

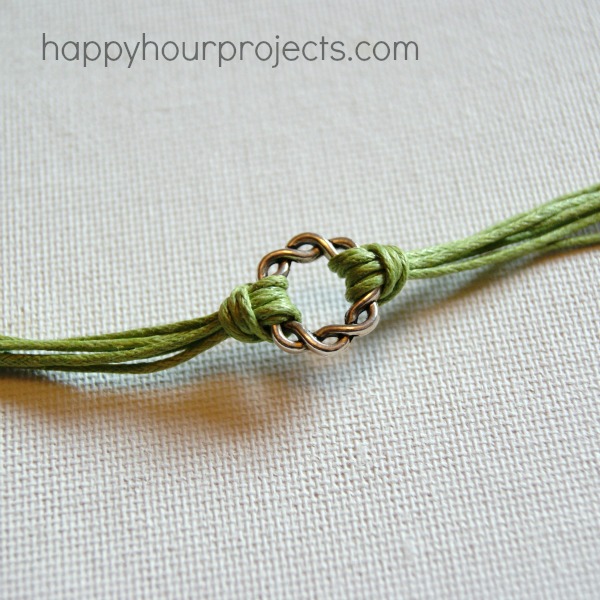
Take three of your strands, and double them so that there is a loop at the mid-way point. You will loop it through the ring connector to make a lark’s head knot. If you’re not sure how to do this, I use them in most of my woven bracelets. You can check out this tutorial to see what I mean.

Make a knot on each side. You’ll have 6 strands coming off that are approximately 13-14 inches long.
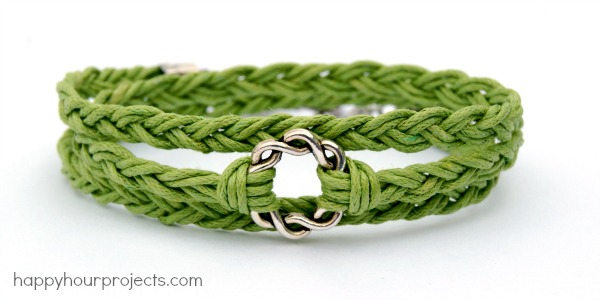
Now, braid each side. You can make a 6-strand braid if you want, but to keep things simple I just make a regular braid with 2 cords in each strand.

When you get to the end, trim your ends off evenly, add a little bit of jewelry glue to your end cap, and glue it on to secure your braid. Twist the end caps around to fully coat your twine. Do the same thing on each side – you may want to check the length against your wrist before finishing off the ends.

Now, just add a clasp to your bracelet and it’s ready to wear!
Perfect for the warm weather coming! What are you wearing this spring?

Hello! I am so excited to try this! What is the mm of the cord you are using? I saw in the comments that you are using a 7 mm end cap. Just trying to buy supplies.
Thank you!
Ursula
Do you use the DMC embroidery thread?
Just wondering if you used wax coated twine. Going to buy supplies, and I want to make sure I get the correct kind. Thanks!
If some one wants expert view about blogging after that i advise him/her to go to
see this webpage, Keep up the pleasant job.
I’m excited to make this for several of our grandkids. I was looking for something like this. Thanks. How do I get on your site to get more projects like this?
Very nice , good directions, that is my next project for my grandson.
Thanks so much for sharing. It looks easy enough that even I can do this. : )
What size end caps did you use for this bracelet?
Love the bracelet! What size end caps did you use?
7mm!
Adrianne,
Where do I find the ring connector you use in this tutorial? Or any other similar items like that?
If you are looking for the clasp, I get them here: http://www.consumercrafts.com/store/details/catalog/jewelry-cord-kumihimo-braiding-findings-and-kits/1999-4712
If you are talking about the focal ring, there should be lots of similar things out there. I think this one came from Hobby Lobby.
This might be a stupid question, but…when you put this on, it should wrap around the wrist several times and then clasp, right?
Very easy tutorial! Thank you very much for all the pics:) Cant wait to make several for birthday and holiday gifts:)
Love, love, love…cute and perfect for spring and summer. I can’t wait to get some colorful cotton or hemp and make my own!!!!
Ummm…this may sound really stupid, and I am probably missing something really obvious, but when I make this using your suggested lengths, my bracelet closure is on the top of my wrist right next to the silver ring. What the heck am I doing wrong?
I’m guessing it’s because your wrist is a different size.
I just clicked over from Saved ByLove and I LOVE this! I can’t wait to make one. I’ll be linking as well- and subscribing- your projects are fantastic!
Where do you find the glue on end cones?
Great idea for a post.Thank you!
Great tips…I’ll try to do a bracelet for someone loved…Thanks for sharing
So cute! Looks easy, but you should sell them!
Love how simple this is to create! I’m featuring your project on my PINTASTIC post tomorrow (Friday, April 5). I think my daughter and I will have to try this together…real soon!
Cindy @crazylou
Where did you find the charm? I am an Irish gal and love it!
You can get the charm from Avon, it’s called the empowerment charm. All proceeds are donated to end violence against women. $5
Love it!! So fun and cute!!
Beautiful and simple – my kind of DIY :)
Thank you, Adrianne for sharing your tutorial
Thank you for this great tutorial! I shared :)
Adrianne, another amazing, quick and easy jewelry project! LOVE it!