
Okay, I know this is two music box necklaces this week, which is probably at least twice as many ideas as any one person needs in this particular category, but I’m just so excited about how this little locket came together that I had to share with you today! (If you missed the other one, be sure to take a look at the leather music box necklace from Monday for an idea that involves a lot fewer tools.) The style of this locket is part steampunk, part vintage, and it plays “Somewhere Over the Rainbow”. I did some really basic metal work (no soldering – just hammering, punching, and riveting) to assemble this keepsake necklace.

Now, when the “art” side of me takes over, I kind of forget about photo step-by-steps as I’m working, and a lot of this was experimenting and figuring it all out as I go. I do have some tips and pointers today if you’re wondering how I assembled this, and I’ll share with you what kinds of tools I used. I’m hoping that you feel inspired to make your own version after you read this (or hey, at the very least, you pin it or share it socially to admire later, haha) but of course, every person’s style will be a little bit different! And if you DO bring your vision to life and make your own, I’m dying to see it, so be sure to share it with me – either tag me on your favorite social channel or email me!

Okay, I will list the supplies that I used when I made my piece, and I’ll drop in links for the products wherever I can. Some of these are affiliate links, which means if you choose to make a purchase, it supports my blog (thank you!) but don’t forget – this is just one way you can style this piece! You may want different elements. Here’s what I used:
- Altoids Smalls Mint Tin
(or any empty tin of a similar size)
- Miniature music box movement and a 4mm key (the smallest one)
- Leather Hand Punch
- Steel bench block, rubber bench block, and hammer
- ImpressArt’s Newsprint font, a Sharpie, and a polishing cloth
- Star-shaped pewter stamping blank
- Awl
- Tierracast eyelets (6.8mm for attaching two layers, 5.3mm for attaching one layer) and an eyelet setter
- Deco Art Americana Chalk Paint in Vintage
, Finishing Wax
, and sandpaper
- Steampunk gears
- Rivetable flowers
- 36 inches of chain

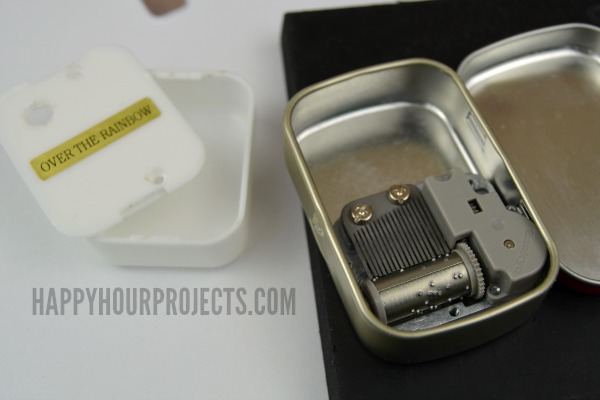
First, I removed the plastic casing from the music box movement. This isn’t essential, but it’s really pretty to me to be able to open the tin up and see it work. I was also concerned that I wouldn’t have enough room inside the tin when I used rivets or eyelets (and it turns out since I used eyelets only, I would have been fine, but if you’re adding rivets you may need the room).
Next, I put holes in the tin using an awl and rubber bench block, or a leather punch and steel block. You will need a 1/4 inch hole in the back for your music key, and the size holes you may need for embellishing will vary. You can stretch holes that you punch with the awl, as well, so if they’re not quite big enough, just muscle it a little bit.

I punched two holes at the top and added a 36″ chain. For that long of a chain, I don’t bother with clasps. A jump ring on the underside works just fine to connect the to ends, and it slips right over your head.

Then, I painted the front and lightly distressed it. I used chalk paint and wax (mainly because that’s what I had on-hand in the right color). I knew that the tin would probably sustain a few scratches, so I just distressed it – that way they will blend in! So I wanted a color that would look nice, so I opted for DecoArt’s Vintage shade.

Finally, I stamped my blank, and I attached my embellishments with eyelets. (If this is a new technique for you, then be sure to check out some of the other projects in my metal stamping category! I have LOTS of posts on metal stamping.)
Want to see how it works? I’m happy to show you in this 30-second YouTube demo!

What do you think? I am actually really excited to make more… I think they would make for a really beautiful gift!

Hi,
I found your blog by accident and love this locket. I do not have any of the tools needed to make it but it gave me the idea to use one of the small tins and decorate the outside with a photo of myself.. Inside will be more photos on the top and bottom along with a little letter recalling special moments we spent together. I will leave these for each of my children grandchildren and wrap them for their first Christmas after I am gone. I don’t mean to be gloomy about this at all, I just remember how hard the first Christmas was after my Grandma passed. I thought about putting a mini recorder inside but the prices are much to high for me.
do you want it to still actually be a locket?
I love love this so Pretty I want to make one really bad where do I purchase the musical box It’s so small I have no idea where to get one thank you
she links to where she got the musical box
Omg im a fan of yours so i just dont know where too find like this locket so maybe………you just giveaway that if you want too if not that’s fine i like how you make it ???????????????????? so i love it thanks
Did you just glue the music movement thingy inside the tin? How did you attach it?
she punched a hole in it
I love this project and your tutorial, which seems very easy to follow. I like the color you painted the tin box. Can you tell me the shade and type of paint? Also, if you were to sell these, what price would you charge? Thanks for your help, and I’m looking forward to more of your tutorials.
Hi Pam, It’s Deco Art Americana Chalky Finish Paint, and the shade is called Vintage. I linked to it above, but here it is again: http://www.amazon.com/gp/product/B00HO03E5M/ref=as_li_tl?ie=UTF8&camp=1789&creative=390957&creativeASIN=B00HO03E5M&linkCode=as2&tag=haphoupro-20&linkId=3ALWKOYWLHNOTK2J
Because I make jewelry and raided my stash and existing tools, this project cost me about $15 to make. But by making many, you’d have to invest in tools and continually replenish your supplies, pushing the true cost to around $25-$30 for each piece. Say I charge $25 an hour for my time designing and creating, then the fees for sales on a site like Etsy or the cost of a craft fair booth, and then deduct credit card processing fees since these days nearly everyone used their credit or debit card… I’d be around $75 for each piece to be worth my time to make up many for sale.
Maybe you were just looking for a number (haha) but I think a lot of people underestimate how much it costs artisans to make handmade or custom pieces in terms of both overhead and time. So I wanted to kind of break it down for anyone who might think $75 sounds outrageous. :) For the record – I think $75 is a little outrageous, which is why I can’t bring myself to make and sell them – though I’m happy to share the tips and tricks for anyone wanting to do it themselves!
When it comes to crafting, I’m a clutz. Would you consider selling these? Or taking orders? charmingrebel_xoxo@yahoo.com. PLEASE?!?
Hi Tammy,
I don’t take custom orders, I’m sorry. I just don’t have the time for it – it’s a miracle if I make it to bed before 1:00 am most nights as it is. :)
If ever you see a piece here that you’d like to buy, quite often I’m willing to sell it, though unfortunately, I don’t still have this one available. I will be happy to keep your email if I make another one, though, because I do still have music boxes left in my supplies. :) Thank you for the note!
This is so cute! I have four granddaughters and, if I can get them done, these would make nice gifts for Easter. Thank you so much for all the links for the items needed…your instructions and short video were very helpful :)
What are the measurements for the altoids smalls box? I think I could find the boxes cheaper if just generic box. That’s the reason for the question. Thanks!
Hi Debi, they are about 1.5 inches x 2.25 inches length and width, and .just slightly over 5 inch deep.
Absolutely love this project….all the techniques you used are new to me but you presented them in a very non-intimidating way. I was curious about how you treated the back of the tin…it looks like it matches the background in your video…is it scrapbook paper?…did you modpodge it on the back? Really want to make one , thanks for the inspiration!
Oh, good question! I guess I didn’t mention, did I? It’s a glittery scrap of vinyl. I just cut it to fit, punched a hole, and removed the adhesive backing to cover up the nutritional information.
I LOVE EVERYTHING about this project! It turned out amazing!
I keep coming back to this blog just for the jewelry. You make everything look so easy for someone who makes everything harder than it should be! Thanks for the clear instructions, and motivation you have given me to try some of the projects.. ????
Sorry the. ?? Button was stuck !
You are so clever, I love this little box, I have so many charms that could be layered ad added to a small altoid box. I would for you to come and share on Friday Feature this week.
Have a great weekend, Karren
Ok, sorry for leaving three comments in a row, but I just watched the video demo you did (the first time I scrolled through in my haste to see the end result, I thought it was just a picture), and it is AMAZING!!!! I love that it’s interactive, and you get to wind the back. This is so so flippin cool, Adrienne! Way to go!
Haha! I love the comments – don’t you worry! Thank you. The photos just didn’t show what it’s like in person, so I thought a quick video would better show it. This is seriously my favorite project yet. I kind of want to make another but you guys are all going to start saying ENOUGH with the same thing again, haha.
Adrianne, how are you attaching the music box to the Altoid box? Is it staying in with just the key?
Thanks so much!
I did attach mine with just the key. It’s a snug fit horizontally and I have the movement positioned at the bottom of the tin, so gravity is doing a lot of the work. I have thought about punching two more small holes and re-adding the two screws that held it in place in the plastic casing, though – that’s certainly an option.
i’ve been holding on to this to make 3 of these for Christmas….so glad i strolled through the comments….needed to know how you added the box….this is awsome
Or maybe if I just left the lid of the altoid box off altogether, and used all the gears and whatnot on the inside.
This is absolutely stunning! How clever of you! My sister would flip out if I made her something that embraced her love of music boxes AND steampunk. :) When you said you took the plastic off of the original music piece because it looks pretty to see it work, I started wondering about not even making a closed case at all, and just incorporating the music player itself into the necklace. I dunno, you have the little wheels in my head turning! :)
That is so cool! I have a ton of Altoid tins waiting for the perfect recycling use. My daughter would LOVE this!
Nothing better than when a project turns out awesome! Love it! Good job!
This is so cute. Neat little project. Pinned for later!
This came out AWESOME!…..Thanks for sharing!
I luv this! I’m looking for the items right now! thanks so much