
Now, if you do know a thing or two about me, then surely you guessed that this little quilt was my entry… I did ask permission from the judges beforehand to make sure it was all right to put Raya’s name on it, since the competition submissions are anonymous.

I’ve had the idea since the spring that I wanted to make Raya a name quilt. My name is Adrianne – I didn’t have anything personalized with my name on it when I was growing up. And I know we’ve chosen a less-than-common name for her as well, so if she’s going to have anything with her name on it – I’m going to be the one who puts it there!
As you know – I do a lot of one-hour things here, and quilts take considerably longer than that. Dreaming up the design took me… well, weeks, honestly. I knew I wanted birds. Picking fabric was a few hours’ worth of debate as well. So this idea was something I dreamed up before the competition started, but the fabric round gave me a reason to finally make it! The actual construction was about 8 hours of work after the hard decisions were made. I spent a lot of quality time with my sewing machine last week, rocking out to Pandora and drinking Diet Mountain Dew until my husband got home from his evening shift working on this, LOL. ;)
I’m not going to give you a quilt tutorial here today. If you’re looking for a simple quilt tutorial, you can check out the one I posted for my niece’s quilt last year. You’ll find that I break the “rules” anyway – and today’s project was no exception. I also didn’t take many photos here, because working at night with bad lighting on a deadline really isn’t the most conducive environment for stopping to photograph. With only a few nights to work on it, I was more interested in finishing in time! Still, for anyone wondering how I put it together, I’ll talk a little bit about it and link to a few other projects I’ve made that use the same methods.
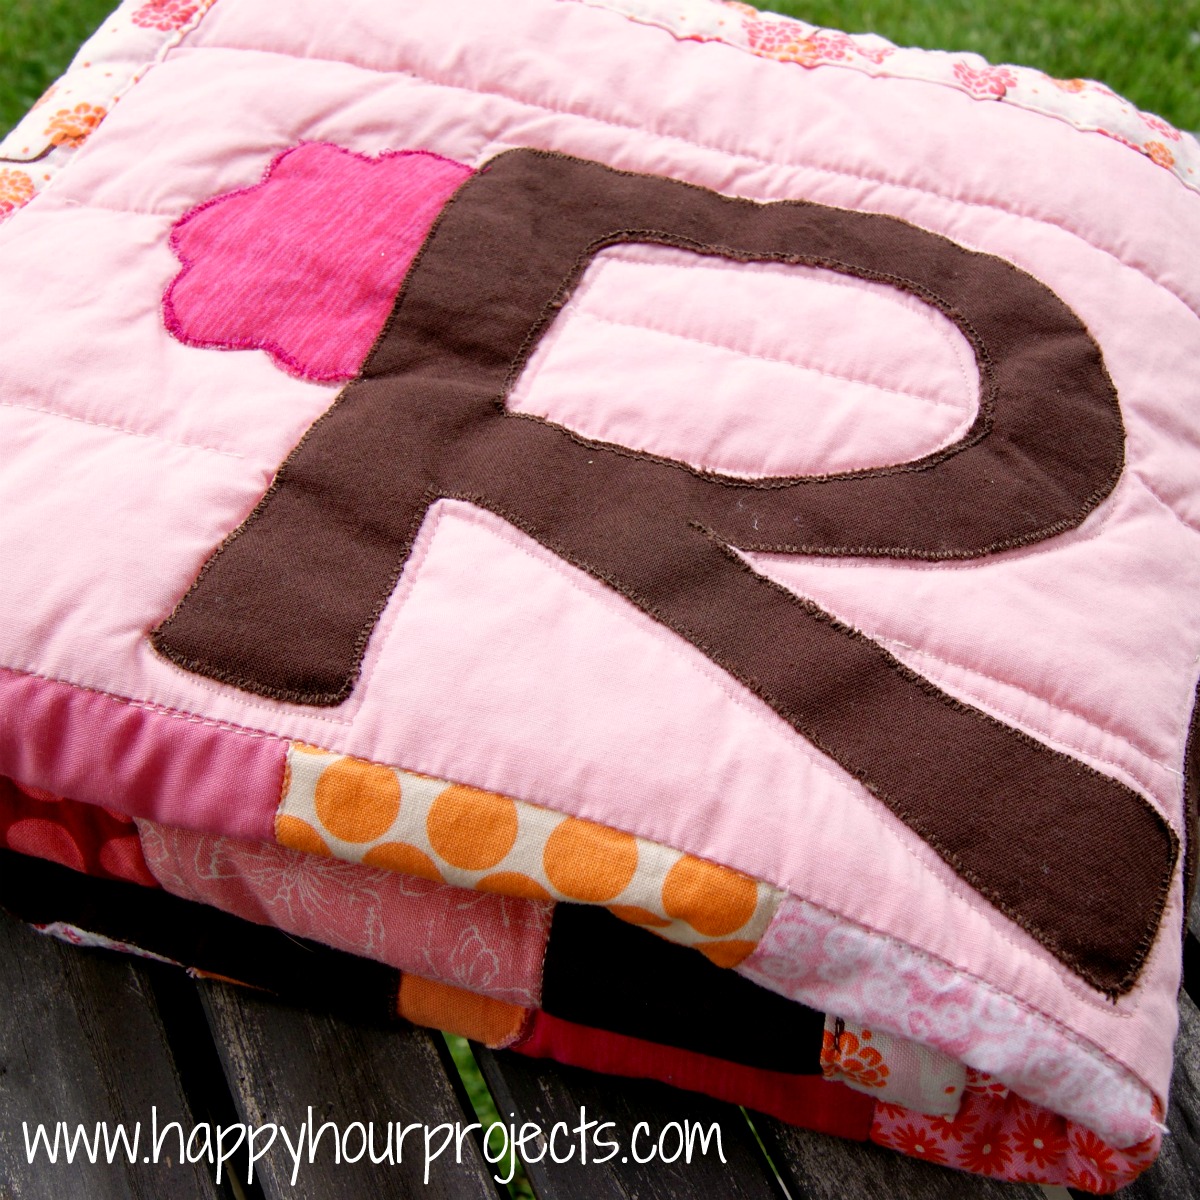
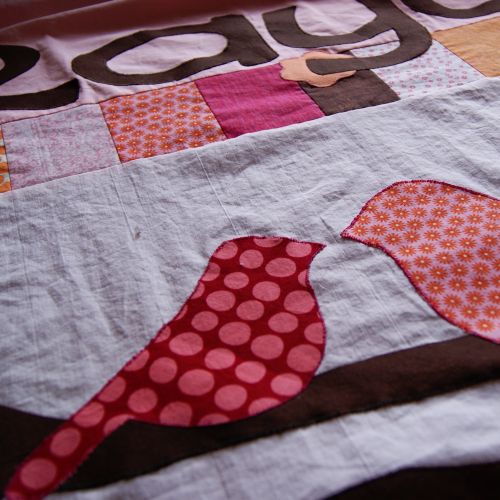
I knew I wanted a mommy bird and a baby bird, and after Googling and scouring Pinterest for a while, I finally decided to just freehand my own design. I did want to incorporate more color and variety than a plain panel background, so I framed up the background. I left a large panel in a pale pink shade, and at the top and bottom I added a row of colorful blocks, and beyond that, I finished with a darker pink.
I used Heat N Bond to create my own iron-on applique elements. I love Heat N Bond, I use it for all my applique projects (like my Marilyn Monroe pillow from last fall). It is important to reverse it, though, because you’re creating the underside of your applique. Heat N Bond comes with detailed directions how to use it, so I won’t get into that (this post is long enough as it is) – but maybe this gives you some ideas of what you can do with it. One word of caution, though – enough use, and it will gum up your machine. I get mine chemically cleaned every other year or so. If you get the light duty stuff, it’s better on your machine than the heavy duty.
The great thing about Heat N Bond is that when you iron it on, your fabric is stabilized enough for more precision trimming. So I was able to cut my birds and letters, following lines I had sketched and traced. That’s right – I did this entire thing without a Sihouette or Cricut or anything (though it certainly would have been easier!) Then I just ironed them onto the quilt panel, and did a close zigzag stitch over all the edges. They need to be secured well or they will begin to fray. There are actually some really cool effects you can create with a raw edge, but that’s not what I was going for with this quilt.
When I finally had a finished top panel, I agonized over how to quilt it. I wanted to free-motion quilt it, but in practicing a little, I found that I just do NOT have a steady enough hand or a relaxed enough stance for it to go smoothly without a lot more practice! So with my deadline approaching, I decided on simple lines. I quilted the center panel diagonally, and the top and bottom horizontally. I will show you a trick I use for stitching along lines that don’t exist on your quilt top: I mark the lines with masking tape. Then, I just machine quilt along the edge, and peel it off when I am done.
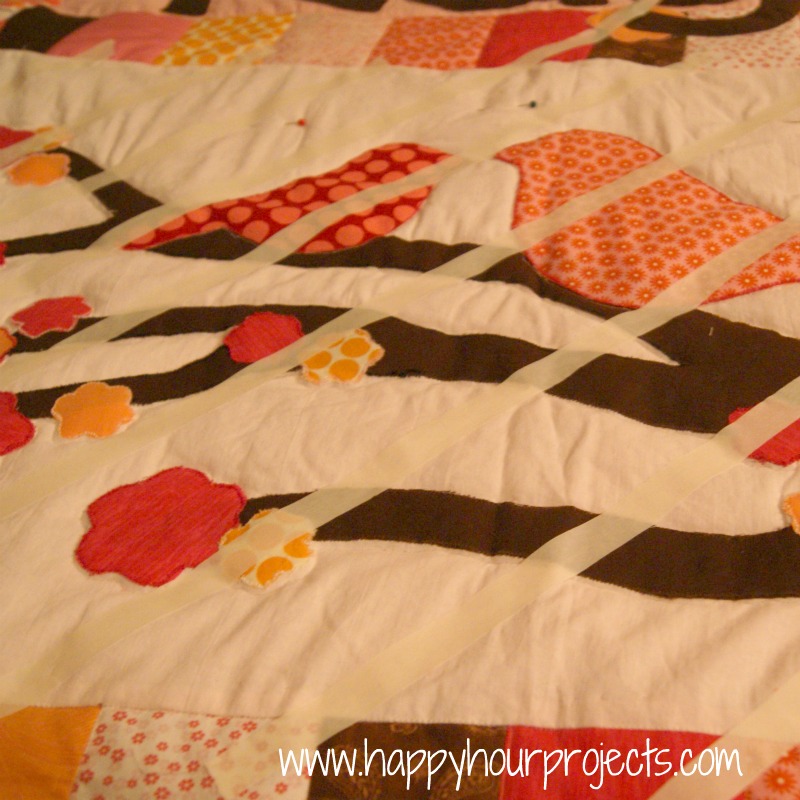 |
| If this looks like midnight lighting on my living room floor… yeah, it is. ;) |
I will freely admit this is not how most people go about creating quilts. It shouldn’t surprise you at all that I buck tradition, though. ;) For this project, I really enjoyed using my quilt panel more like a canvas, and adding the elements I liked to it in bold colors. Not only is it 100% by my own hand making it a one-of-a-kind gift to my daughter, it has both heirloom and contemporary qualities to it (quilts have been around a very long time!) and I love the juxtaposition of that.
 |
| I think she likes it! |

So thank you, once again, for letting me gush about a big project. I have really enjoyed this challenge, because it has given me a good reason to “think big” with some of my projects. I can’t do big things like this all the time, but it’s so fun to really flex some creative muscle every once in a while!
I link up to these great parties!
~ Adrianne
Could you tell me how you did the letters for your quilt. I love the font and wondered if you made your own or used a printable font? The quilt is beautiful and your daughter is blessed to have something so unique!
Hi Charlene – the font is called DiMurphic. I love it when I want a wide font that’s not as tall. To prepare them for applique, if you don’t have a machine that cuts fabric (and I didn’t at the time I made this), I typed it in Word so that one letter filled the page. Then I reversed it (like a mirror image) and traced it onto the paper side of Heat N Bond. Then, I ironed the Heat N Bond to my fabric, and cut the letters out. If you can’t figure out how to reverse your letters, you can also cut it out from the printer paper and then flip it over to trace it. Since you will be ironing onto the underside of the fabric, your letters have to be reversed or they will end up backward.
A side note – just this week when I added this on to my daughter’s bed for a little extra warmth at bedtime, she said, “hey, that’s my name!” TOTALLY worth the hours I put in to hear her recognize that for the first time!
Thanks so much! This is so helpful. I am doing a project for a little girl who goes to Primary Children’s Hospital regularly. I thought putting her name on the quilt would make her feel special.
This is beautiful! I love it. I am a very new sewer, but I aspire to make beautiful things like this one day. I'm pinning this!
I love it! I definitely voted for this over at One Artsy Mama (and your tile mosaic, you're just super talented!) I don't follow the rules either when I quilt. I'm pretty sure the last one I made wasn't even quilted together; it was a t-shirt quilt and I just tacked the corners of each t-shirt square with a bit of corresponding thread by hand. Bad quilter, but it turned out just fine! Thanks so much for linking this up to The Fun In Functional!
I love this! It is so cute! Thanks for sharing at the party!
Holly
Adorable!
This is so absolutely adorable!!!!!
This is an awesome project – love it!!
Oh My Gosh…. thats you!! or should I say RAYA! LOL I saw your entry in the contest and I LOVED IT…. I'm so thrilled you've made it another round…Thank so much for linking up to the ALL STARS BLOCK PARTY… I'm so glad I found your blog…
Carri
simplydonewright.blogspot.com
That is a lovely quilt! I love the design, colors, the letters…everything!
Oh my goodness…that quilt is DARLING!!!! I love the colors and the cute birds! Wow! You did an amazing job! Thanks so much for sharing this as well at Thursday's Temptation.
Jill
Congratulations! I love the colors in this quilt!
The quilt is gorgeous and so is that little cutie sitting on top! You have really outdone yourself! BEAUTIFUL!
You impress the heck outta me lady!! I would look at this and want to do it, you make it happen! It came out beautifully and Raya will treasure it her whole life I am sure. I voted for you too and can't wait to see what you come up with next!
This is amazing. What a beautiful and sweet keep sake, that I know she'll treasure for a very long time. Too sweet.
Aloha,
Just stopping in to say “hi” from follow me Wednesday.
xoxo,
Nicole
localsugarhawaii.com
I love it! You did such a great job on it, so creative!
I love this! Totally knew it was you so you had my vote. :) congrats!
Great job!! I really liked reading how you put this together. I learned to sew making quilts. And my mom was/is a stickler for doing it the “right way”. I really dislike applique, however your way sounds like more fun maybe I'll try again.:)
Congratulations on another wonderful project and making it to the next round. All of your entries have been beautiful. With so much great work, you must have a really efficient crafting style, a huge stash of Mountain Dew, or both! Looking forward to seeing the wood entry, Sarah@MyProjectBag
It's truly beautiful, Adrianne!
I just want to tell you that Raya could also be a jewish name so if you find something jewish-y it might have her name on it!
Wow – I really love the whole thing – especially the birds. Great job. Makes me want to break out the sewing machine – or have another baby ;)
Found you on WW – glad to be a new follower.
-Buffi
My Wonderfully Dysfunctional Blog
I'd say you flexed your creative muscle all right. This is truly fabulous, Adrianne. I can't believe how you just figure it out as you go – brilliant.
That quilt is stunning! I voted for it too! Learning to quilt is one of my summer goals. It may end up being a disaster…lol Can't wait to see what you come up with next!
Jill @ Create.Craft.Love.
This project is awesome….I voted for it! So glad you moved onto the next round. Good luck! :D