
Today’s one-hour project and awesome giveaway is sponsored by my friends at Bottle Cutting, Inc.
Today I’ve got a fun way to re-use your old wine bottles – or any glass bottles! I’m going to show you how to easily cut a bottle, and a simple project you can make using your newly recycled bottles: beeswax candles. There are LOTS of things you can make with cut glass bottles, but this project is one of the great basics. Use your favorite empty bottle to add personal flair to your decor, or a friend’s favorite for a fun gift! I’ve got a full tutorial for you in this post, and be sure to read all the way to the end so that you can enter to WIN one of these fabulous tools for yourself!

See, I’ve tried a few different methods for cutting bottles, and I haven’t been able to accomplish (let alone master) any of them. I had accepted that maybe recycled glass projects just weren’t for me… but then I saw the Kinkajou from Bottle Cutting, Inc. It’s an innovative tool that helps you get a clean cut from round bottles in a range of sizes in just a few minutes. I put it to the test, and guess what? I was able to get a perfect cut on my first try using it. It took me a couple of minutes to do while I’m still getting the hang of it, but it works wonderfully, and the more I practiced, the faster it’s coming along. And I’m getting a lot of practice, because I’m already at work on my next project. ;)
But – one thing at a time. Let me introduce you to my new friend. Here’s what you will need to cut glass bottles with the Kinkajou bottle cutter:

Here’s the science. By alternating heat and cold on a weakened area of glass, it will expand and contract rapidly enough to crack. We know this, especially if we have ever tried to move a dish too quickly from the oven to the refrigerator, or vice versa. So the goal is to control where the crack will take place, and make sure it’s a fabulously even crack, placed exactly where you want it. Cracking it is not that hard. The precision is a lot more difficult – and that’s why the Kinkajou tool is particularly awesome. You use it to create a precise scored line, and then use the separation rings to control exactly where you heat and cool the bottle. The result is that one half of the bottle literally just falls off the other, exactly where you want it.
Score your line. You can use bottles of a variety of sizes, though they do need to be round. Tighten the tool around your bottle, drop the scoring wheel, and twist evenly. (Even twisting is actually a key skill for this technique; if you tilt the bottle while twisting, your lines won’t meet in the same place once the wheel has gone all the way around the bottle.)

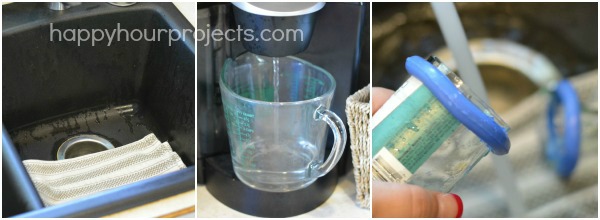
Next, place the separation rings on either side of the score line. Boil some water (how much you’ll need depends on several factors, like the thickness of the bottle and how much practice you’ve had, because it is a technique you start getting a feel for with practice). I found that using my coffeemaker to heat my water as I worked was perfect, then I didn’t need to wait long for my next cut. Prep your sink with a towel or other padding so that you don’t end up with broken glass.
Next, you will alternate pouring hot water and cold water (which you can just run from your tap) onto the scored line. The separation rings help you concentrate the water in the right place. After alternating a couple times, your top should just fall away. I had a few cuts when I first started that took a LOT of water, but I found that tended to happen when I switched too quickly between hot and cold, and the bottle didn’t heat enough before I cooled it down.
Finally, use wet or dry sandpaper (or sanding sponges) to sand the edge and remove that sharp edge. I started with a 100-grit paper at first, and finished with a 180-grit. If you’re planning to make drinking glasses, a final sanding with 220-grit paper is a good idea. If you’d like to see the process in action, be sure to check out the videos at the “School of Bottle Cutting” on the Bottle Cutting Inc. website.
So now – you’ve got your candle holder. Depending what type of bottle you’ve chosen, you may want to remove the label, or not. Beer bottles with painted-on labeling can be very cool, but in my case, using these wine bottles with paper labels, it made more sense to remove them. (You can use your sandpaper to get the glue from under the label off.) That means you need to prepare your wick and wax.
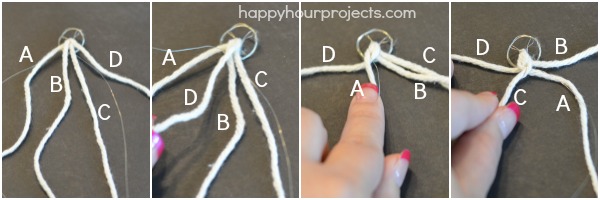
You can make this process easy by buying pre-made wicks. Which is an item that’s on my craft list… like never. but the good news is that if you have white cotton string, you can braid your own wick! Just make up a wire base (I used 28-gauge wire and coiled it up, making a wheel-shaped base). I added some 34-gauge wire to my braid to stiffen it, but after doing it, I will tell you, it isn’t necessary. I’m going to show you how to make a 4-part braid for your wick, in case you’ll be braiding your own, but disregard the additional wire. You don’t need it after all. :)
Cut two long strings. The length will depend on the height of your candle. You’ll be tying them to the wire base, so make sure you can double them, and then you will want it to be a good 3-4 inches longer than what you truly need for your candle, so that you can stabilize it while you pour your wax. I’m labeling the strands A-B-C-D below so that you can see where they go as you braid, but a 4-part braid is just the same as a 3-part braid, except that when you pull your right-most cord to the “center”, you’ll be passing it over two strands instead of just one. When you pull from the left, you’ll only pass over one string, same a a regular 3-part braid.
I went an extra step here (depending on where you read) and I dipped my wick in melted wax. This is why the extra wire was redundant, because the wax made it stiff and really easy to work with when pouring my candle. So I’m going to call this step optional, but I would do it this way again. It also allows the wick to burn longer when you first light it, allowing the wax to begin melting.
Now – melting wax isn’t too difficult at all. I bought actual bars of wax a while back, but it comes in pellets, too, and those are a bit easier to work with.

I just cut it into chunks, and placed it in my glass craft cup. (This is also what I use when making lip balm – that’s why it’s on the small side. You can use a larger one as well.) I placed my cup into boiling water – making sure I didn’t get any water into the cup itself. I stirred it while it melted, and as soon as it melts (around 140 degrees or so), I added several drops of essential oils (about 25 drops, and I used an orange oil, though scent is totally up to you), and poured it into my cut bottle. You’ll need a way to secure your wick, and for me, a pair of clothespins worked perfectly. You can tie your wick around a base, like a bamboo skewer or pencil, or I’ve seen people poke it up through masking tape across the top of the candle – find whatever method works for you to keep it stable, and pour your candle.
Allow it to cool, and you can add your finishing touches! I made 2 candles with my 2 cut bottles, and tied a bit of burlap ribbon and hemp around the jar for a rustic look.

If your jar still has a label, then it probably doesn’t require additional decoration, but I thought this was a nice touch for a natural candle made from recycled bottles.

Now – if you’re dying to try this tool out for yourself, I’ve got great news! Bottle Cutting, Inc. is also giving away a Kinkajou cutting tool to a lucky Happy Hour Projects reader! The tool comes with separation rings, a few sheets of sandpaper, and a finishing tool – everything you need to get started, except a few empty bottles!

Bottle Cutting, Inc. also has a $5000 feature project contest going on – if you make a project with the Kinkajou, submit your photos. If you’re chosen as one of the 50 featured projects they will be selecting, you will win $100 cash! Be sure to check out their site for all the details! You can also keep up with what’s new at Bottle Cutting, Inc. including new products and project inspiration but checking them out on Facebook, Twitter, and Pinterest.
Rafflecopter will walk you through how to get your entries in below. U.S. readers may enter now through August 21, 2014 at 11:59 pm EST. Good luck!


Hey! These are soo cute!
I have a question for you. I made a beeswax candle once, in a jar that was from a candle that wasn’t beeswax. When I lit the candle, after a little while the jar burst. My thought is that it must be that the beeswax burns hotter? Have you ever had this problem with any of the candles you’ve made? I’m hoping since wine bottles are thicker they should be great for beeswax.
Thank you for the tutorial!!
I would use the tops of the bottles to make wind chimes. Tricky to explain but would invole a cork, some monofilament ( fishing line) and a heavy duty wire hanger. Anxious to get started!
I would make wine bottles into glasses.
I would turn them into drinking glasses.
Shivs, great for gang warfare.
We would use them for coin holders. Thank you
I would make drinking glasses
I want to make pendant lights for my kitchen.
Christmas gift candles!
This looks like fun!
I’d make candles for Christmas gifts, or drinking glasses, or modern vases, I think. What a great giveaway!
I would like to make some candles from cut bottles and maybe even some glasses!
This would be really cool to win! I have so many bottles around my house! Could make decorative holders or glasses out of them. :)
I would make pretty planters and drinking glasses
i could use it it to make something sweet with the flat bottoms possibly something like a stained glass curtain with some wire i got it could be linked together…yes
I want to turn them into a cool light fixture and vases
This looks so cool! I think I would cut the bottoms out of wine bottles and then turn them into light fixtures!
I’d love to be able to sort my art supplies in them!
I’d make candle holders, kitchen and bar ware, containers, and sculptures. :)
I’d like to turn them into jars for my kitchen.
I would use them for drinking glasses, I have some green bottles. And for planters, organizers for qtips, cottonballs, etc..
I would turn my empty bottles into cute drinking glasses.
I wold make candles!
I love the concept, would use them to make gifts for a bridal and baby shower.
I would turn them into lanterns or windchimes
Some pretty drinking glasses and then for candle holders.
I would LOVE to win this great gadget! I would use it to make awesome candles as gifts for teachers, friends, and family!! I also love the other user’s idea of making mini-planters!!
Vases, candle holders, too many things to do.
This is super cool! There are so many possibilities!!! Start with something simple like candles and get creative from there!
I would make glasses and candles! :D
I would love to make some candles!
I would love to try this bottle cutter. I had one of the old fashioned kinds and got rid of it because it was too hard to use. I would make candle glasses, but I would think of lots of other ways to use it, I’m sure!
You come up with the coolest projects, Adrienne!
Possibly the coolest thing ever- my oldest son has said recently that he wanted to try cutting his glass pop bottle to make a drinking glass!
I’d turn them into drinking glasses; vases, candleholders, in that order.
Herb planters and candles.
O…the things I could do with this!
What a fun giveaway! I”d love to play with one of these! I’d probably make candle holders – or a cool vase. :)
VERY COOL! I think I would make some candles and maybe some tiny glass pots. :)
I would love to win to make candles…awesome giveaway!
I would turn them into candle holders and vases.
I’d make wind chimes and lanterns
I would make wind chimes and lanterns.
I would make all sorts of fun things. I could see doing the candles, candy dish, all sorts of fun :)
I would love to make a memory frame (box frame with up turned bottle ends in rows, inside containing small momentos of my life.
I would turn them into humming bird feaders, or other bird feeders. But I think that if cutting a bottle like this is so easy, there might be other projects that will be very cool to create.
I would make vases and candles. Thanks for the chance to win!
Storage cups for beads would be fabulous!!! Also like the garden path idea.
I’d like to use mine as storage/organizers
I would turn mine into candles and cups.
Well done. I’ve been looking at the Kinkajoo and this may be the incentive that I need
I would love to make them in to planters for herbs or succulents!
I have so many things this could be used for! Candles, balms, mini-treats, decorations and more!
OMG!! What an incredibly fabulous device!! My friend would probably hate me as they would be getting homemade bottle cut gifts for years, but I love it!
drinking glasses, vases, candles! (this is so much safer than burning with fire and acetone!! would love to try it :) thanks
I would love to make some drinking glasses from recycled wine bottles. Thanks for a chance to win! Oh, and love the little candles!
This is the coolest thing EVAH! I hope I win!! I can think of so much fun with one of these.
This is seriously so cool. You know us crafters hang on to every bottle and jar we get our hands on. I’ve got 4 wine bottles on top of my fridge right now just dying for a makeover! What a great idea! :)
I would use them for so many things around my house. Planters for my african violets. Holders for my sewing notions. candles that my husband loves to make for gifts, vases, glasses to drink from, holders for q tips-cotton balls-pencils, the uses would be unending.
Drinking glasses, indoor herb planters, candle holders, pencil holders for my desk, etc…
So cool! I would totally make a set of glass tumblers out of blue beer bottles!
I’d love to give this a try!
I enjoy making gift baskets at Christmas and often include a candle and/or small plant. It would be so fun making my own containers for the candles and plants out of our many discarded bottles.
Oh…this is so perfect timing! My daughter is getting married this December and we’ve been saving wine bottles to make centerpiece decorations. Of course, it involves cutting the bottles………this sounds like it will make a scary project almost fearless. Thanks!
I would make candles. Yours are gorgeous!
I would try your candle project!
I think this glass cutter looks so much easier to use than the one I have. What is the size of the largest bottle that it will cut?
I would think this would make Christmas gifts where miniature Christmas villages are inserted into a bottle a much easier process. You could then reattach top and hide with trim.
I would make a wine bottle into a light
I would try the candle idea first and use “frosted glass” paint to add design. I think I’d also like to make bud vases from skinnier colored bottles.
I’ve had a bottle cutter on my ‘wish list’ for quite some time now. This looks like I would be more than delighted to be named the winner. :-D
My high school daughter has been asking to do this all summer and I have been putting it off because of the cutting process. With this tool, I feel like we can do this much easier. Would love to win one!
I’d love to make drinking glasses!
I make fairy lights and would love to be able to cut a wine bottle and make one.
Thanks for the awesome giveaway! I would love to have the bottle cutter! Wish I was a tweeter.
Vases for flowers and candles. Thanks for sharing! I tried to bring up the site but I could only get half of a page, I don’t know why but I was disappointed.
Today is my birthday and this would be a great present.
LOVE this project! I have been scared to cut glass because it seems like such a dangerous pain in the butt, but this tool looks like it makes the process much easier! I would love to win it!
This looks like a lot of fun to try!
I would make planters for succulents and vases for flowers.
Such a neat tool… Love the candles idea. Thanks
I would use them for flowers.
Candles and drinking glasses, the possibilities are endless.. Would love to use beer bottles too.. I’ve seen this cutter before and thought it would be cool to have one. Thanks
Now I have a use for all of those beautiful glass bottles that I just hate to throw away. It is a nice way to recycle and reuse that looks SO professional.
Thank You for Sharing,
Mary
Craft room storage, candle holders, glasses, candy jars, the list goes on and on and on…What a great too.. Love those candles
so many great ideas!!!
SO cool!! Love your candle idea. Genius!
I’ve been looking for a tool that works!! SO many uses!!
I am intrigued to be able to use this tool to make hanging mobile in our garden. Thank you for the easy and wonderful suggestions for the candle-making. Very clear and kind ideas.
I would make candles.
I have some really pretty wine bottles that I would turn into drinking glasses.
I’d like to make some drinking glasses.
I actually did a similar project in my glass working class in college, I have been wanting to do it again, but haven’t had access to the tools. This looks great!
This is awesome! I’ve been saving this 30or so year old bottle kitting kit I found in my dad’s garage so I could use it, but have been to scared to try it :p!! This is so much easier!!
I have tried so many cutting methods and have broken so many bottles!! This tool would be perfect to help me make planters and candles for my upcoming craft shows!!!
I dont blog or tweet. but I have used glass cutters in past and found to be difficult. this one looks extra easy and I would love to win. it would give a chance to make gifts for xmas. hope with only 2/12 I have a chance!
Can you say hello Christmas gifts
Candles, drinking glasses and storage
I would love to make candles out of the bottles.
I would make candle jars and so many other things!
I would turn them into drinking glasses!
That would make some awesome outdoor lights as candles. That little gadget did a awesome job.
What a great giveaway! I would use my bottles as tumblers to drink out of!
I would like to make a path in my garden with them turned upside down and buried with just the bottoms showing.
Wow that is SO cool! I would use mine as vases!
I need one of these! I already have bottles to use too:) great product, thank you for featuring it!
I would take wine bottles and make several cuts, to make “rings” of glass that could be used for a wind chime.
I’d love to do some fun craft room storage for small supplies, small planters or just fun glasses for gifts! Such a great tool to try out! :)
Drinking glasses would be cool!
I have been saving pretty bottles to try this out. So many cool ideas.
I have so many beer bottles that should become glasses.
I would make come candles and some drinking glasses
I would turn my empty bottles into tiny planters!