
I got some great feedback from my stamped & beaded bracelet, and as promised, I’m going to give you all some jewelry stamping tips, in case you’re considering trying stamping (or considering hurling your stamps at something breakable out of frustration, LOL).

I’m no pro, let me first say that. I consider myself and an adept beginner (is that a real thing?) It’s still tough for me, but I’ve come a long way since I first got started. The questions I get most often are all the same.
Where do you get your stamps and blanks?
I am editing this post 4/7/14 to reflect the changes in availability over the last 2 years since I wrote this post! The good news is, supplies are more accessible than they used to be, and I’ve had the chance to use my tools for a few years to know how they hold up. There are several sources I like. If you like to shop in-store, Hobby Lobby and Michaels both have a tool selection and a few stamps and blanks available (bring your coupons!). But, I primarily shop online, especially if you’re looking to get everything in one shot. My friends at Goody Beads make buying a starter kit easy by having a “getting started” category on their website. You can check it out here: Metal Stamping For Beginners. They also have a nice selection of basic blanks, and they carry the ImpressArt product line which I’m partial to, personally. If you’re looking to step up your designs and go beyond basic circles, hearts, squares and the other essential starter shapes, Beaducation has a lot of unique and original stamps and blanks.
Is it hard to do?
Not at all, as long as you are a patient person who doesn’t mind lots and lots of practice. It’s something you finally just get a feel for, and the only way to do it is to do it. Invest in inexpensive blanks – aluminum is a perfect starter metal since it’s soft and takes a good impression, and the price point is perfect for less-than-perfect pieces.
What do I need to get started?
As I mentioned – Goody Beads sells a whole category of starter supplies. It’s about $100 for ALL the essentials, which more than qualifies for free shipping. I spent nearly twice that when I got started because I let a salesperson at a specialty store talk me into things I didn’t need. You can ALWAYS expand your set, you will always want a new font and a new design, haha. But start small, and make sure you enjoy it. I’m editing this list on 4/7/14 now that I’m a couple years in. It hasn’t changed much – I’m actually paring the list down to what’s essential and what’s optional.
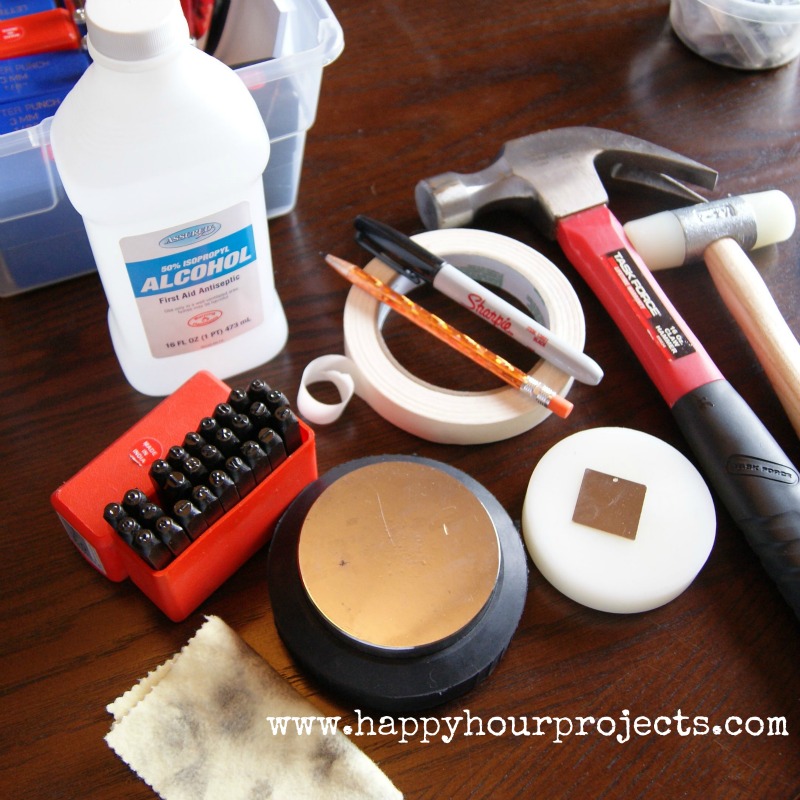
- Stamping hammer. I started with the standard 16 oz. hammer from my tool box (pictured above). I upgraded later to a specialty brass stamping hammer with a shorter handle, and I cannot tell you how much of a difference it made. My strikes were straighter and more consistent, and I was a lot less nervous about hitting my hand, haha. So you CAN get the job done with a standard hammer. If $20 for a specialty hammer is a deal-breaker, it’s not essential… but I really recommend it after trying it for myself.
- Steel bench block. It doesn’t need to be big. I bought the fancy one with the rubber bottom to absorb noise. I am extremely glad that I did; hammering on metal is a loud activity. But you can find a basic, small steel block for as little as $6 and it will serve you well; you can upgrade later if you find you really enjoy stamping.
- Stamp set. This is where it can get very expensive, very quickly, because if you love stamping, you will want ALL the fonts. :) To start, I recommend buying just a 3 mm economy set to see if you like it, before you spend ANY more money. 3 mm (1/8″) is a big enough size that you can feel when it’s level, so your results come out better with less time practicing. If you’re really uncertain and decide to buy just uppercase or just lowercase – let me recommend the lowercase set. Lowercase letters soften your stamped message. All caps is just like when you read online, it looks LIKE SHOUTING. Anytime I hesitate in buying 2 sets (upper and lowercase) I start with the lower to see if I like it first.
- Masking tape & pencil – maybe a ruler too in the beginning. Small supplies, and you probably already have them! You can also use washi tape, or pick up some stamp-straight tape which is designed for metal stamping, but any non-residual paper tape will do if you have some in your stash already. Edit to add on 4/7/14 – I still use tape every time I stamp. You will be able to control your spacing and vertical alignment so much better by using tape as a guide.
- Sharpie marker or acrylic paint and optionally, rubbing alcohol. If you’re working in copper or silver, you may want to use liver of sulfur to oxidize your pieces. But it’s not as beginner-friendly as paint or marker. Also, liver of sulfur will only oxidize the finer (read: more expensive) metals – you can’t oxidize aluminum. So for absolute beginners, start with something simple and work your way up later if you wish.
- Polishing cloth. You’ll want this to finish your piece. It will be oily, fingerprinted, and have Sharpie or paint remnants on it when you’re done. :) The cloth works wonders for making it shine. It’s a small investment but it will make your piece so much better when you’re done.
- Blanks. Lots of them! Aluminum is a good metal to start on, and bonus – it’s one of the least allergenic metals out there (yes, even better than silver). In the beginning you will make some mistakes. Better to goof on a 30-cent aluminum blank than an $8 silver one.
- Nylon hammer. Softer metals, especially if they’re a thinner gauge, will begin to curve when you stamp them. You can flatten them out really easily by pounding them flat again with a nylon hammer. Thicker aluminum or harder metals won’t have this problem, but before you stamp on silver, you should get a nylon hammer.
- Hole punch – I bought the hand punch, and it will only do metals of a certain thickness. It’s also more expensive. It is, however, more convenient than the screw down punch. I own both, and I’d say that the screw down punch is the long-term more versatile, though go ahead and buy both if you want the added convenience! If you don’t buy a hole punch, you’ll be limited to working with blanks that have a pre-punched hole. Most economy blanks and specialty blanks will not have holes and you will need to punch your own.
Secondary Tools:
These are things that are fun to have if you get a starter set that already has them, but are a waste of money if you stamp a couple projects but decide that metal stamping really ins’t for you. But, as soon as you are hooked, you will want these tools. If you’re trying to cut costs on a beginner set, they can wait and you CAN get started without them.
- A chasing hammer (for texturing)
- A Dapping Block (for curving/cupping round blanks)
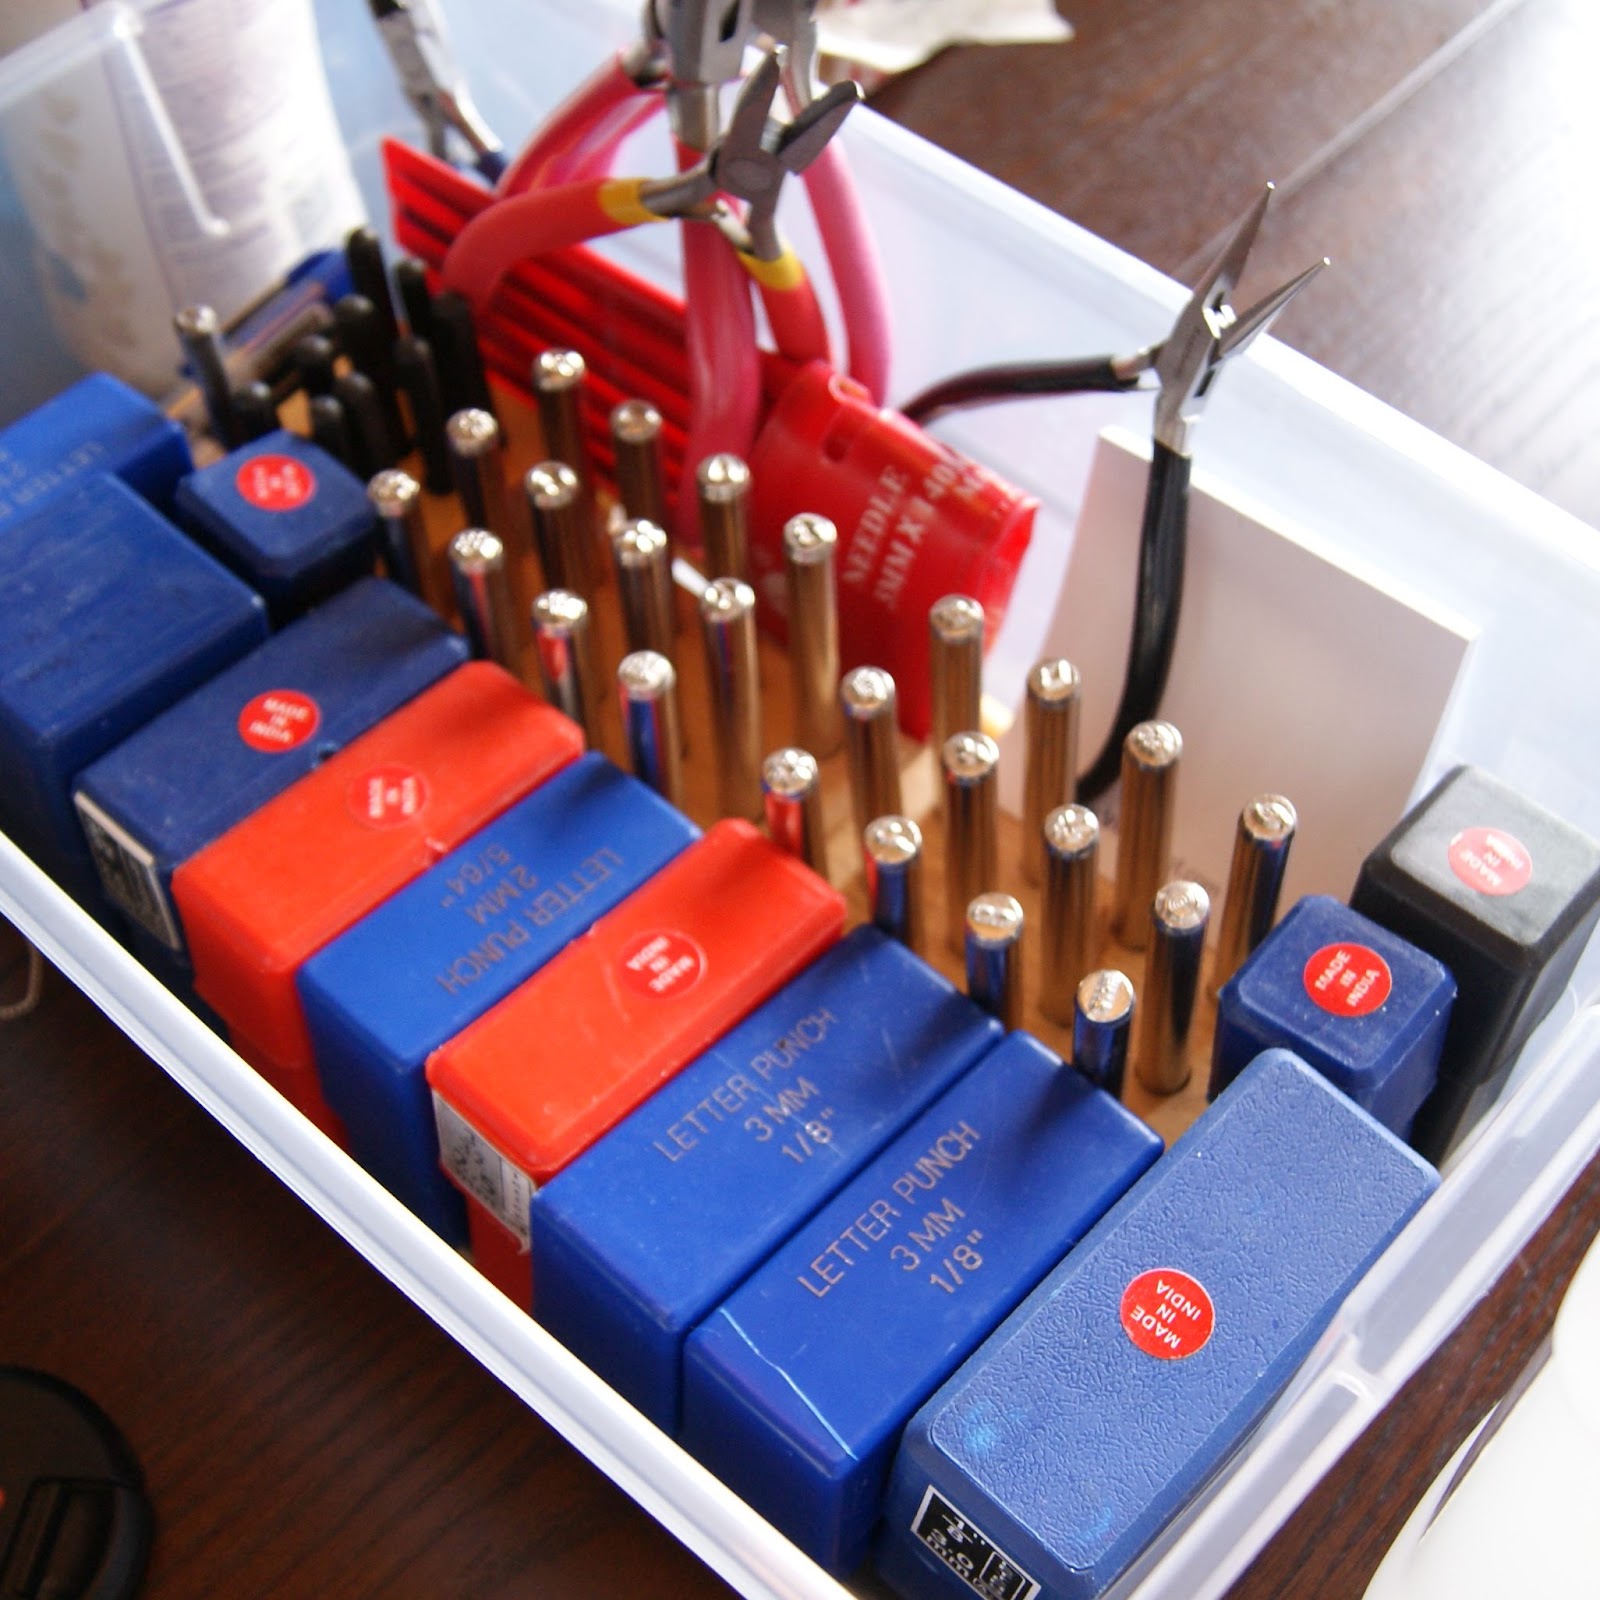
- Additional Stamps unless they’re part of a specific project. Don’t worry about the hearts, stars, numbers, punctuation, etc. unless you know for sure you want it. Alpha stamp sets nearly always come with an ampersand (&).
Okay, so you can see that supplies do add up… plan on spending $100 to do it right. Was that painful? I’m sorry! But a lot of hobbies are like this (hello, scrapbooking??) – the difference in metal stamping and most other hobbies is that you buy your tools up front, and blanks are relatively inexpensive to keep using them. It’s a hobby that gets cheaper as you go, and not the other way around. :)
In theory.
Because that’s what I said, and shortly thereafter, I had a stash that looked like this:
But – assuming I haven’t scared you off with the both the financial and time investment – let me show you how to get started! I’ve got a new video I added on 4/7/14 when I brushed this post up a little, and then there is a full photo tutorial to follow.
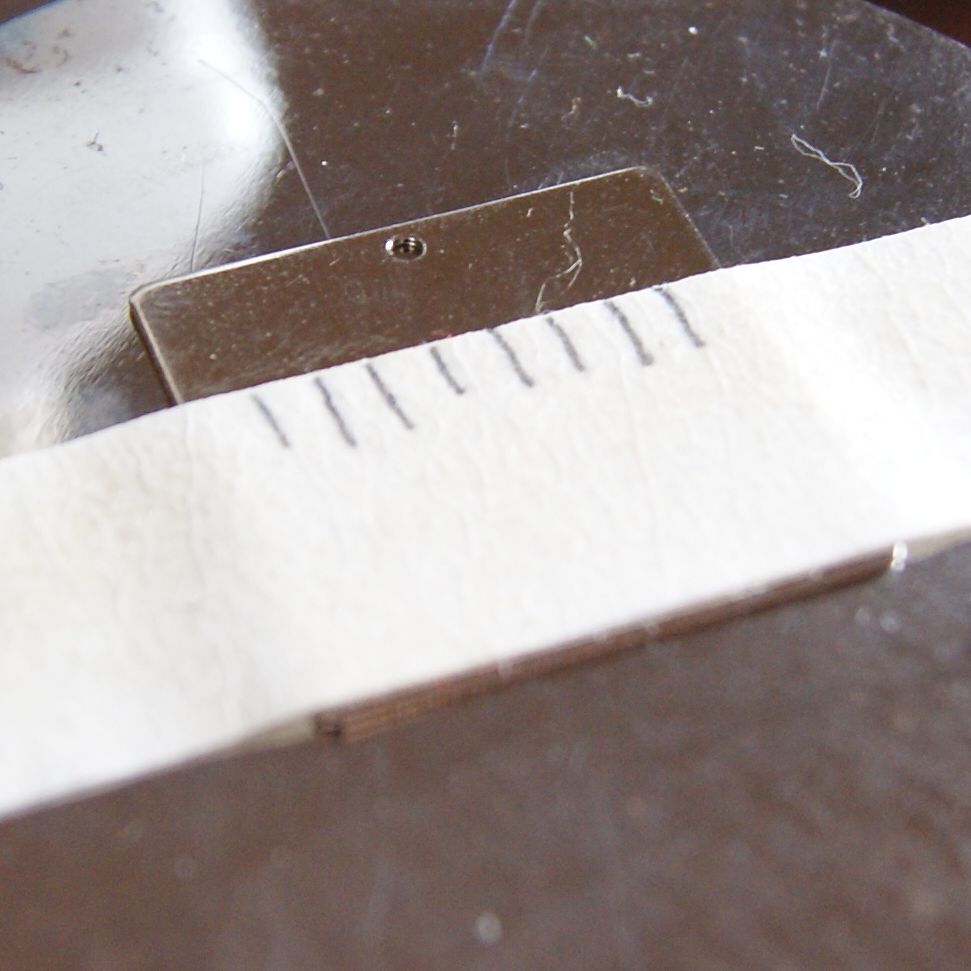
Pick your blank and measure it to make sure there’s space for what you want it to say. I have gotten pretty good at eyeballing my spacing, but to get started, you may need to measure. Then, put a few layers of masking tape on your blank. I use 2 or 3 layers of tape – just be sure that they are exactly lined up. Now, mark where you’ll be stamping your letters. You may want to mark it with the letter too!
My personal method is that I do the letters first that don’t have a descender. (Like “g”, “p”, “y”, etc.) That helps me line up my word vertically. If your set is all capital letters, you won’t need to worry about that. I’m going to spell the word “practice” here – but I’m starting with the “r”. I will come back to the “p” at the end.
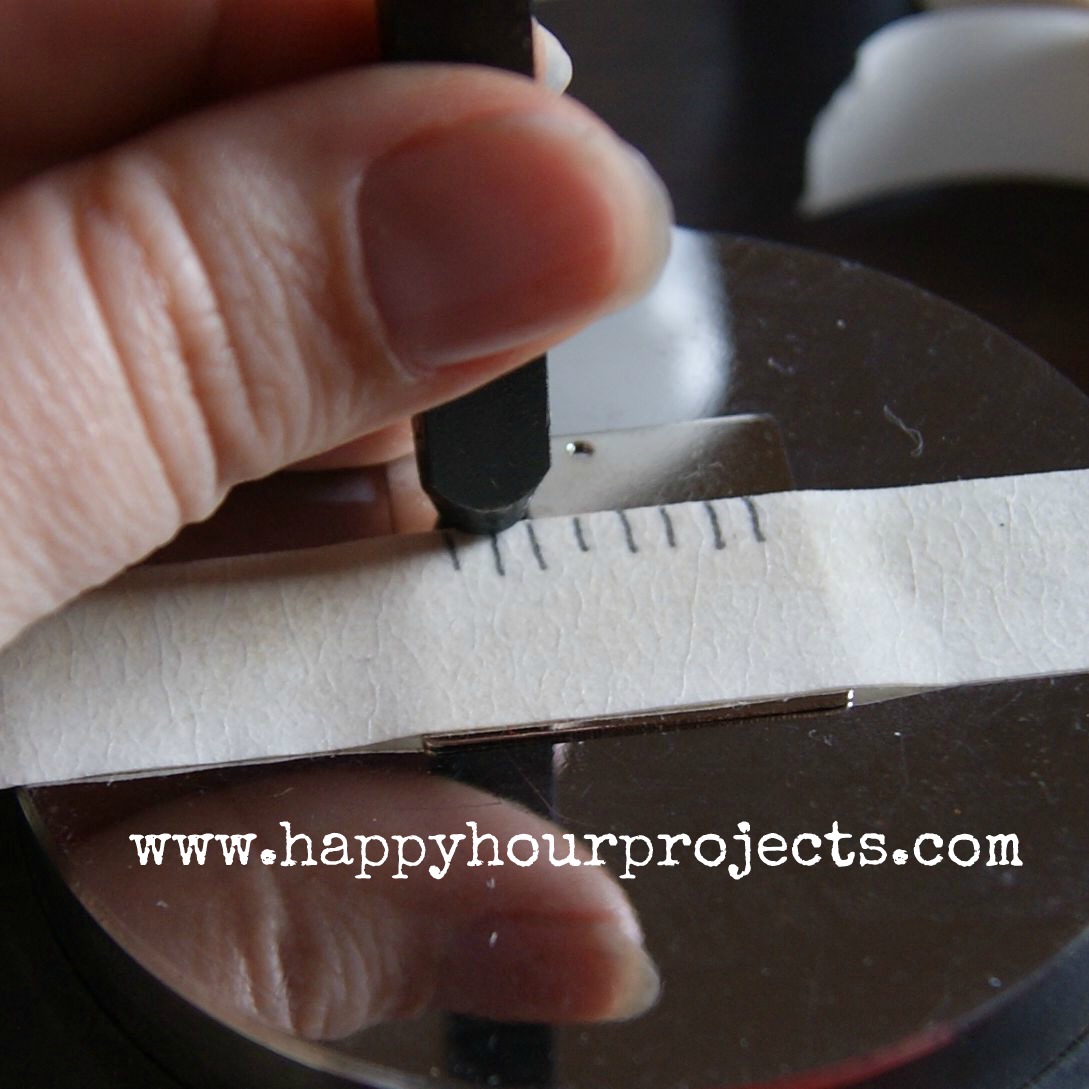
Line up your stamp with the mark you made, and lay it gently. Drag it down to the line of the tape. You should feel the ridge the tape makes. That will help you keep it straight, since you won’t be able to see it when you’re stamping.
You want your stamp totally level, and to use just one solid tap. If you have to hit it twice, you will get overlap. If you hesitate – it will show. It’s really common for hesitation to create a double stamp. So don’t worry about hitting your fingers. Seriously. Just relax, and give each one a nice tap. You’ll get a good feel for how hard to hit it. Bigger letters like “m”, “w”, “e”, and “a” will be tougher to stamp than slim ones like “i”, “l” and “f”.
No matter how hard you try to space them perfectly, it’s never going to happen. ;) That’s the charm of hand-stamped jewelry. It’s imperfect. See how closely mine are lined up to my spacing lines? And they are still a little off.

Now, I place another line of tape along the top edge of the letters, so that I have a guideline to place my “p”.
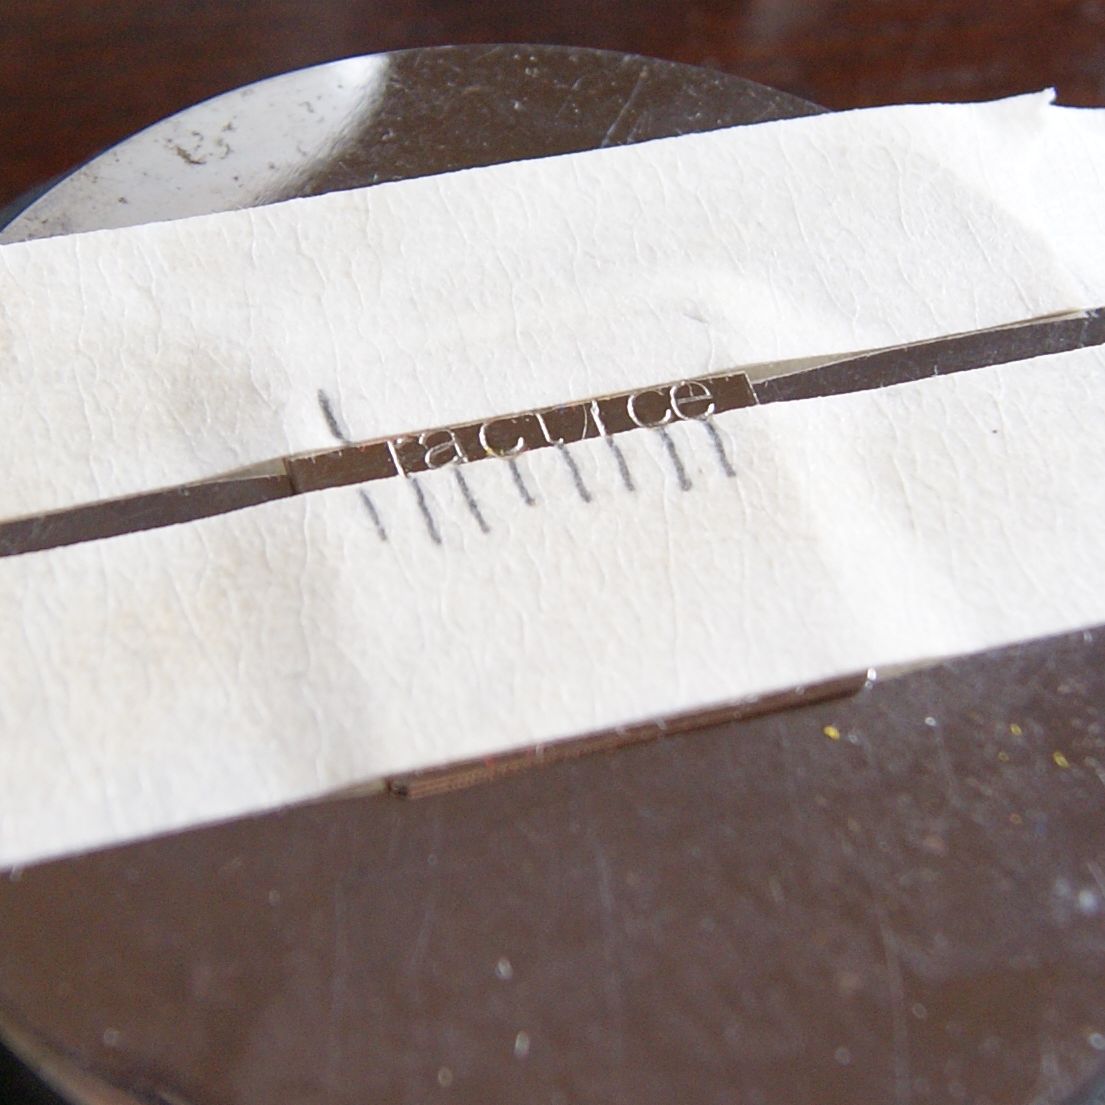
Then I peel the lower tape away and stamp.
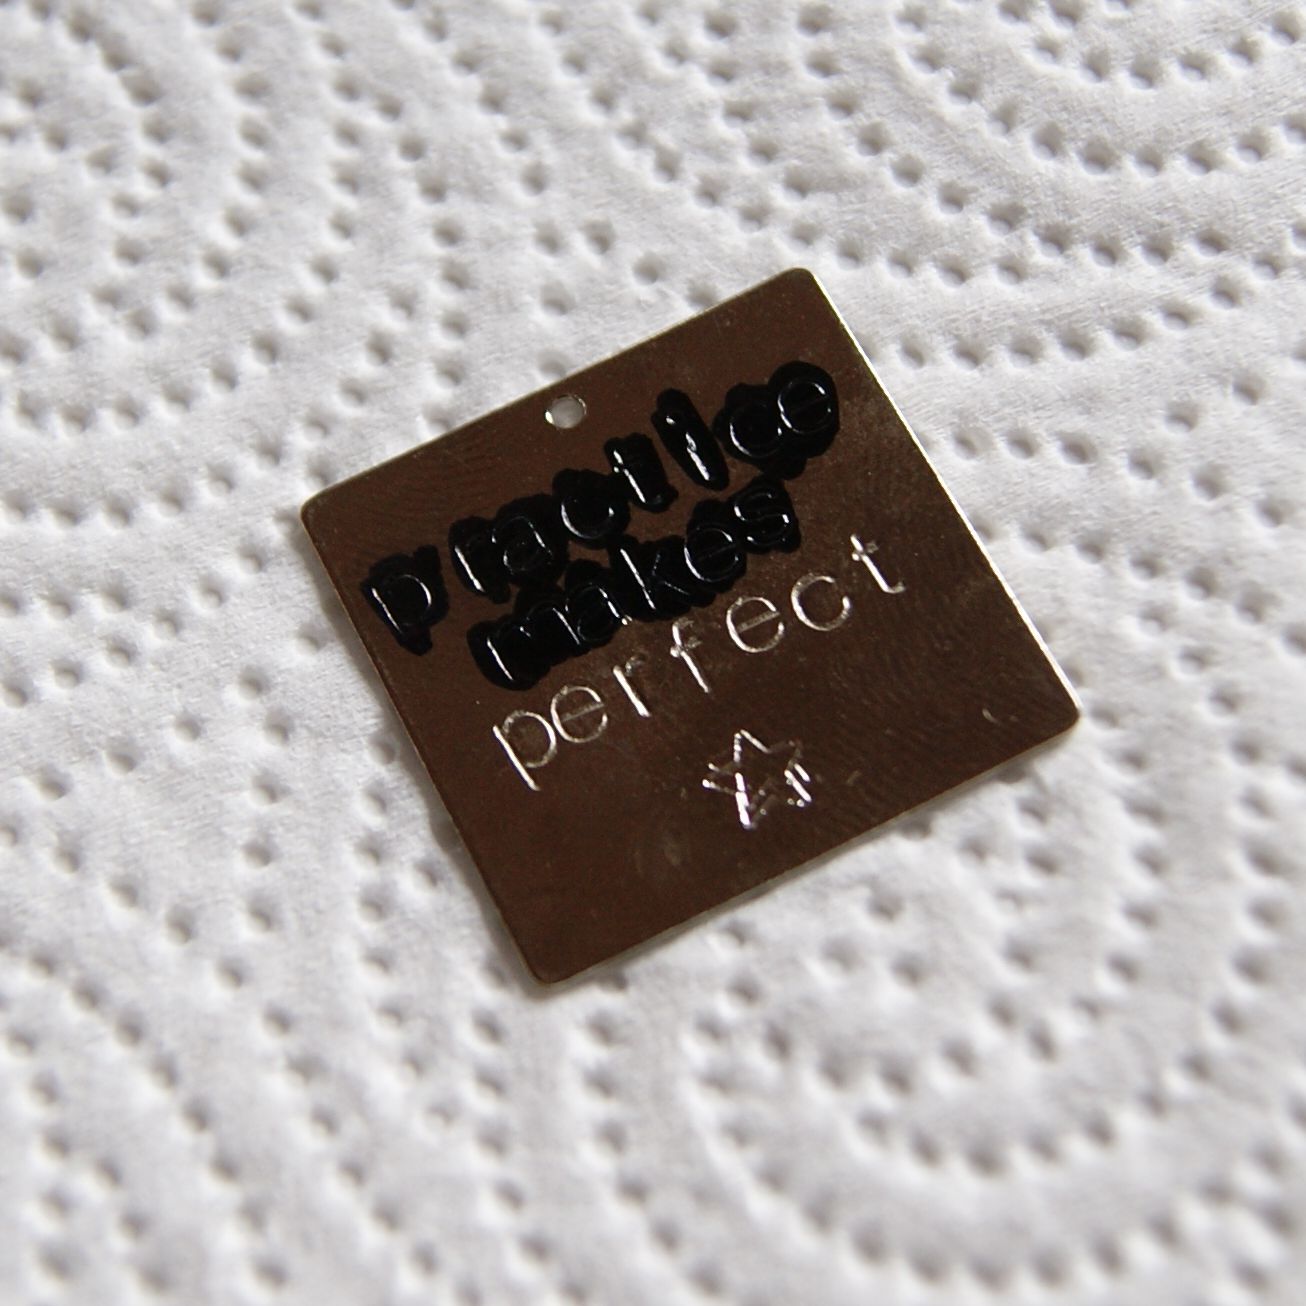
Then I stamped my next lines the same way. Then I decided I wanted to add a shape. For shapes, I like to use the reflection from my block or my blank to make sure I have it right-side-up.

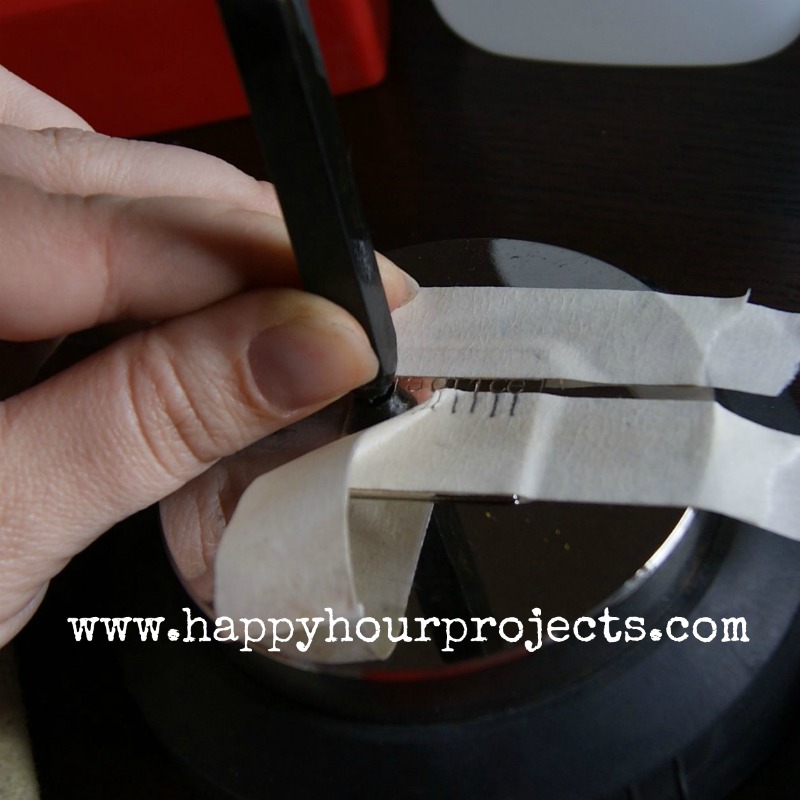
Now, between photographing and trying to stamp, I had trouble with a couple letters and I also goofed on my star. I hesitated at the last moment on my star. Remember when I said that you can get a double-imprint if you do it that way?
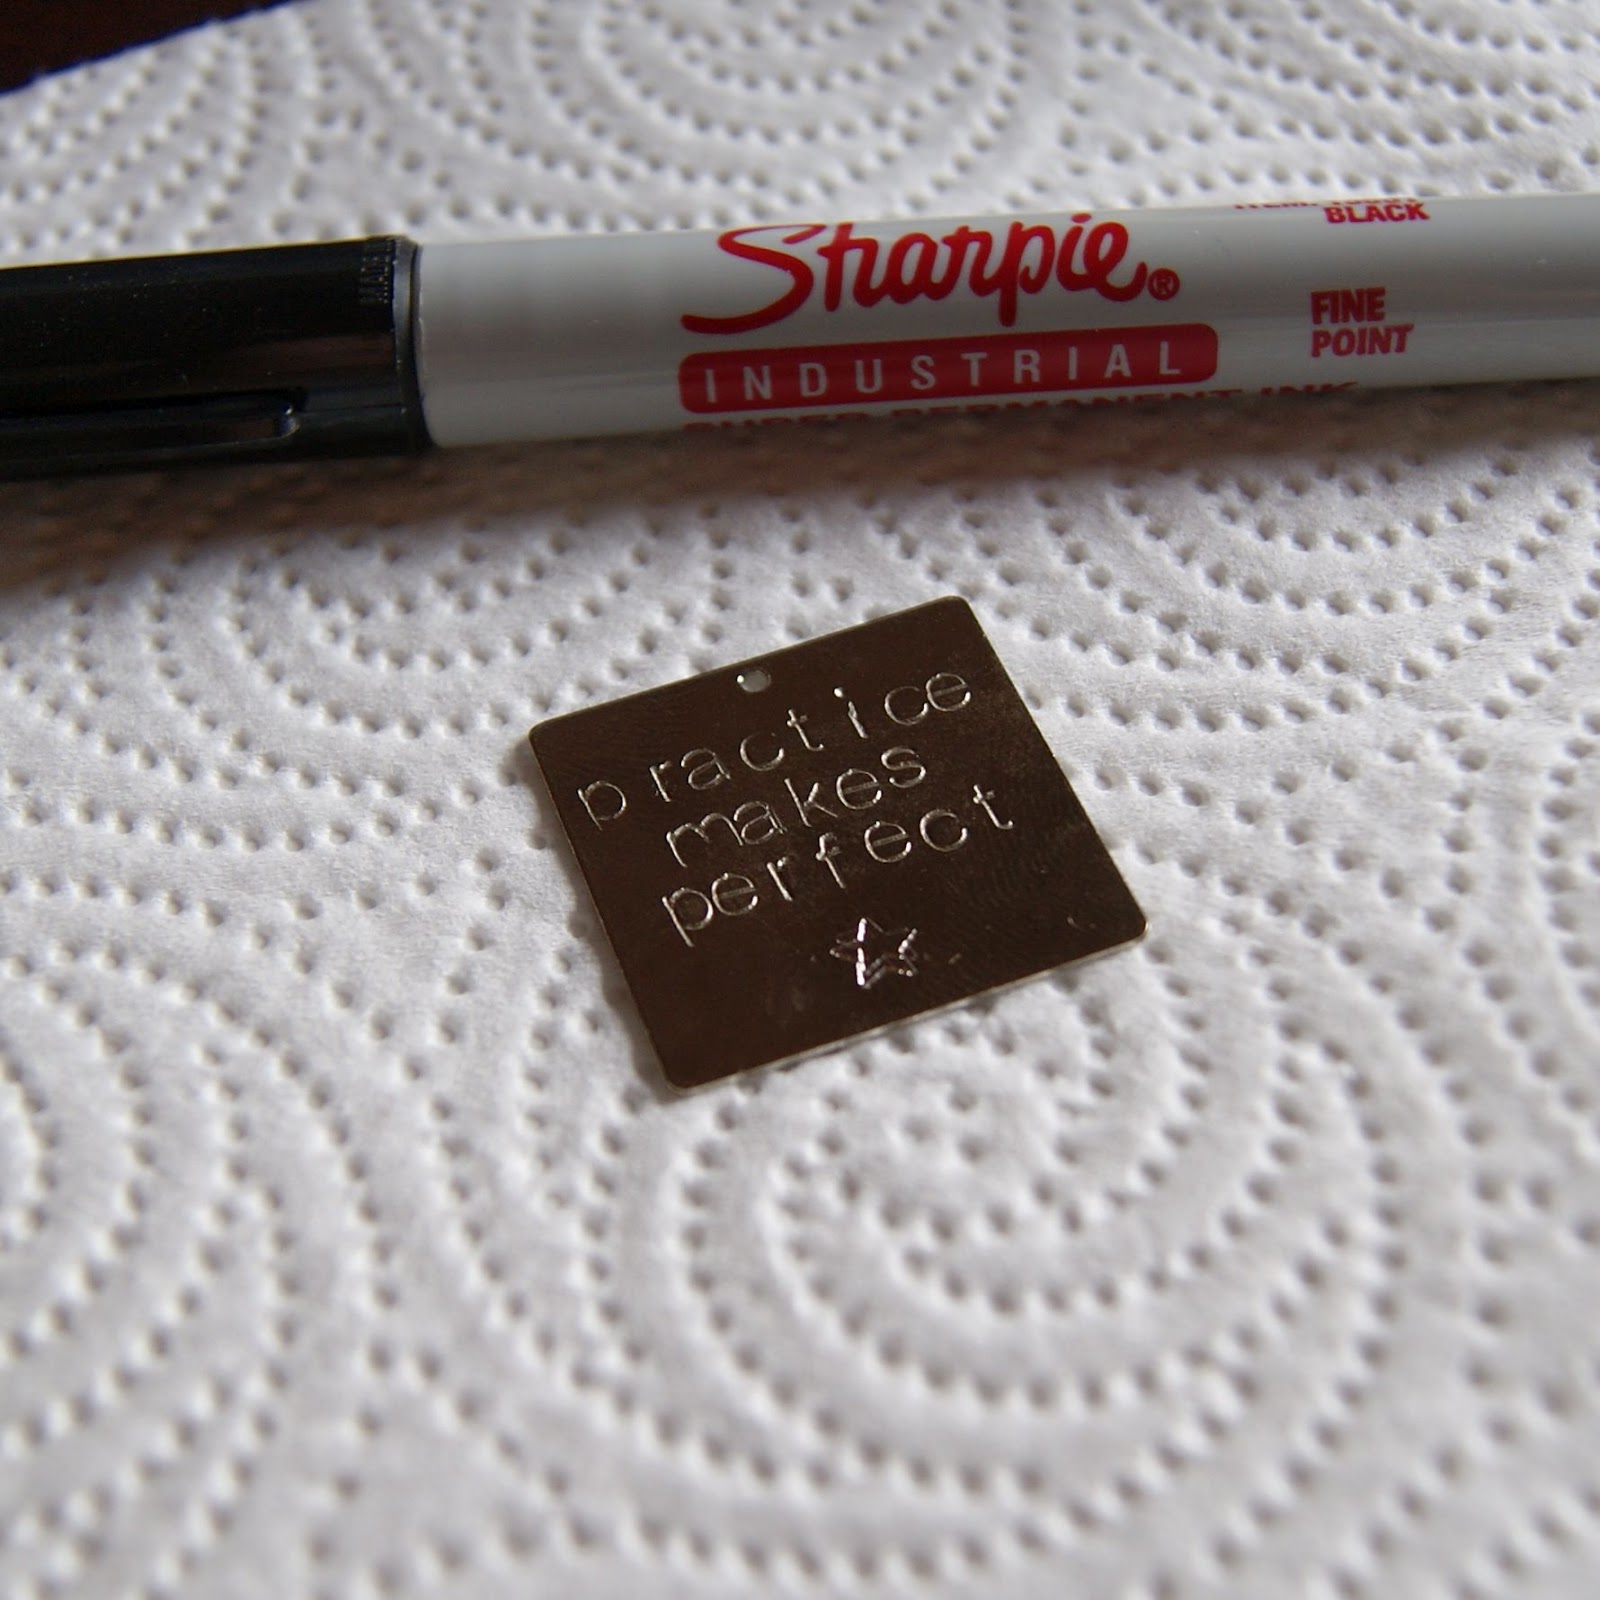
But that’s ok! This was just a practice blank. :) Now, let’s blacken the letters. Just color the letters with your sharpie.
Then wet a tissue or paper towel with rubbing alcohol, and wipe off the excess. I wouldn’t recommend a cotton ball, otherwise you will wipe it out of the grooves in the letters, too.
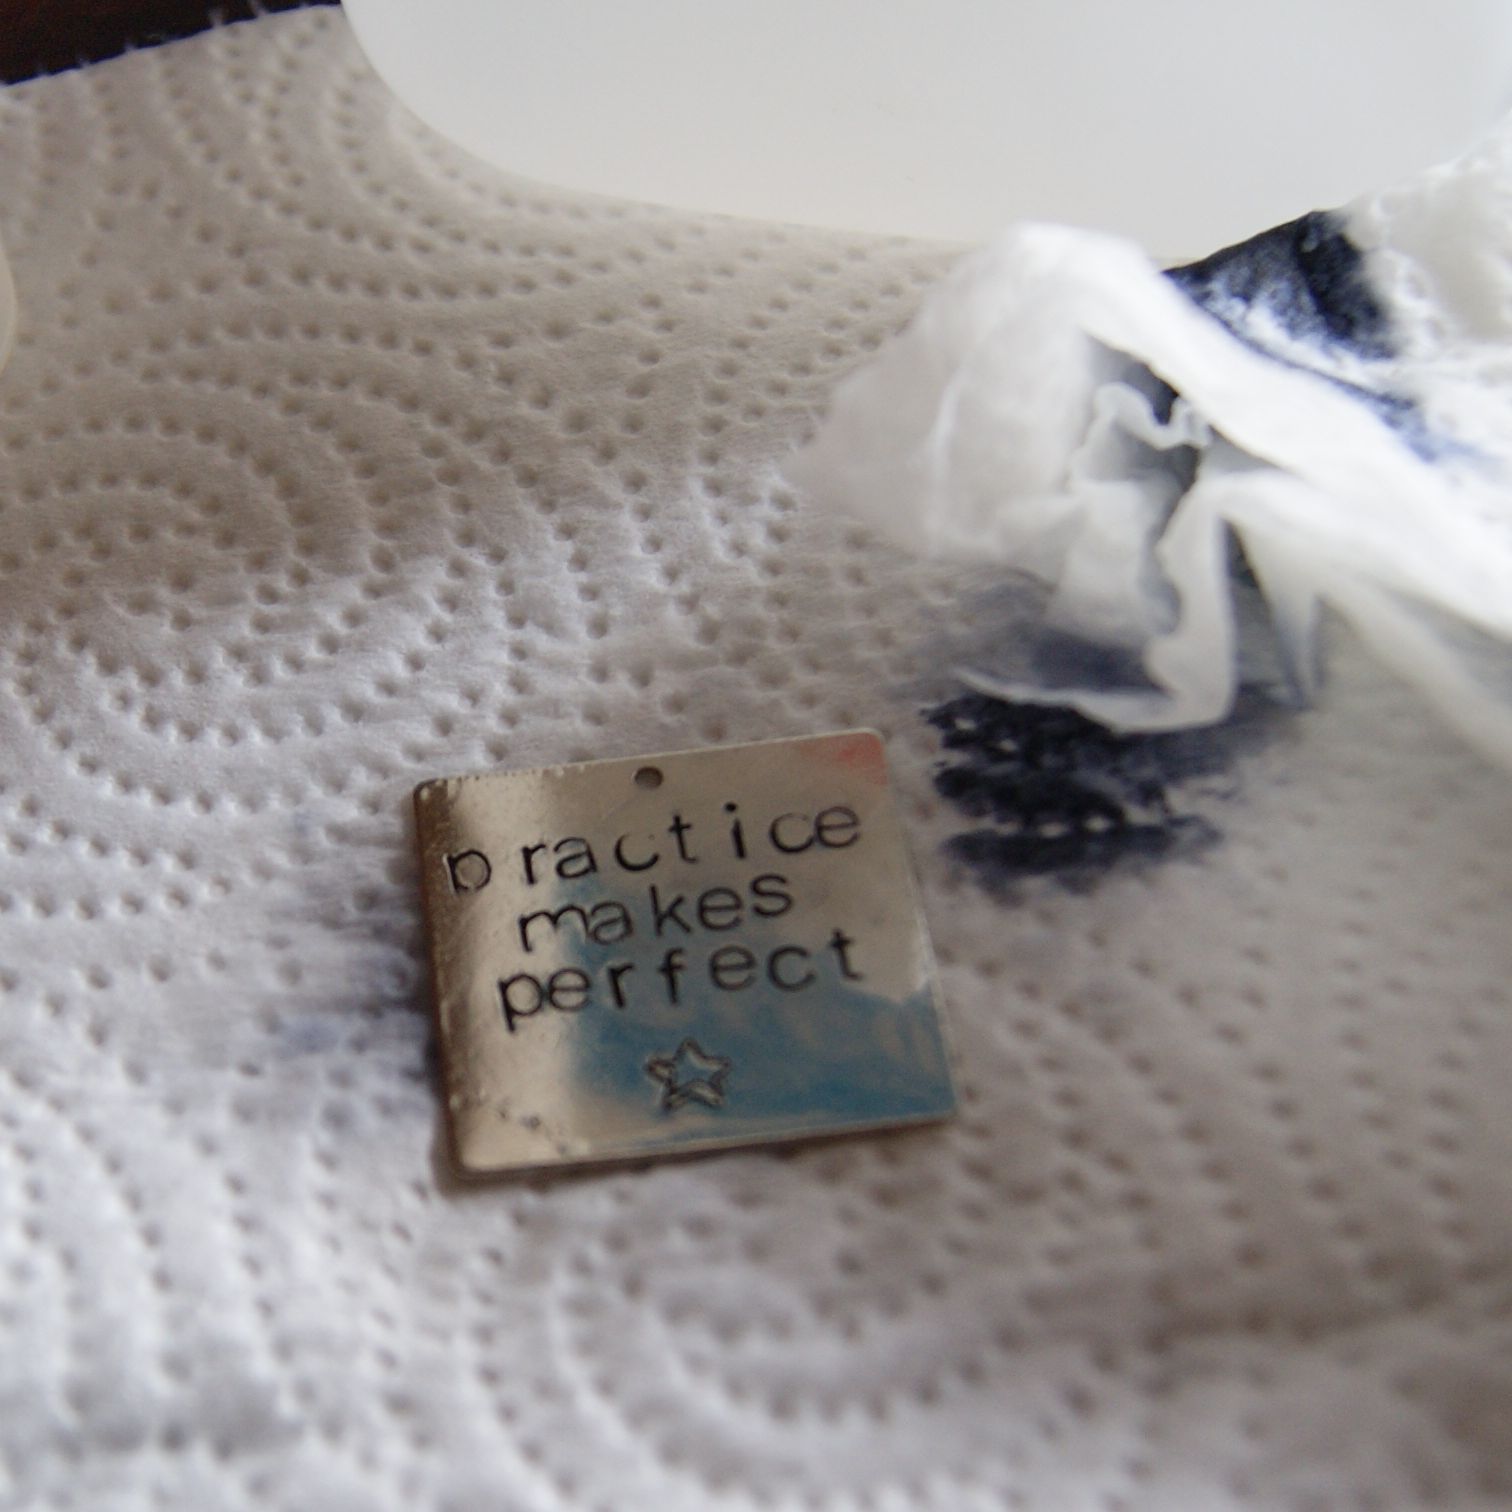
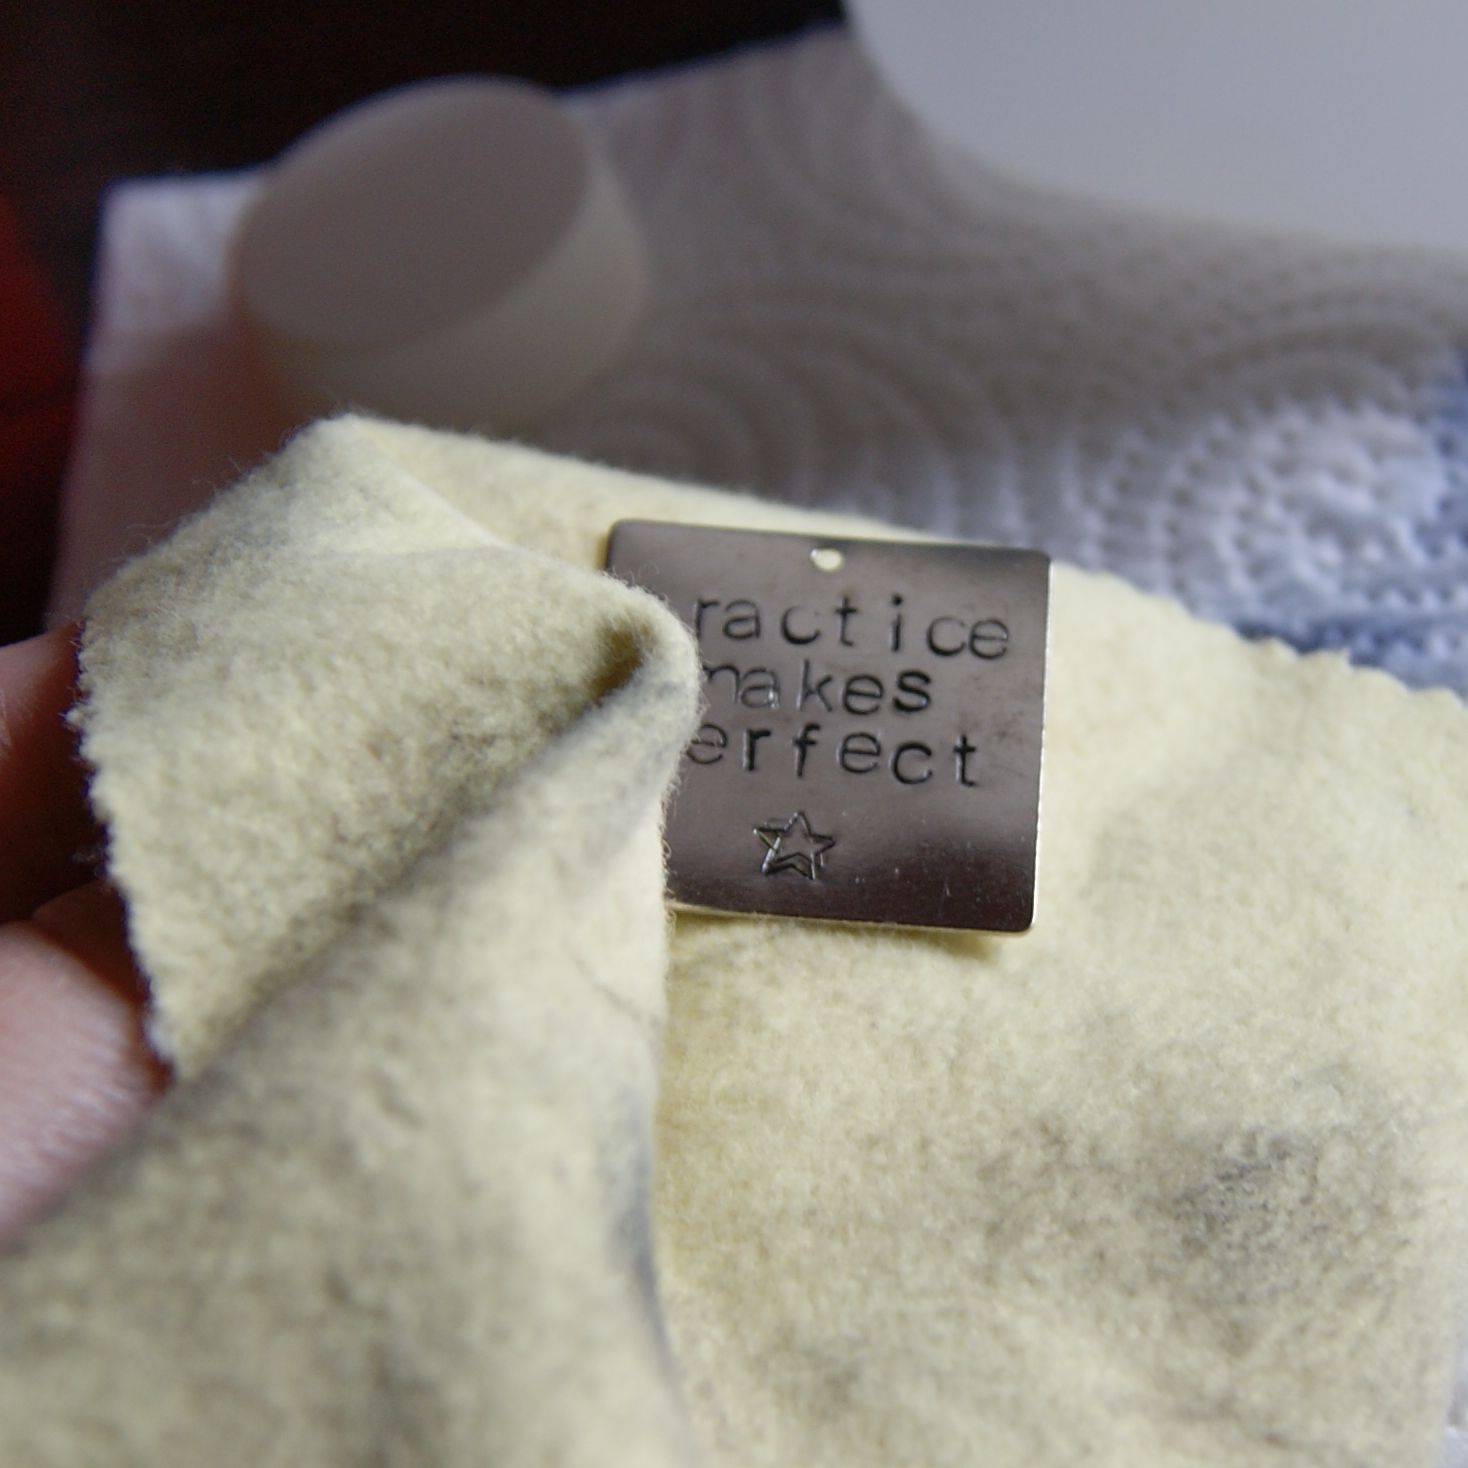
Now, polish up your piece with your polishing cloth:
How did you feel about your practice round?

I’m ready to move on to my real piece! I’m using Vintaj brass for my real piece. Remember how I told you that softer metals can curve or curl? For this piece, I’m going to need to use my nylon block and hammer to flatten it out.
Just put it upside down, and hammer it with your nylon hammer (so it doesn’t put dents in it). I usually tape a corner down to keep it from skidding away.
Now, I’m going to blacken my letters and polish my piece –
Then just add my finishing touches. :)
Good luck, and happy stamping!
I link up to these great parties!
~ Adrianne
I absolutely love the idea of jewelry stamping! The step-by-step instructions made it so easy to follow, and I can’t wait to try it out myself. The tips you shared for personalizing the pieces were especially helpful. Thanks for the inspiration!
I love the idea of jewelry stamping! It seems like such a fun and creative way to personalize pieces. The tips you provided in this post are super helpful for beginners. Can’t wait to try some of these techniques myself! Thank you for sharing!
Allmovieland is a 100% safe all in one movies app. This file is scanned many times and it is free from all security hazards. You can download Allmovieland APK and enjoy video entertainment without any security risks for your device.
I absolutely loved this post on jewelry stamping! The tips you provided make it feel so accessible for beginners. I can’t wait to try some of those designs at my next crafting session. Thanks for the inspiration!
I absolutely loved this post on jewelry stamping! The tips you shared for beginners are super helpful, and your project ideas are inspiring. I can’t wait to try this out during my next crafting session! Thank you for sharing your expertise!
I thought “shine” would be a fun word.
I loved this post! The jewelry stamping ideas are so creative, and I can’t wait to try them out during my next crafting session. The step-by-step instructions make it feel approachable, even for beginners. Thanks for sharing such inspiring projects!
This jewelry stamping project looks like so much fun! I love how you make it seem so accessible for beginners. Can’t wait to try it out and create some personalized pieces! Thanks for sharing your tips!
I absolutely love the idea of jewelry stamping! The tips you shared are so helpful, and I can’t wait to try them out during my next craft night. Thanks for the inspiration!
I love the idea of jewelry stamping! It’s such a personal and creative way to make unique gifts. Thanks for the great tutorial!
I have struggled with letters with descenders. This tip has saved me countless blanks that I would have continued to mess up
Hey its wonderful post. This is something which I’d definitely look forward to. thank you sharing it with us.
Hi I’m a beginner with metal stamping and using metals. I’m working with nickel silver and sterling silver right now. Is there a way to buff out or trick to get the scratch imprint on the backside of stamping? TIA
Hi! I’m new to Stamping also! But I can tell you that using the steel block has been essential in getting rid of the marks you are talking about. And also taping the project really well so it doesn’t slide and scratch as much. Be sure the back of your piece is clean and your steel block as well. I wipe my piece and block with rubbing alcohol before I start. The polishing cloth helps a lot! Then of course remember the beauty of these pieces is in the imperfections ? what FUN!
How do you polish the aluminum blanks from Hobby Lobby? They have very unfinished edges, and I’m afraid to wear it as-is for fear of getting nicked by the sides. Help?
Hi, stumbling on this late. I do wirework, but stamping is a whole new world to me. Do those craft store stamp kits work on old keys? I’ve seen stamped keys out there and thought it’d be a great makerspace teen project for the library, but for our library that’s a big investment not knowing if it’d work!
Most of today’s stamping can be done with advanced laser equipment. The price may range anywhere between $1000 – $5000 for a more advanced machine but the result is certainly worth it!
Not very practical for most of us and takes from the fun and skill building of doing your own stamping. I wouldn’t invest that much money unless I was going into business and going to do this on a large scale. Part of the joy of making your own jewelry is the totally handmade aspect involved.
Thanks for the tips, I have always been passionate about stamp designing, your article would help me create some great stamping jewelry in future
This is really awesome and seems so easy to make. Many thanks for sharing all the details.
Thanks for all of the information. A friend bought a set and quickly decided she didn’t have the patience. I’m trying to figure out what I’m doing!
Thank you so much for all the great information! I’ve been looking at kits online for a few days and you’ve helped me make some decisions as to what I need.
Wheen ?ome ?ne searches f?r h?s requuired
thing, so he/she needs tto ?e availab?e t?at iin ?etail, therefore t?at th?ng is maintaind overr ?ere.
Great tutorial! I just started getting into the metal stamping. I purchased a metal anvil and 1/8 steel letter stamps. I have been practicing on metal washers but I feel like the stamps are not going through deep enough. I’ve tried banging harder with my hammer but I don’t feel that’s working. Am I using the wrong type of metal? Should I used a block instead of the anvil? Any suggestions?Thanks!
Great tutorial Adrianne !!! A quick question though… In one of your pictures you have lots of stamp sets with “made in India ” sticker on them, was wondering what make are they (any information on the box etc) . Actually I am from India and cannot find any supplier. Will call great if you can provide me some information. Thanks :)
Great tips and links If anyone is looking higher quality we found a lot a luck with StampBlanks’s blanks, they have an etsy shop and also a website https://www.handstamping.com/stamping-blanks.handstampingsupplies
We love their copper and brass its the highest quality we have found. Their aluminum is the BEST they stamp like butter and require minimal finishing – we highly recommend if anyone wants to try them out, it has really cut down our time for projects at the shop. Happy stamping everyone!!
Have you used their pewter? I was wanting to try it but I wanted to see if anyone has tried t yet. We don’t stamp on aluminum but we may try it.
Thanks for this tutorial!
-Diane
Hi Adrianne
Thanks so much for taking the time to offer such an amazing tutorial. I love your faux liver of sulphur Sharpie trick. I learned a lot as a newbie to stamping and you saved me from making a lot of mistakes on my learning curve.
You may well have figured this out by now but if not, I’ll hopefully add a piece that may help with the spacing of letters. If you measure out equal spaces, that only works for letters with the same (or very similar) horizontal width. You’ll notice that I and i have the narrowest widths of the letters. So in your word “practice”, your c is too far over toward the e because the i took up less width. Similarly, j, r, t and f are pretty narrow. And conversely, w and m take up more width.
So if you need to include the narrower letters in a word, you’ll want to space the adjacent letters a little more closely to make them evenly spaced. And the reverse for the letters m and w. Look through the words above and notice the different widths of each letter and you’ll see what I mean. The widths will vary for different fonts so you can practice on thick masking tape on your anvil (striking lightly) to set up your words.
Hope this is helpful and thank you so much for sharing your talents!
Thank you so much for taking your time to share your information!!
wow, I always appreciate when someone takes their valuable time to share their expertise. By the amount of positive comments,, a vast amount of people will benefit from the sharing of your time, expertise and kindness. I will definitely be one of those people. I am grateful for your post, Thank you!
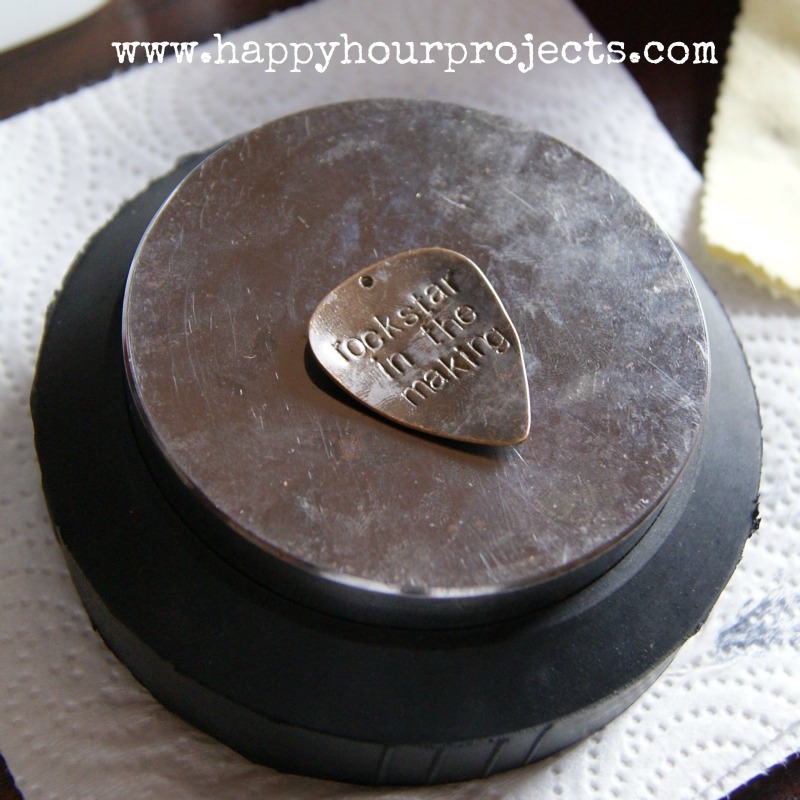
Hi Adrianne – this was a great tutorial! Can you tell me what set you used for the ‘rockstar’ stamping? I am trying to find it on Goody Beads but nothing looks similar
Thanks!
PW
Hi Paula, sure! It’s the economy font (some retailers will call it Sans Serif). Here’s the lowercase 3mm set: https://www.goodybeads.com/store/products/TL00130.htm Or if you want uppercase, here’s the link to that one as well: https://www.goodybeads.com/store/products/TL00129.htm
thank you!!!
This is fab Adrianne!!! I am new to Jewllery making and am so glad to have found your site. Your tips are sooooo good and thank you so much for sharing.
Kath :}
Thanks Adrianne for the step by step tutorial! I’ve been curious on how to make my own tags. I’m glad I came across your site! I’ve inherited every type of crafting supply you can imagine from my boyfriend’s mother (former home ec teacher!). We know there are stamps there, now I can’t wait to dig them out and use your tutorial to give it a whirl!
Thank you for this tutorial it is wonderful and so informative. The video was exceptional. It was so detailed given the short time of the video.. I appreciate all the help and information provided to enable me to begin metal stamping.
Here are a few product links for you to check out!
On Amazon:
Chain: http://www.amazon.com/gp/product/B002NWAJ1S/ref=as_li_tl?ie=UTF8&camp=1789&creative=390957&creativeASIN=B002NWAJ1S&linkCode=as2&tag=haphoupro-20&linkId=DAW3F6ADLTNEORK5
Pliers:http://www.amazon.com/gp/product/B000SN9Z78/ref=as_li_tl?ie=UTF8&camp=1789&creative=390957&creativeASIN=B000SN9Z78&linkCode=as2&tag=haphoupro-20&linkId=5KPRLZOKQDDGOU3F
Jump Rings: http://www.amazon.com/gp/product/B00GOXYD00/ref=as_li_tl?ie=UTF8&camp=1789&creative=390957&creativeASIN=B00GOXYD00&linkCode=as2&tag=haphoupro-20&linkId=IBOA4LI5SMJTYEU5
On Goody Beads (where I typically shop):
Chain: https://www.goodybeads.com/store/products/A008346.htm
Pliers: https://www.goodybeads.com/store/products/FTTL0002.htm
Jump RIngs: https://www.goodybeads.com/store/products/Z007449.htm
I hope this helps!
Adrianne could you please suggest to me where i can buy the chains and little hooks and all that i would need to make the mom necklace? Also what kind of pliers is best? Thanks !!!
Hi, I tried metal stamping recently but couldn’t get it right. This blog post was so helpful, so I’m hoping you may be able to help. When I stamp, the metal significantly bends and the letter isn’t defined on the metal, so I’m wondering if it may be the supplies I bought. I tried hammering harder and more softly, on the block I bought and on a different surface, and on both types of metal discs I bought, but I get the same result. The supplies I have: Tekton 5/32” number & letter stamp set, Cousin weighted steel head 6-inch mini hammer (by Cousin: Tool Basics), Solid rubber bench block (2-1/2″ x 2-1/2″), Thumb-safe Stamp Holder, Round Bronze Tone Blank Stamping Tags Pendants 20mm(6/8″), frosted anodized aluminum 1” 21-gauge discs. Any thoughts or advice? Thanks so much!!
Okay I’m not seeing that you are using a steel bench block. If you’re just using rubber, that’s the culprit. You can use a rubber-bottom block, but the surface you stamp on needs to be extremely hard – like steel. You can stamp on concrete also, but you run the risk of scratching your blank too much if you’re not using something smooth like steel.
This is the block I recommend https://www.goodybeads.com/store/products/A014415.htm
But if you already have a rubber block, you can get just the steel block and place it on top. The rubber isn’t necessary, but it will absorb a lot of the noise. You can find a steel one here: https://www.goodybeads.com/store/products/A011605.htm
I’ll definitely try that — thanks so much!
All of your great tips and confidence inspiring instructions goes a long way..
It is like having a good teacher standing right there with you! I had looked at
your ideas before but did not read the directions – I appreciate how thorough
your directions without being too wordy. Keep these coming – you are doing
a great service to people that enjoy trying new things! PS I consider myself pretty
crafty, yet I feel I learned a lot readying your directions. Even old dogs CAN learn
new tricks!! Thanks
Never mind the last question, I read your 2nd tools more carefully. Sorry and thanks!
Hey! I just watched your tutorial on stamping (which is great btw). I know that you may have answered this question but you had so many questions/responses that I didn’t want to have to read them all. I am wondering where you got that little cube that helps you “dome” your metal plate?
Thanks!
Hi – Love your stamping tutorial! Great info. In the interest of creating something truly unique, why not check out stamping blanks that NO ONE else has??? That’s right! I know this because I design & make all of the blanks that I offer at my Etsy store. Please come check out my unique designs in fine pewter, soft-strike stamping blanks at extremely great prices & let me know what you think. Adrianne – I want to earn your support & will be happy to send you samples of my stamping blanks for FREE! Just contact me.
Thanks for your time & remember…
Stamp Happy!
Lisa
…by the way – my store is VerseTag on Etsy.
I cannot find the starter/beginning kit on Goody Beads website.
Hi Jeannette, try this: https://www.goodybeads.com/trends/Stamp-It.htm
Thanks. I guess I just don’t get it, the website says’ “Our friend, Adrianne; from Happy Hour Projects put together a starter kit for beginners that has everything you need to get started on your first metal stamping project. ” I see a pic that looks like a kit, and a bunch of items listed separately to purchase below this quote. Maybe I am looking for something that doesn’t exist. A kit to me sounds like a set of items that all come together, but it looks like there are suggested items to make your own kit. This is confusing to me.
Oh yes, there’s some flexibility about which items you can add to your cart (and it also means that if one item is out of stock, you can pick an alternate item instead of waiting until it’s back in stock). It’s really a collection where you can just quick-click, add to bag, add to bag on the basics.
Thank you for this great tutorial! It is what got me started. My question is, when you hammer the piece to flatten it out, what surface are you working on? I found that when I do it on my jeweler’s anvil, it gets scratches. Can these be polished out?
I do work on my bench block, or on a nylon block I have, and I haven’t had that issue. I would try adding a polishing cloth or pad to the block first and then hammering it if you’re getting scratches.
Where do you get the chains?
Hi Angela – typically I buy mine at ConsumerCrafts.com, though I have never bught chain anywhere and thought, “wow, I was disappointed with that.” COnsumer Crafts seems to have the best prices I have found.
Awesome tutorial! Thanks so much!
Hi Adrienne. This is the best tutorial for metal stamping I’ve ever seen. Thankyou so much for the detail and making it seem so simple…I’m dying to give it a go and have a group of friends I’ll be trying it out on too. You are awesome and I just adore your blog!
Great hand stamped jewelry!! I am just fond of like this jewelry……..
Thank you Adrianne for the tutorial on metal stamping! Im beginning to do bracelets and love the personal touch of a stamped charm so I bought a stamp kit. Bought some metal blank charms and the stamp didnt leave a decent impression.
I will use tape as you’ve suggested this will def. help with keeping piece in place. I also like the idea of marking off spaces. Again, thank you for the fabulous tutorial on metal stamping.
Looking forward to other tutorials and ideas from you.
This is the best tut that I have seen on letter stamping. Thanks for putting your tutorial on video.
Hi Adrianne! I’m copying your exact “be yourself” bracelet and will be making with 30 girls at a camp, I ordered blanks from goody beads, that have preset holes on either side. But two questions:
1. The blanks are much taller than what you used, so I’m considering cutting them down, but worried about sharp edges. Any suggestions?
2. I’m trying to avoid buying a leather punch, but looks like I might have to for this…how do I know what size will fit the holes in my blanks and the brads from Hobby Lobby?
Oh, and I’m thinking of using the nylon/vinyl type cutting boards rather than buying the stamping pad. Do you think that’s ok? Thanks for any help you can give!
You can definitely cut them down, or if you haven’t already invested in the leather cuffs, just buy a wider cuff. If you do cut them down, you can use metal shears like tin snips (from the hardware store) but you definitely will need to file or hammer the edges because yes, they will be sharp. :(
As for the leather punch, even just a hammer and awl would probably work fine! Leather is much softer than metal so putting a hole in it shouldn’t be so tricky.
And finally for a stamping surface, it needs to be very hard to take an impression. If you’re not using steel, then try finding something more like concrete. For what you’re making it won’t matter if the back gets a little scratched.
Can’t wait to see photos!
So, I tried the stamping today, for the first time. I need to work on my letter spacing, as well as straightness (I used the tape, but still crooked..lol)
After I was done stamping, I blackened the letters with the sharpie, but when I wiped it with the polishing cloth, all of it came out, including the black inside the letters. Not sure why that would happen. Shouldn’t it have stayed in the grooves?
Okay. This is another one of those things you will get a feel for. When you’re polishing, you want to go straight over the surface of the blank, and not get your cloth into the grooves. Basically, you want to polish the parts up high and not the impressions. But, it does happen to me sometimes too and you can easily re-darken the impressions and re-polish until you get that look you want.
Instead of polishing rubbing with your thumb, try using your index finger and rubbing it over the top. That will help you learn the “feel” of how to polish. And kudos for finally getting to try it!!
Thanks so much!! Sorry I have been a pain in the butt.
I ended up ordering the Gothic lowercase since my uppercase are gothic. Did order the hole punch, and also a rubber/steel bench block (only 4 bucks).
I have one last question, then I think I am set…lol
Since I bought the 3mm stamps, do I go bigger or smaller for designed stamps. For instance, if I want to get the awareness ribbon, or a heart……do I stay within the same size range?
Thanks!!
Hi, thanks for all of the tips :)
I received my package today (I ordered everything needed to start, from the link).
Unfortunately, two items were out of stock (lowercase letters, and two hole punch). Can you recommend another site where I can get them for a reasonable price.
Thanks!!
There are a few options on Amazon – the punches:
http://www.amazon.com/gp/product/B003L7PLNK/ref=as_li_tl?ie=UTF8&camp=1789&creative=390957&creativeASIN=B003L7PLNK&linkCode=as2&tag=haphoupro-20&linkId=UK6W3SD4PAR6C4NO
http://www.amazon.com/gp/product/B00BXBJNXA/ref=as_li_tl?ie=UTF8&camp=1789&creative=390957&creativeASIN=B00BXBJNXA&linkCode=as2&tag=haphoupro-20&linkId=HH327C6GHALBGUJC
Stamps: http://www.amazon.com/gp/product/B003TTPFNG/ref=as_li_tl?ie=UTF8&camp=1789&creative=390957&creativeASIN=B003TTPFNG&linkCode=as2&tag=haphoupro-20&linkId=2EIUJQIEFFVCTAMY
Hope these help! :)
I know I have a lot of questions (sorry…lol). What are the best chains to use for necklaces and bracelets? Thanks
Oooh, that’s tough to answer, because it’s whatever you like. I use a lot of 2mm chain for necklaces and 5mm for bracelets. Some people like ball chain, I use a lot of curb chain, but I also think rollo chain looks nice. Chain comes in about a hundred different styles, and at all different price points.
It’s kind of like asking a painter what’s the best shade of blue… it’s whatever you think looks best when you put it together. :) But for necklaces I’d aim for about 2mm in whatever metal you prefer, and go from there.
Where did you buy the steel block bench with rubber? I checked the site you gave, but they only show a square one (without rubber).
Thanks
I got mine at a local bead shop, but the rubber bottom one I mention above is probably temporarily out of stock (that does happen from time to time). I would check back in a couple days or Google where else you can get it – or, the rubber doesn’t really affect performance. It just makes this a slightly quieter hobby. :)
oops….one more thing: When you write your lines on the masking tape, approximately how far apart do you put each line?
Thanks!!
That will depend totally on the size stamp you’re using. Each time I get a new font, I have to get a “feel” for it. Generally, though, I start with 1/8″ spacing and see if I need to go narrower or wider. You also need to take the size of your blank into account to “fill” it – you may want a little more or less space between letters depending on how much empty space you have surrounding it.
So this will vary a lot, but it all comes down to your own preference once you get used to your font.
Thanks for this great tutorial. I am thinking of getting into the stamping, and this really helped me understand how to make it.
Can any color sharpie be used, or does it only work well with black. I thought I saw some designs in color, but not sure if that is done using something else, of they are just using colored sharpies.
Also, the size that you mentioned to buy for the stamps: is that a good size to use all the time and does it work well on most things, or do most people use bigger size?
Thanks in advance!! :)
Hi Dawn – I’m going to scroll down and answer these one by one, hope that’s okay!
You can use any color marker. You can also use acrylic paint. Depending on how large the piece is, sometimes one makes more sense than the other; paint is a little messier but it gives you faster coverage, so there are pros and cons.
3mm is not the biggest size out there but it is the biggest common size. You will often see 3mm, 2mm, and 1.5mm. Once you get into higher end fonts more sizes are available too, but for economy stamps, 3mm is large and legible. As far as it being the “best” – it depends what size piece you’re stamping. Like if you’re doing 1/2 inch discs, you won’t be able to fit a long name or phrase at 3mm, you may want to go smaller.
Thank you for the tutorial! Brand new to the Art of Metal Stamped Jewelry. Planning to make Mother’s day gifts… was hesitant about this, until finding your site!
Thank you so much,
Cindy
Hey, I want to use both upper and lower case letters ” Shine” what sizes do I use. I know I need two sets of letters. World they both be 4 mm ? Thanks for any advice yput can share.
They should just both be the same. Any size that fits your project will work. My favorite size to work with is 3mm personally, but you can certainly use 4mm sets if those are what you have your eye on! The uppercase letters will match the height as any lowercase ascending letters (like b, d, f, h, k, etc.) so you want them the same size, in most cases.
Hi there!
a new metal stamper here, currently have lowercase 3mm newsprint. I have a question!
I’ve had a few people request captials, especially in names. I want to invest in a capital set, but I’m confused as far as the sizing. If y current set is 3mm, if i buy a 3mm capital set the capitals wont be slightly taller than the lowercase, right? so if I were to stamp out Adrianne, the “A” would be the same size as the non ascending/descending letters, right? So, should I get a larger size than the 3mm?
It’s true that the letters will all be the same size, but that’s typical. Take the word “The” as it’s typed here: both the T and the h are the same height. It won’t look weird! If you’re going for a much larger look, that’s totally a style preference, but typically people match 3mm with 3mm.
Thanks so much for sharing this information. I’ve just started metal stamping and found your tips very helpful.
This is awesome. I think your getting me hooked on this!! I really like your page! Man, where have you been!!!!!!! I cant believe I didnt find this earlier! :( but thats ok, cause I did now!!:)
Thanks for this great blog. Would never have thought about that for the ‘p’. Have had stamps for a couple of years or more now and hardly used them. You’ve filled me with new confidence. Will definitely give thus a go now.
Thanks
Thank you so much for all the information and guidance you offer on stamping. I have been looking at all sorts of kits to get started and you have helped me tremendously!! And the pictures explaining the basic process are wonderful. I can not tell you how happy I was to find your blog.
I have just found this tutorial and I am really pleased I did. Thank you, I have been wanting something like this as I really want to start stamping but wasn’t sure what is the best to buy to start up. I will be back to reread it!!
Hello,
That looks wonderful ! If I were not so fare from you I would like to do a stage. I don’t if we can find the same tools in France. If someone know the information, please let me know.
Bien cordialement.
marie
Very nice tutorial!
Hi. After being very frustrated tonight bc I couldnt find anything at my hobby lobby I found your blog. Here is my question: with the 3 mm letters what size blanks do I use? I want to use a 7mm x 11mm stamp of a dandelion and write believe so what is the best size? And also what ia the best nickel free blank to use? Thank you for a straight forward tutorial!!
Anytime I’m looking to avoid metal allergies/sensitivities, I like to use aluminum. The bonus to that is that it’s also a nice soft strike metal so your letters come out clear even for beginners.
There isn’t a magic formula for size… but I will say you should look for blanks 1 inch/25mm and larger for the larger fonts and design stamps.
Where can you find very cheap practice blanks? I am not looking for anything fancy, just a cheap way to get started.
Thanks so much!
Hi,
Great tutorial – thanks!
I’ve been wanting to get into stamping for ages now, and keep delaying as I become overwhelmed, researching suppliers. Do you have suggestions regarding suppliers, or what to look for/ask?
Thanks,
S.M.ile
Hi Sarah! That is exactly what this post is for! I have links above to some of my favorite online suppliers. :) Good luck!
Hi There,
This blog post is so helpful!! I want to start stamping cutlery – spoons specifically – is the stamping format the same process do you know? Thanks so much!
Julia
I haven’t done spoons, but I’m hoping if someone else has, they see your comment and replies!
If I were to try them, I’d try them just the same as I would any other metal blank. Just be sure your spoon is a soft metal (like silver) and not stainless steel or something hardened. I haven’t ever checked to see if there is a special bench block for something like a spoon to keep a hard surface underneath while also maintaining the curve – but it’s worth looking into. I bet there are videos on YouTube if you haven’t tried looking already, but I have no experience personally – sorry!
Ms.Adrianne:
Thank you Ma’am for sharing this. It’s easier than I thought it would be…for some reason, I thought it to be extremely complicated.
You have been extremely helpful & I can never thank you enough.
Thank you again Lady Adrianne.
8 )
Thank you! Like someone else said this answered all my questions and ones I wouldn’t have even thought of! I was wondering if the 1/8th stamps were too small or just right – for me they look to be just right! And the sharpie! I never would have thought of that! Jeez!
Thank you a million times Over for this!
I’m just starting out and starting to get all my supplies in order, and I was wondering what other pieces can I use instead of the metal block or does it have to be metal, could I use a block of wood? Your ideas would be awesome.. thanks ;)
thank you for sharing your great information in a truly understandable manner.
Thanks for sharing! I am blogging about all my Pinterest creations and shared your tutorial link. This was my 205th pin to complete! You can see it at lizspinspiration.blogspot.com/2013/05/pin-204-pin-205-wristlet-key-chain-with
Where do you purchase the chain from ?
Also, what the best stamps & metal to buy & where from ??
Thank you !!
Such a great Stamping tutorial!! Using the masking tape to line up the letters is priceless. I’m excited to do some stamping today and have much better results this time.
Thanks for your fantastic tutorial. I’m wondering if you would share where you get your ball chains from?
it was awesome how simply you described how to do it. I went to my hobby lobby and was looking at the stamping and thought it may be too difficult……but w/your fantastic tutorial, i’m ready to start my new projects w/confidence. thanks soooooooo much!!!
Loved your tutorial! Makes it look so simple! I am confused about the “practice blanks”. I looked on the site you mentioned beducation…..I dont know where to start?? ! I have been practicing on washers from a loal hardware store! I know they are thicker and require a much harder hit but are nice for learning letter placement and so on. What is the best “real” blank to start with ?
Thank you so much for this information! I just about bought a book for $10 for my Kindle, but decided to search the web for free info, first. I am so glad I did! Your information has also ensured I not waste money on a “starter kit” that contained some things I just don’t think I would need – at least not right away. Also, thank you for the tutorial on how to actually stamp the product. I’m ready to order some stuff and get started!!
Wow! You took a lot of time to fully explain this for rookies like me! Thanks! I think I could do this with confidence now. Wonderful!
Love your stuff! I enjoyed reading your DIY stamping stuff. I’d like to try this next weekend. Let’s see how artistic myself can be.
Great article, really really helpful! Bought some stamps last year but haven’t really used them much – but this article has definitely inspired me to get stamping!
First of all, THANK YOU! For taking the time to show us beginners your tips you learned through trial & error! I purchased my supplies in December and they sit here because I don’t have the nerve to start. Weird, I know. I bought practice blanks and sterling. Did one practice and was nervous to ruin the sterling.
Thanks to you, I feel I can do this! The trick of the marked tape is exactly what I needed. I also didn’t know I needed a nylon block….something else to order…lol
I want the hammered stamped look. which is done first?
Thanks again!!!
I so love your jewlery! It’s beautiful and uniquely designed. Thanks for this simple tutoring. Will definitely try this.
Thank you so much! this is awesome! thanks for telling me what NOT to buy in the beginning, that’s really helpful
Great tips, I really like the bit about the tape. I will tell you that if you use a Brass Hammer, your metal will NOT curl as you stamp, it will stay flat.
Thanks
Love your tutorial! Very good tips and trick to ensure you get the desired outcome for your piece – one of the best I have seen. Thank you for Posting. Please don’t forget your local bead shops when mentioning supplies – we have lots of resources, and don’t hesitate to special order, and give help when needed. We compare our prices to the big box stores and the online stores and on similar items can often match or even beat their prices. And we have great gemstones to accent your finished pieces.
Great info-can you give any suggestions where to buy good quality metals?
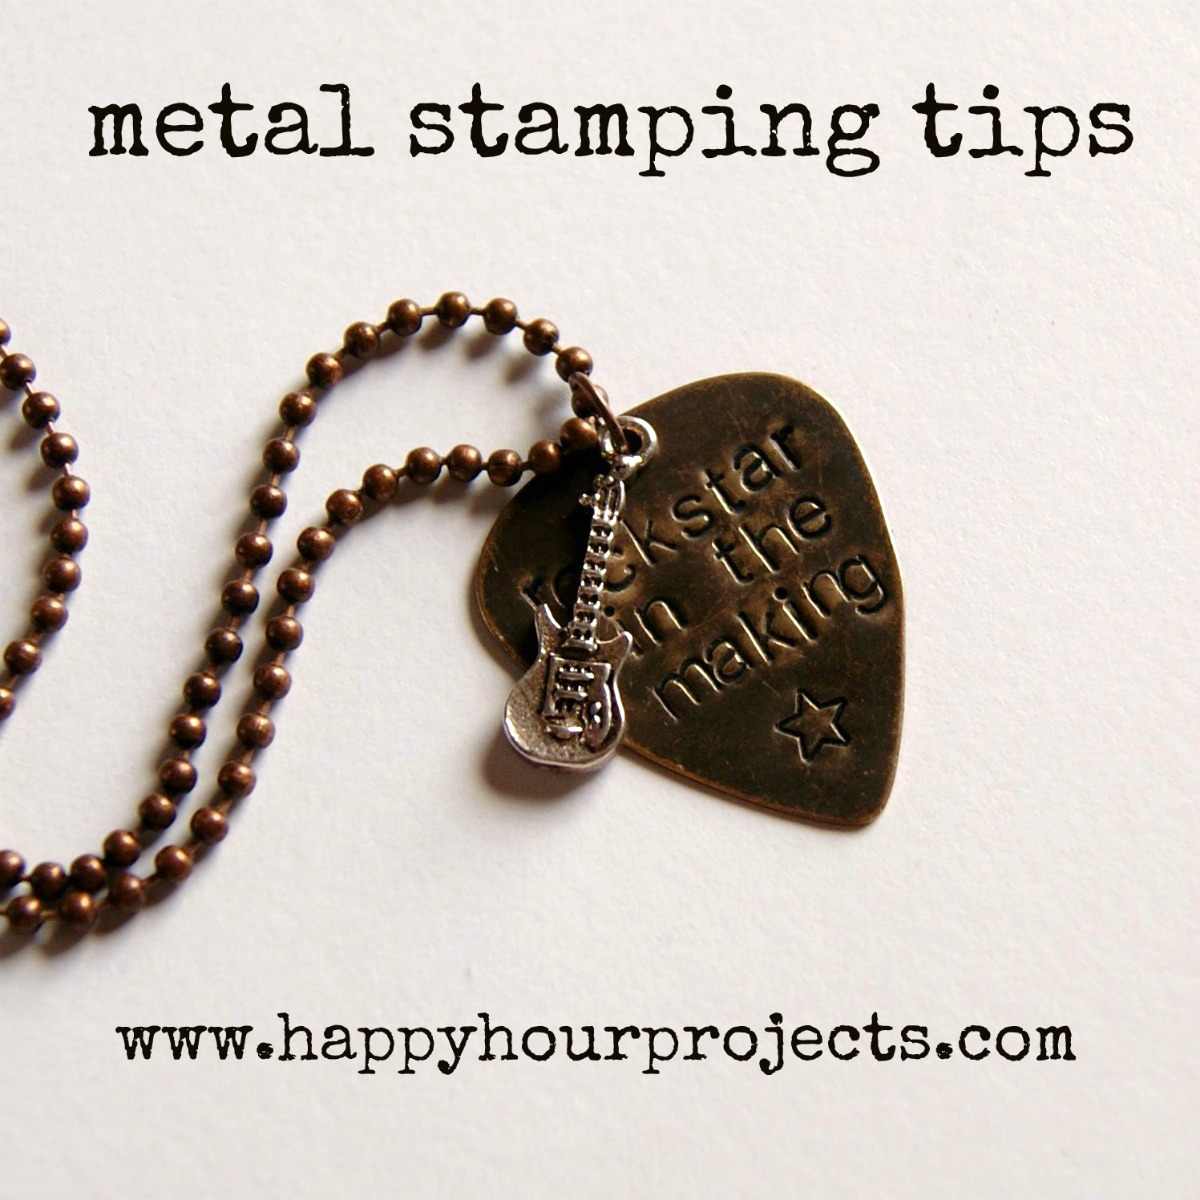
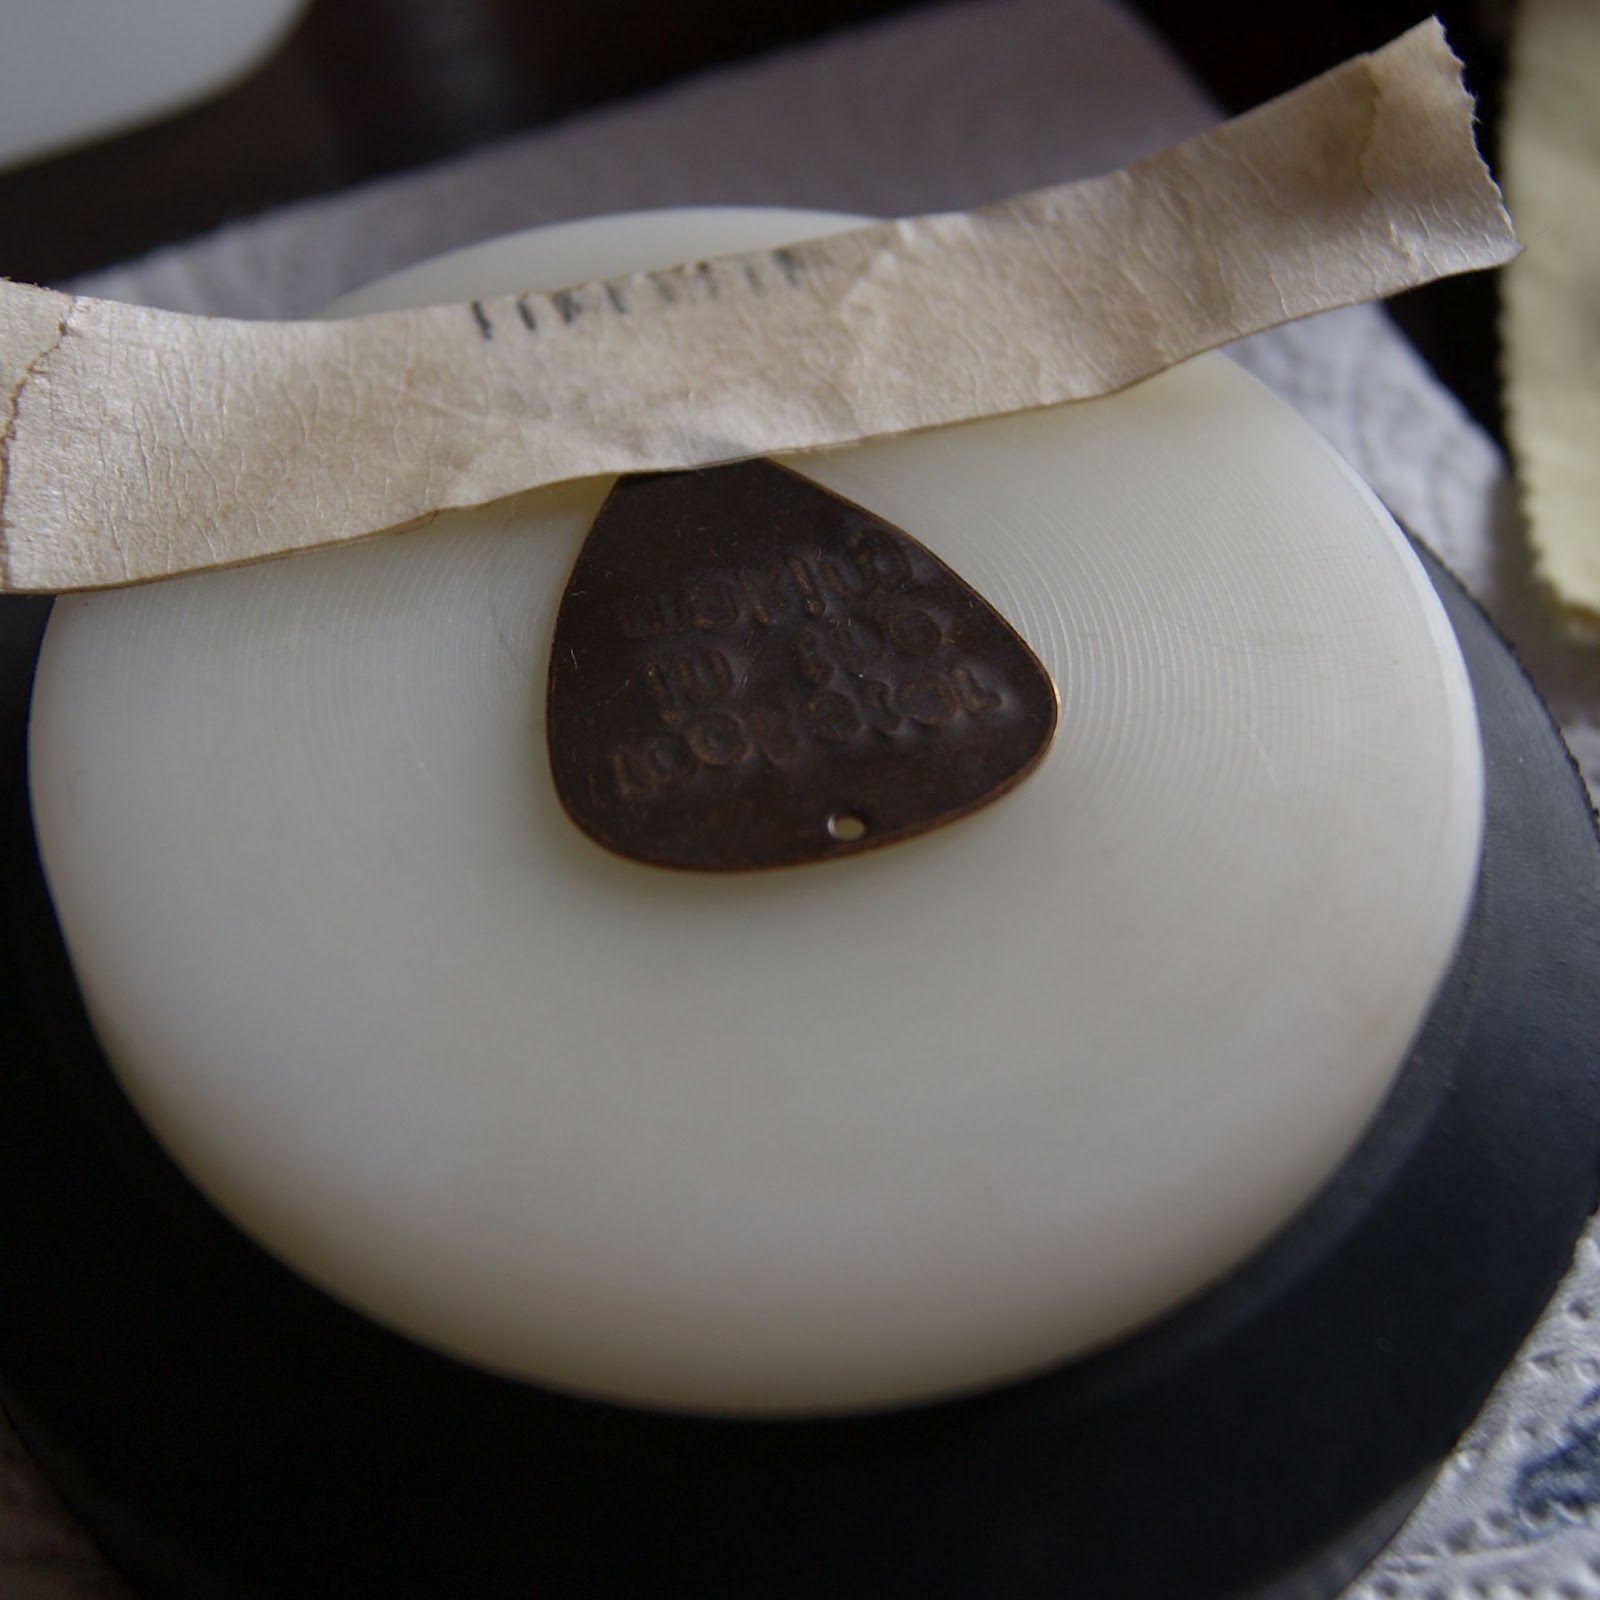
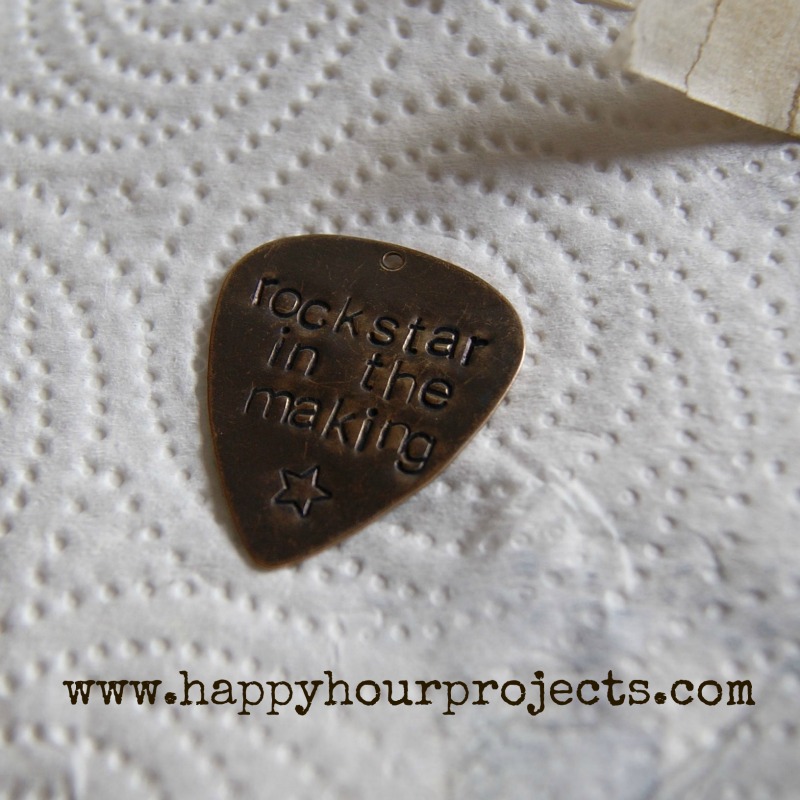
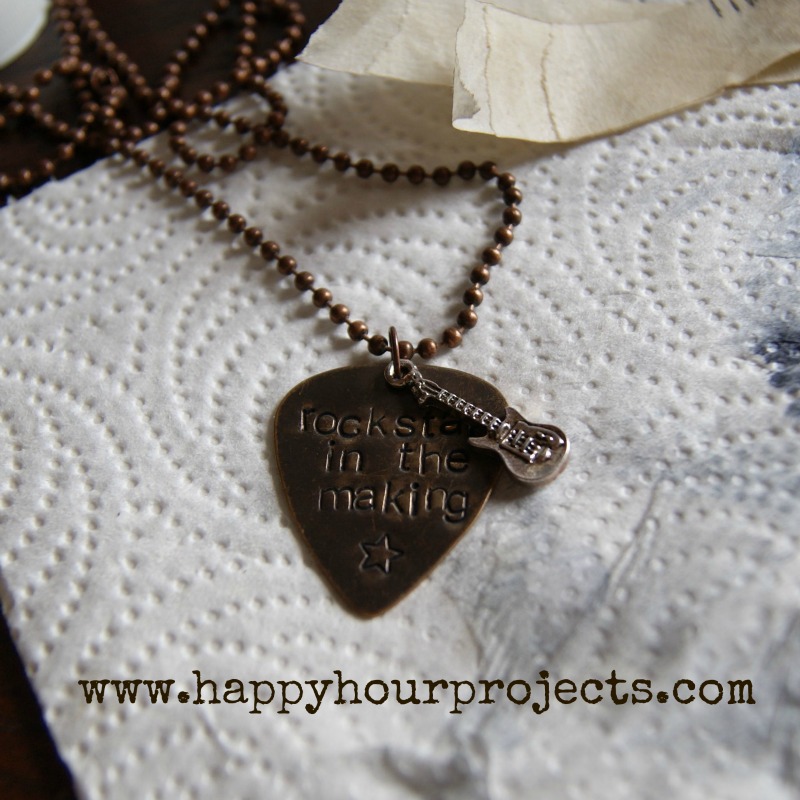
Where did you get your supplies for the guitar pick necklace???????
Where did you get your supplies for the guitar pick necklace??????
Thanks for this great tutorial! I just got started and blogged about some metal stamping project ideas and linked back here for the tut. Happy New Year!
thank you for this post!!
This is so awesome and helpful! Thank you so much for doing this tutorial! Thank you so much for sharing! Your page has been bookmarked :-)
This is beautiful. I was wondering could you please suggest places that will stamp a name for you. I would like a couple but don’t hv the resources or time to buy the tools.
I’ll rather contract someone & pay. Thanks
Awesome tutorial. Thanks for taking the time to make such a great & informative post. I have been doing some research into stamping because i want to start doing it. I hope you don’t mind if i add my 2 cents. And, if I’m wrong, please correct me.
1- harbor freight carries a 3mm set for under $10. Now, this is where you may need to correct me, but from what I can tell from the pics (I live in the boonies & don’t have a Harbor freight near me) it looks just like what everybody else is selling for more.
2- Since it is a cheap set it won’t have the letter engraved on the shaft. A good tip I read was to use your Sharpie to mark each shaft with what letter it is. Mark it on the side so that when your marking is facing you the letter is in the right position for stamping. not sure I explained that very well.
Again, thanks, I’ll be pinning this.
I have the harbor freight set. It’s pretty plain but I;m just beginning and its been ok. I’ve made a couple for gifts. I think it’s a good first time stamp.
What a wonderful tutorial for people starting to have fun with stamping! or to give it a whirl! thanks.
AWESOME !! Thank you so much for sharing! Found this thru Pinterest & am pinning it myself.
I don't know that it has a name, it's just the basic lowercase Sort of like Arial. No frills. :)
What is the font for the “practice makes perfect” I love the way they look.
Can't wait to get started ~ thanks for the helpful hints!
Thank you for the clear pictures and instructions! Super job! I ordered an 'econo' set of stamps, and wanted to try it. You have great hints I wouldn't have even thought of!
Thanks for this tutorial …. I am ready to get started :-D
Bought my letters (1/8″) at Harbor Freights … spent $7.00 … figured it wouldn't kill me if I didn't like it. Can't wait to give this a go!
:-D
What kind of chains do you buy for your projects/charms? Do you just get them at Michaels?
hank you asking this Question…
I have this same question.”Chain ? If she shares this information I hope I can find out also.
Almost any store that sells jewelry supplies will carry ball chain. Michaels, Hobby Lobby, etc or you can find them online at several etsy sellers, from consumercrafts.com – just search for “ball chain”.
Adrianne, my daughter emailed me the link to your blog after I told her I wanted to make some of the metal stamped jewelry and I'm so happy she did. This is a great tutorial, the information here is perfect for those of us who are just starting out with stamped jewelry. I love the fact that you explained everything from the supplies needed to start out, all the way up to what a finished stamped jewelry piece looks like. Excellent job, thank you so much!
I agree – and I mentioned those here as things people will want to try once they've gotten the hang of it. But for a beginner (which is who this tutorial is aimed at) who may not even know if they enjoy stamping, it's not absolutely essential to purchase before getting started, and skipping them in your first round of supplies keeps the cost down enough to make it affordable to find out if they want to keep going with it.
great tutorial but I really suggest silver black or liver of sulfur to blacken and pro polish pads they are great for tarnish as well! just saying :)
Thank you so much for the fantastic tutorial, I just bought some stamps but were
Not sure how to use them, thanks again!
Thanks for the tutorial. I've been wanting to try Metal Stamping for a long time and you inspired me to go ahead and try it!
Very Cool! Great tutorial.
What a great tutorial! I'm pinning this. :)
Wow! I just want to buy the for my daughter.
Thanks for linking up @CountryMommaCooks link and great party. I really like this tutorial I can't wait to get to the hobby store and see what they have …I have leather letter punches do you think they would work? Hope to see you again at tomorrows party:)
This is so awesome and helpful! Thank you so much for doing this tutorial!
I'm your newest follower. I found you over at Take It From Me's blog hop! Maybe you could check out my blog too! :) xo
Katlyn
The Dreamy Meadow
Featuring on Thursday at Bacon Time!
Thanks for the tutorial, I don't know that I have the patience to try that! Thanks for linking up last week at whimsy Wednesday!
Now that's a total rock jewelry. They can either make the pick made of metal or by plastic.
artisan designer jewelry
So generous to share your knowledge of this. I have been searching for good directions for a while.
Great tutorial :) My daughter works at a camp and may do this with the kids this summer, I am sure this will come in handy. Thanks
Great tutorial! I feel like I could totally do this, which is terrible because I need a new hobby like a whole in the head! Thanks for linking up at What's Cluckin'
What a fabulous tutorial! Seriously. Now I'm so very tempted to run out and get me a stamp kit (not like I don't already have a million projects waiting to be done around here …)
:)
Linda
This was a great tutorial for beginners. I also make handstamped jewelry and when I first started, I got a really cheap set of metal stamps at the hardware store (Harbor Freight Tools)- only a few dollars with my 20% off coupon and practiced on cheap, metal washers also from hardware store.
Eventually bought more expensive stamps and blanks, but it was a cheap & easy way to test the waters.
Blythe
http://www.thedesperatecraftwives.blogspot.com
Thank you so very much for this tute! I have tried stamping and got so frustrated that I spent the money I did and hated it! Now I have a new inspiration to try and try again. Thanks again!!! Anne
That looks like so much fun! I need to look into getting this for me! Think of all the things you can make! Thanks so much for sharing at Thursday's Temptation.
Jill
WOW! What a fantastic resource! I have always been curious about stamping metal but one of the few tools my hubby doesn't own is a letter set. I appreciate all the tips and advice that you shared because I'm sure I'll give this a try one day. I love the look of stamped jewelry and know it truly is an artform. Such patience and precision.
Thank you again!
This is cool! I found stamps at Harbor Freight Tools. They were about 8 bucks for the alphabets and a few numbers and characters. I just need some metal now :)
These are awesome and a great tutorial as usual! But lets face it I'm never gonna make this… I will just look at your and be jealous of your AWESOMENESS!
FANTASTIC tutorial and great information. Someday I want to get into this myself, but for now I am trying to learn so many other things. However, I do chipart and when I stamp/emboss with that it is similar in that you can't hesitate or you get double impressions, etc… I also found people sold me stuff I didn't need when I started so I particularly appreciated your honesty in that area. I think you are doing a great job with your new hobby and I can see you selling these soon! Be proud hon, you are doing terrific!
Thank you for this tutorial, I am saving it for future reference!
Great explanations! Thank you! I purchased a stamp set recently but haven't really had time to play with it, but now I'm eager to try!
This is super helpful. Thanks so much for sharing!
Great tips; very well explained! I wish someone had told me all this when I started out!
Thanks for this info, I was considering buying a stamp set but wasen't sure what to get, what other supplies I would need etc. You answered everything!
Have a great week :)
hetkabinet.blogspot.com
This is a fabulous tutorial. Great advice initially on what to get and great advice on how to do with little tips at each step. Yay. I'm definitely pinning this to save for my career in metal stamping. :)
Great info Adrienne!! I have really wanted to get started in stamping. The think that holds me back the most is that I will end up hording all the supplies.:) Now I want to try it even more. I LOVE the way they look!! Thanks for the great tutorial.
Great tutorial! :D
I just got a full alphabet stamp set from the flea market for $20. So, stamping is in the very near future for me. I had planned on just winging it SO I am really glad I found your tutorial. You answered all my questions (even the ones I didn't know I should have). I am pinning and will definitely be back. Thank you so much!
amy @ whilewearingheels.blogspot.com
Great tutorial, Adrienne. I never knew how these were made, see them everywhere here in blogland. You've made it look very doable.
Great tutorial! I am just getting ready to embark upon my first stamping project! This could not have come at a better time! Thanks so much for all the hard work you put into making this tutorial! It will definitely make my project easier…
Jill @ Create.Craft.Love.
Thank you Adrianne!! I was really struggling with my stamping and you have given me some courage to give it another go! The masking tape idea is going to be a huge help!
This is great Adrianne!!! I've always been curious of the handstamped process…not sure if I would have the patience, but I totally LOVE the outcome :D
YOU ARE ALSOME I LOVE DOING THIS AND YOU SHARING MAKES IT NICE THANKS… I AM LOOKING FOR FONTS IN OTHER SCRIPT AND SIZE AND CURRENTLY ONLY HAVE CAPITAL PRINT IN 1/4″ AND NUMBERS AS WELL AS SMALL LETTERS IN 1/16″. LOOKING FOR OTHERS.