
Thank you Polyform for sponsoring this project.
Are you loving the polymer clay projects I’ve been working on? I have a couple more for you this week that I cannot wait to share, including today’s tutorial for making marbled beads (that you can, of course, turn into a fabulous piece of jewelry when you’re done). I put together this marbled bead bracelet made with Polyform’s new Souffle clay. The Souffle line is awesome for jewelry because it’s lightweight, and comes in trendy colors that are perfect for accessories. You can even blend colors together easily for whatever look you’re going for!

Here’s what you will need for making marbled beads:
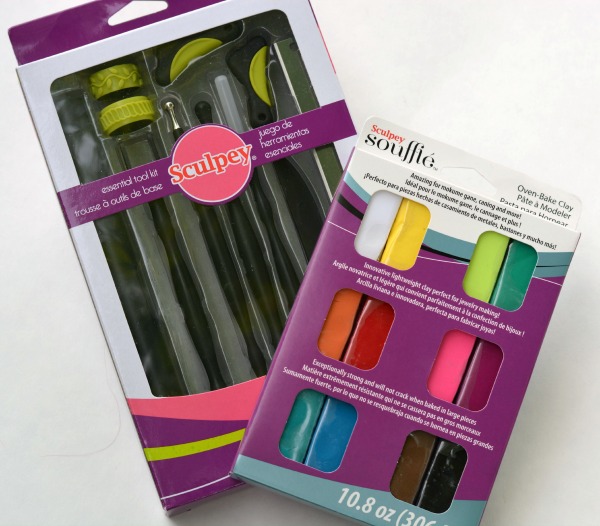
- Polyform Souffle Clay
- Clay tools (specifically, you’ll need the super slicer for even cuts, the clay knife for helping shape, a roller, and likely the needle tool to ensure you have even holes).
- Bamboo Skewers (or similarly-shaped item, for making channel-style holes in your row of beads)
- Wax paper and/or parchment paper for protecting your work surface (or a clay mat)
- Crafts-only baking sheet
- Jelly cord and optional spacer beads, for constructing your bracelet once your beads are finished
I want to offer a few notes on your supplies and tools. I’ve seen tutorials out there with people using kitchen utensils to create their projects, and that is fine – as long as they aren’t your active kitchen utensils. Clay is not food safe so you should keep your clay tools separate from your baking implements. If you are the type to hit up thrift stores or yard sales to pick up supplies for working with clay, then go for it, as long as you keep these items for crafting only when you’re done. I really recommend investing in the clay tool set, just so there’s no confusion as to which is which (and they are designed specifically for clay techniques) but don’t feel like you absolutely must buy all the supplies before trying a few projects out for the first time!
Now with that out of the way, let’s get to work! Cover your surface with parchment or wax paper to protect your table (you can also use a clay mat). Choose your colors, and you can blend them if you don’t have exactly what you like. You will need to take a moment to work with the clay to condition it to get it ready for your project. I found the souffle clay to be wonderfully soft compared to other formulas I have worked with. I was able to get to work right away.
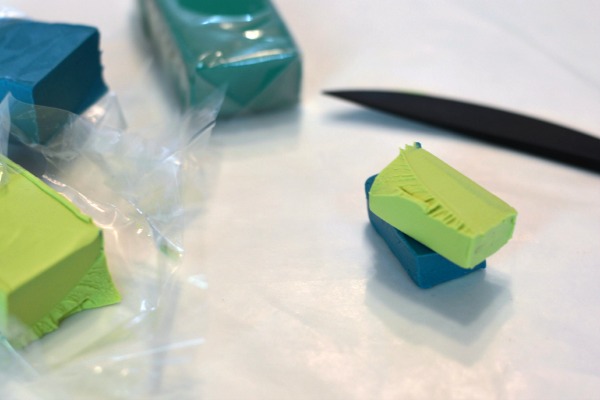
You can get the marbled look by stacking colors, and rolling them out flat. You can just use the hand roller, or I actually have a pasta-machine-style clay roller that works really nicely for getting a very uniform thickness.
Marbling can be a little bit tricky your first time trying it, because the key is to blend the colors of the clay enough that they are not fully mixed. I wasn’t going for the bold striations below, so I folded my clay and rolled it again, and repeated the process until I had a more subtle blend.

You want to make three layers here, all about 1/8 inch each (or if you have a roller machine, use the #1 setting). If you don’t get your marbling right the first time around, don’t sweat it. You can use that piece in the center, if you like. You need sheets that are about 7.5-8 inches long, and 1.5-2 inches wide.
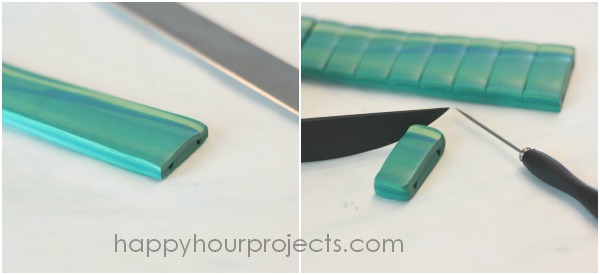
You will be able to use your beads in either direction (where either the fronts or backs show) so you’ll need 2 coordinating marbled layers that you like. Lay one down with the side you want to show facing your work surface. Stack the center layer on top of that, and set your bamboo skewers into the clay so that two channels are formed – these will become your holes. Use the roller to press the skewers firmly into the clay, and then remove them. Finally, stack you last marbled layer on top. Press it down enough to secure the three layers together but not so much that you roll it out flat.

Trim away the uneven edges with the super slicer. I cut my stack to about 1 inch wide by 7 inches long. You can see the holes running through all the layers in the photo below. Now, use the super slicer to cut the stack into uniformly-sized beads.
You can round the edges or trim the beads down to give you a more organic look, or you can keep them as-is for a more geometric style. If your holes get squished, use the needle tool to make sure they’re open all the way through the bead.
Now, bake! Mine needed about 45 minutes in a low oven. (275F for 30 minutes for each 1/4 inch thickness). They will feel slightly soft while they are still warm, so allow them to cool to ensure they’re baked. They will feel hard and not rubbery when they’re done.

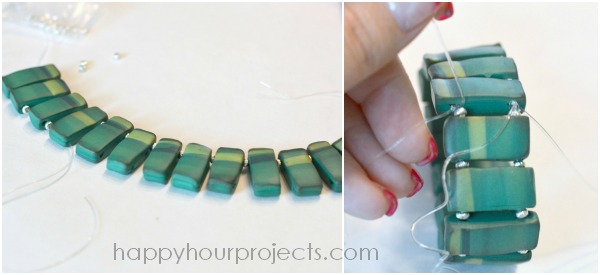
Once your beads have baked and cooled, it’s time to make them into a simple stretch bracelet (or, whatever project you had in mind)! You can place spacer beads between your clay beads if you like (these are a 4mm metal spacer). You’ll want to cut two lnegths of about 9-10 inches of stretchy jelly cord (mine is .8mm) for a final finished length of about 7 inches.
Once you’ve got both holes strung, tie the cords with a regular square knot (double knot). Just make sure it’s tight. Trim your ends away.
And now you have a fabulous, lightweight finished bracelet that is one-of-a-kind! I love mine and I’ve gotten several compliments on it.
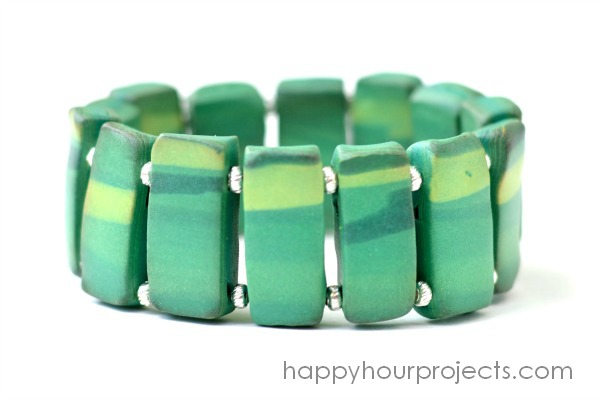
The finish is smooth, and it’s not heavy so it’s great for big statement pieces. You can also get creative and add crystals or metal findings as you work, it’s a really versatile formula that was created specifically with jewelry in mind.

You can keep up with what’s new at Polyform on Facebook, Twitter (@SculpeyPolyform), Pinterest, and Instagram (@Sculpey_Polyform), or just search #sculpeyprojects while you’re out on your social media! You can also browse some projects from some other awesome bloggers by browsing the collection below:
Thanks for joining me today for this fun project! What do you think? Are you ready to make your own beads now?

Gorgeous! I’m so daunted by clay, but you make it look easy, lady! Love this!
This turned out great- your jewelry is so creative and unique!
Very cute!! Love the colors!
You are so clever!!! I love the way you make the clay marbled.
This turned out so cool! I’m excited to try this clay out soon for an upcoming project!
This is so pretty! I really like the colors!
I love this!! Pinning it! Just got some of that clay to play with…
The voice of raaolntiity! Good to hear from you.