
Well, we got a head start on our Earth Day project for this year, and while it’s not all ready, the first part is a project in itself, so I wanted to share part one with you, which are some seed paper tags that you can plant right in your pot or garden, and are made from recycled paper.
This is a great project to recycle that little pile of junk mail that accumulates weekly. You can make these cute little tags up in just about any color, and add any kind of seeds.
I did a full tutorial on paper tags last year, so I am not going to be really detailed today. I’m just going to highlight a few points on making your own paper, and refer you to the original tutorial if you want to read up a little more on papermaking. Today’s tutorial will mainly focus on how to make your tags look like little planets. ;)

A few points worth mentioning, though – don’t use your normal blender for this project. Yes, recycling is eco-friendly, but the inks and chemicals in commercial paper are not necessarily food-safe. I found this blender at a thrift store last year and marked it crafts only. If you like this idea and want to give it a try, be on the lookout now for a cheap blender you can use just for papermaking.
I tore my junk mail into strips. To make it blue, I found a half sheet of blue scrapbook paper in my scraps pile, and added that to the mix.

I added plenty of water – like 3/4 of the blender full. You really can’t add *too much* water when you make your pulp. This is actually WAY more pulp than you need for a few tags. I got a little carried away with my recycling and only used about 10% of this batch of pulp on 10 tags. Ahem.
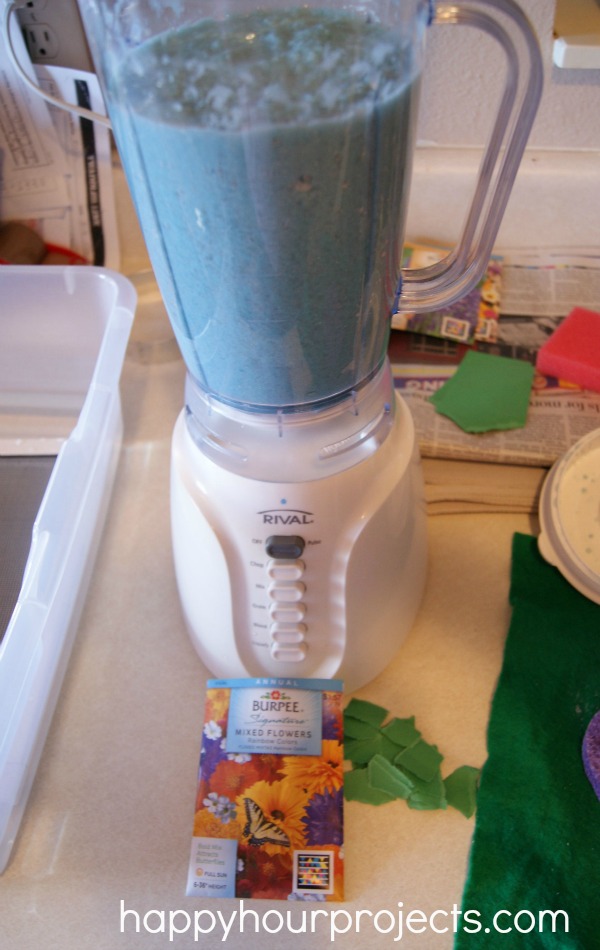
I tore up a few tiny scraps of green paper, and opened a packet of mixed wildflower seeds to prep them for tag-making. Don’t stir them in, these are best added in individually to each tag.
Now if you’re not already familiar with papermaking at all, you will want to take a time out and read over how I came to my current setup in the original papermaking tutorial. There are a lot of ways you could set up your mold, but I use a small screen inside a plastic bin. You need enough water in the bottom to cover your screen by about 1/2 inch.
For tags, you can just use a cookie cutter to form them. You just won’t want to use a cookie cutter that you use for cookies – keep your crafting cutters separate from your food utensils.
You just place the cutter on the screen, and push it into the water.

You will want to add just enough blue pulp in to not have any thin spots, but no more. This was about a Tablespoon of pulp. Add your green scraps if you’re making little planets, or if you want to add visual variety. Sprinkle the seeds on top. If you get thin spots or if it’s clumpy – just stir it with your finger underwater (make sure the water doesn’t go higher than the edges of your cutter – about halfway up is good). The screen will keep the pulp from falling through, and the cutter will keep the edges formed.
When you’ve got coverage you’re happy with (and a few trial runs are all you need to get the hang of it) – you’ll pull your whole screen out of the water, and when the water runs off, then remove the cutter.
Getting the paper off the screen is an interesting technique. And again, I’m going to refer you to the original papermaking tutorial if you haven’t tried this before. I’m just going to point out a few reminders here today.
Over a sink or even outside – anywhere you can press water out of your paper pulp – place a piece of wool felt on top of your tag. Press the water out with the tag between the felt and the screen. Remove excess water from the felt by absorbing it with a sponge – just press it on top of the felt (don’t rub it). You’ll know when you’ve removed enough water when you gently lift the felt and the paper tag sticks to it. If it’s not sticking, keep absorbing water out of the top of the felt until it does stick.
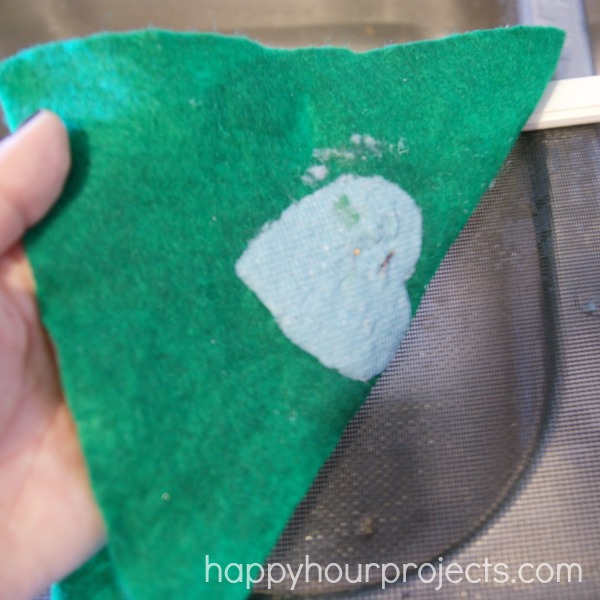
Now, just transfer the felt to a piece of newspaper – all you need to do is place it on top of the paper with the paper tag between the felt and the newspaper. Press down and gently peel off the felt – and the paper tag should stick to the newspaper. If it doesn’t stick well, press down on top of the felt with the sponge again like you did over the screen. I’m sure there’s amazing science at work here, and I have no idea what it is – I just know it’s crazy, but it works!

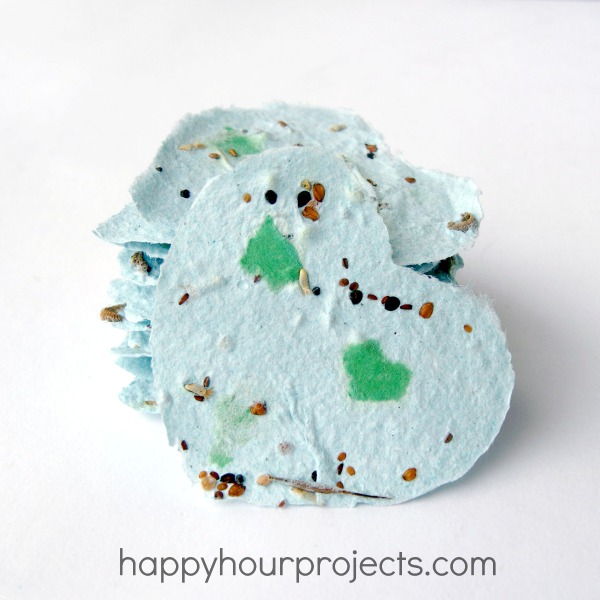
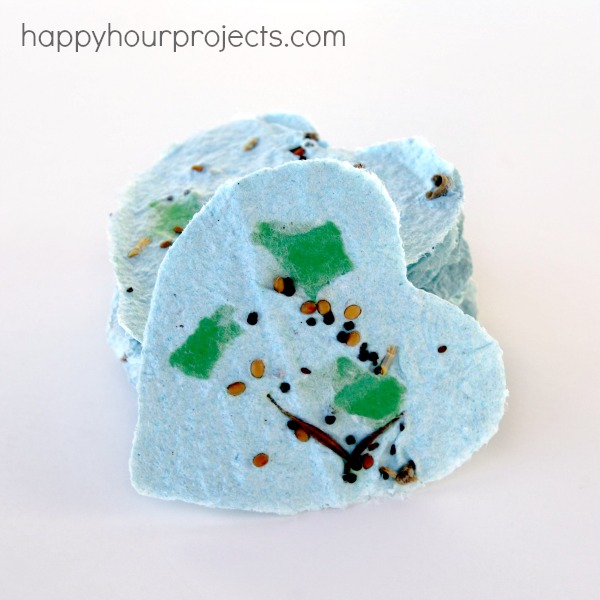
I let these dry for about 4 hours because of their small size, and then peeled them off the newspaper. Bigger tags might need longer. (And yes, I let them dry right on my kitchen tile floor.) I only made about a dozen tags, but I obviously had plenty of pulp to keep going and only used about half the packet of seeds. They dried like this – so pretty, don’t you think?

I’m excited to put together a sweet little Earth Day gift next month for some of our friends & family this year, but with as many steps that go into the paper tags, I wanted to show them to you separately and give you plenty of time to be on the lookout for your supplies and plan out your recycled project. This is only my second time making paper tags, so while I know from when I decided to try it out – it seems like it could be overwhelming or complicated, the learning curve is actually pretty fast. Once you get the hang of it, each tag will take you 2 or 3 minutes, so making up a dozen or so shouldn’t take more than an hour.
The beauty of these tags is not only did you repurpose junk and scraps to make them, but you can also just bury this tag in a pot or in your garden to plant the seeds and grow your own wildflowers (or herbs, or whatever sort of seeds you want to include)!
Happy recycling!!

Love this? Share it!
Let @happyhrprojects show you how to #recycle your junk mail to make gift tags that actually grow wildflowers! bit.ly/ZP9npw
— Happy Hour Projects (@HappyHrProjects) April 12, 2013
Since you add the seeds when the paper is wet, don’t they start to germinate? If they do, when the paper gets dry they will die and not grow, no matter how great the idea is. Have you had any problems with this?
7000K Final Fantasy XIV Gil in amfrit [US/NA Server] Sold, Customer Left the Review: Got my FFXIV Gil super fast! very friendly customer service! will dfintly order again from them. :)
super pretty! i wonder if you could make a large sheet of the seed paper and use a paper punch to cut out the shapes? hmmm…i need a crafty blender!
Hello, Adrianne. Thank you so much for the full DIY tutorial in making this fancy paper (the tags are just lovely!) and thanks for clarifying my long-time curiosity in crafters who use kitchen apparatus while making crafts. As you say, I often wonder if the use of blender or oven (baking clay & etc.) is food-safe. Appreciate your helpful note! :D
what a great idea! i will def. try it! thank you, adrianne!
Adrianne, I just love how you made these in the shape of hearts….I definitely need to do this…I have some new neighbors that just moved in and should add these to my welcome basket! :D
Such a cool idea!! I’m glad you said to use a craft blender…I wouldn’t want to ruin my good one…lol!!!
oh my, my- I couldn’t love this more! What a great idea- could use in a cute little gardening gift, aside from Earth Day :) Fun to see something so unique and your instructions are great! Pinning also :)
Just love these! Will have to try with my kids. Pinning it :)
These are so cute! I love that you have a blender container just for crafts, very smart. One day I’ll stop being lazy and make some of these.
Love this, Adrianne!
I love this idea!
I have to try it.. I think it’s a lovely pre-schooler project too!
Tx for sharing
MammaNene
SergerPepper.blogspot.it
What a great earth day project!
How clever!! Love it!
Love this tut! We bought some when we got married in 07 and gave them out as favors. Really love the idea of making our own. Thanks.
GREAT idea! P.S. I Love that you have a crafts only blender! That’s awesome!!