• Skip to primary navigation
  • Skip to main content
  • Skip to primary sidebar

  • home
  • about adrianne
  • buy the books
    • DIY T-Shirt Crafts (2015)
    • DIY Stamped Metal Jewelry (2016)
    • Rock Painting for Beginners (2019)
  • videos
  • crafts
    • diy beauty projects
    • kids’ crafts
    • paper craft projects
    • polymer clay
    • sewing projects
  • jewelry
    • bracelet projects
    • earring projects
    • necklace projects
    • jewelry tools & supplies
  • metal stamping
    • beginners’ tutorial
    • video tutorial
    • project ideas
    • metal stamping supplies
  • recipes
    • cocktail recipes
    • appetizers
    • main and side dishes
    • sweets and treats
  • by season
    • birthdays
    • new year
    • valentine’s day
    • st. patrick’s day
    • easter and spring
    • mother’s day
    • patriotic
    • fall
    • halloween
    • christmas
    • thanksgiving
  • privacy

Happy Hour Projects logo

03/26/2013

Spring Bling Week – Mixed Media Bracelet

I love making mixed media pieces and blending different elements into one piece of jewelry.  I picked up some turquoise nugget beads when I was on vacation last summer  – it’s my daughter’s birthstone – and I thought Spring  Bling Week would be a great time to get them out and start working with them!
Mixed Media Turquoise Bracelet
I have been fussing with a different style of end caps recently and I have two things to say – first, I LOVE the polished look they lend a piece – I recently used them for the first time on my Woven Wrap Bracelet.  And second… they are not as beginner-friendly as I like.  So today’s tutorial comes with a disclaimer that I will walk you through how to use them and they really make your piece look professional, but there is a bit of a learning curve and you will want to have some bead-stringing experience for today’s tutorial.  Mixed media pieces also mean you need all the kids of supplies for all the kinds of jewelry-making you’re about to embark on, so it can be quite a few supplies… but if you love jewelry already, I’d wager you probably have all these things already.
What I used in today’s bracelet:
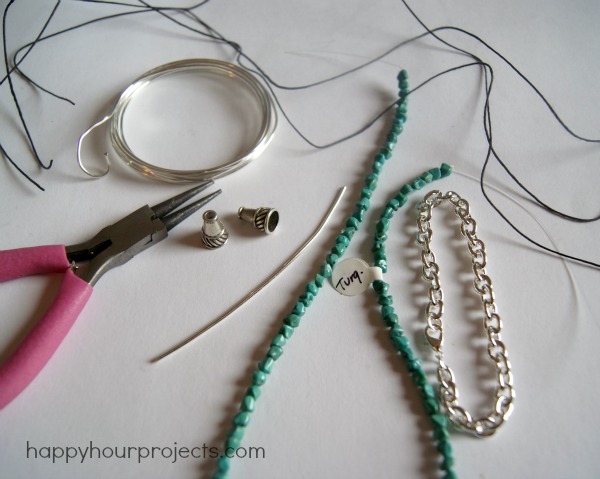
Mixed Media Turquoise Bracelet
  • A bracelet chain
  • 30 inches of hemp twine
  • 6 inches of drilled turquoise beads, beading wire, wire 2 guards and 2 crimp beads
  • 2 end cones, 6 inches of 16 gauge wire, and round-nose pliers
  • A clasp (I used a large lobster clasp)
Ready to get started?  You’ll need to start with one of your end cones.  I demonstrated this in a little more detail in my Woven Wrap Bracelet tutorial, so if you are still confused after reading this, you may want to check that one out, too.  But take about 3 inches of heavy gauge wire and make a loop at the end with your round-nosed pliers.  
Mixed Media Turquoise Bracelet
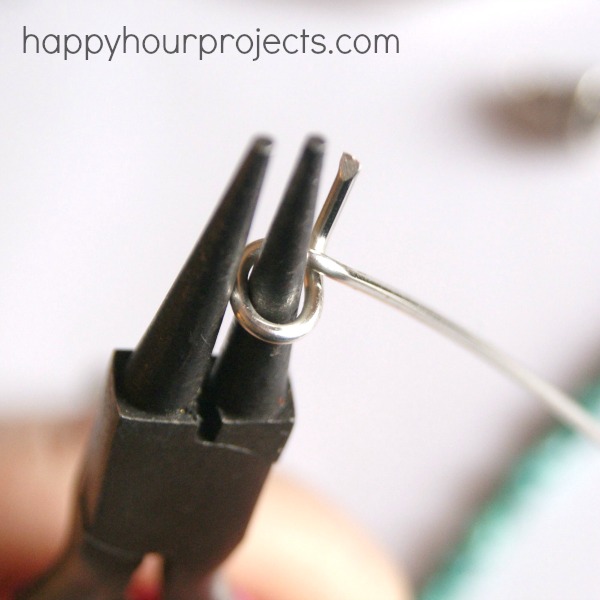
(Take a moment to make sure the loop-part fits withing your end cone before moving on.) :)  Make another one to finish off your other bracelet end.
Mixed Media Turquoise Bracelet
I don’t think it makes any difference which strand you attach first, I’ll just show you the order I went in.  You could also use any number of strands, leave out the hemp, add more beads – really, it’s up to you!!  I started with the hemp and tied on 3 ten inch strands.  I used a dot of glue to secure my knot before trimming the ends.  I braided them, but not until the end to make sure it was the same length as my other two strands.
Next, I removed the clasp from a bracelet chain and added that to my end cone loop.   I did remove about an inch of chain as well – the end cones and clasp add an inch or so of length, so you only need about 6 inches’ length on all of your bracelet strands.  Go ahead and attach the other end loop onto the other end of your chain.
Mixed Media Turquoise Bracelet
Third, I added a strand of beads.  I just cut about a 8 inch length of beading wire and attached that to the loop as well.  When you’re using wire, it will hold up over the long run much better if you loop it through a wire guide (the little U-shaped piece) and you can close it off with a small crimp bead.  Then, just string your beads!
Mixed Media Turquoise Bracelet
I beaded about 6 inches, the same length as my chain.  when you get to the end, close it off in the same way as what you started.  Last – braid your hemp or twine if you are using it, and when you reach the same length as your other two strands, tie it off on the closing end of your bracelet.
Mixed Media Turquoise Bracelet
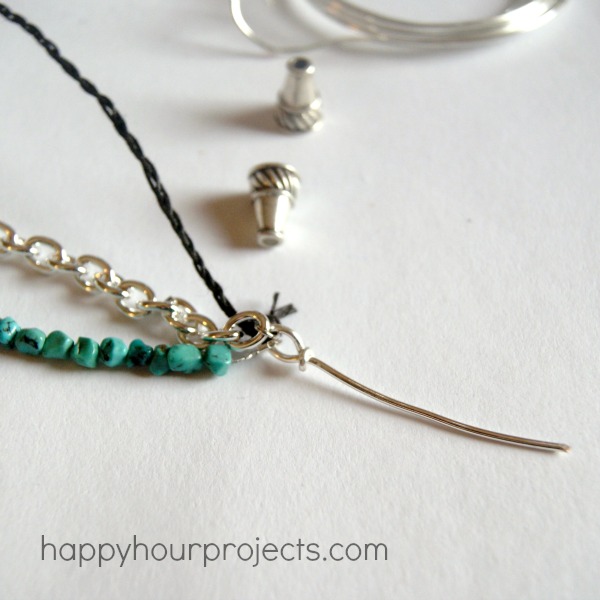
Now your bracelet should look about like this.  Not so pretty, is it?  This is where the end cones finish it off.  Slide one over each wire end.
Mixed Media Turquoise Bracelet
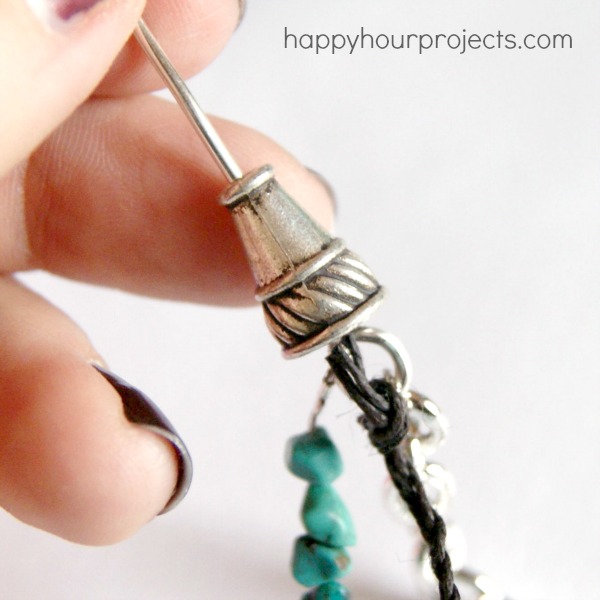
You’ll make another loop with your round pliers to close it off.
Mixed Media Turquoise Bracelet
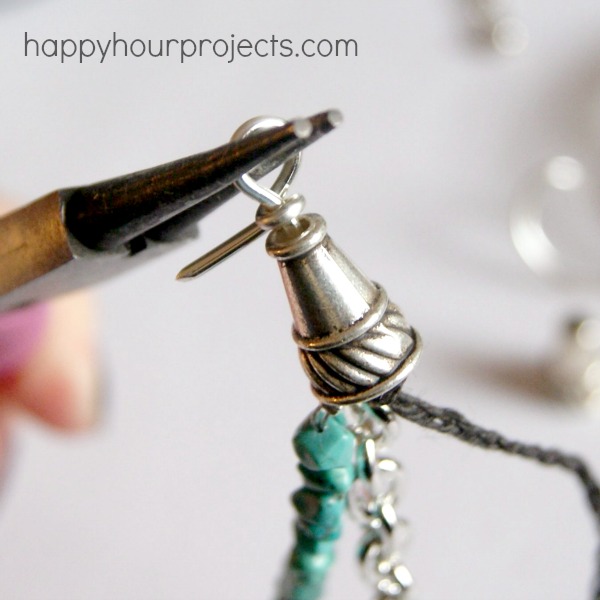
Add your clasp (I used a lobster clasp) to one of the ends.
Mixed Media Turquoise Bracelet
Using these end cones  is a style that takes some patience to finish, I’ll admit.  It’s not hard to do, but it’s a little fussy when you try it for the first time.  But it’s well worth the effort to do finish it off properly and professionally, it’s a much nicer look!
Mixed Media Turquoise Bracelet
Stay tuned for more tutorials right here all week, and you can check out a couple more jewelry projects today from Natalie at NorthShore Days and Rebecca at My Girlish Whims – just click the thumbnail photo to visit them!


Statement necklaceNecklace

Don’t forget to check out the other awesome bloggers contributing this week, too!
spring_bling_button
Holly from 504 Main
Kate from Cheap Crafty Mama
Kara from Happy Go Lucky 
Rebecca from My Girlish Whims
Natalie from North Shore Days
Amy from One Artsy Mama

Adrianne

Filed Under: Bracelets, Fashion, Jewelry, Tutorials Tagged With: bracelet, chain, hemp, mixed media, stone, twine

copyright policy and terms of use

I love it when you love my work! All tutorials and photos published at Happy Hour Projects are copyrighted. If you would like to feature my tutorial on your website or share it on your social media you may use one photo to feature, as long as you provide a link back to the original post.

If you feature a photo, it may not be accompanied by the project tutorial or recipe, whether in my own words as it originally appears or paraphrased by you. This also includes personal sharing on social media and Pinterest. Publishing multiple photos from a project, or including instructions with an accompanying photo are not permitted and you will be asked to remove them.

I love to share my projects, and my tutorials, recipes, and e-books are ALL free for your personal use. However, photos and ideas that are published to this site are my protected intellectual property. You may print them at home, but please do not copy or distribute them. I also allow all designs to be made and sold at fundraisers, craft fairs, etc. If you are selling a piece made from one or more of my free tutorials in your online shop, I require that you use your own, original photography, and include a link back to my website to credit me as the designer.

I hope you enjoy what you read here, and please be fair when you share!

Reader Interactions

Comments

  1. Lisa says

    04/16/2013 at 9:21 pm

    I love your creations!! Can you tell me where to get the findings? I can’t find those silver end cones anywhere. THanks.

    Reply
    • Adrianne says

      04/16/2013 at 9:36 pm

      I get most of my supplies at consumercrafts.com. Here is a link to their section of end cones: http://www.consumercrafts.com/store/browse/catalog/jewelry-findings-end-cones. That gives you a few options including the ones I used!

      Reply
  2. mbergman says

    04/05/2013 at 1:28 pm

    this was a great tutorial. clearly explained and your photos were amazing! i am not a jewelry maker but i can see how it’s done now. thank you.

    Reply
  3. Rebecca says

    03/27/2013 at 4:18 pm

    This is really pretty!! great job! :)

    Reply
  4. Crystal says

    03/27/2013 at 11:39 am

    Love the bracelet!! You make it look so easy and encourage me to try my hand at jewelry making. Thanks so much for the inspiration and tutorial!!

    Reply
  5. Kara says

    03/26/2013 at 9:33 pm

    Love this! Thanks for always sharing such fabulous tutorials!!

    Reply

Trackbacks

  1. Danilell | Pearltrees says:
    02/22/2015 at 7:03 am

    […] Spring Bling Week – Mixed Media Bracelet. Round Lace Bracelet FREE Pattern. The Round Lace Bracelet Pattern is one of my favorite free bead patterns. […]

    Reply
  2. Spring Bling Week – Druzy-Style Resin Necklace says:
    04/09/2013 at 7:10 am

    […] Monday I showed you a woven ankle bracelet made from hemp and a cabochon, and yesterday I made a mixed media bracelet with turquoise chips).  Today I want to talk to you about using resin in your jewelry […]

    Reply
  3. Spring Bling GIVEAWAY! says:
    03/29/2013 at 12:00 am

    […] Marker Spoon Pendant by Holly from 504 Main / Beaded Wire Earrings by Kate from Cheap Craft Mama / Mixed Media Bracelet by Adrianne from Happy Hour Projects / Color Block Earrings by Kara from Happy Go Lucky / Pearl […]

    Reply
  4. Clothes says:
    03/27/2013 at 11:39 pm

    […] Spring Bling Week – Mixed Media Bracelet […]

    Reply

Leave a Reply Cancel reply

Your email address will not be published. Required fields are marked *

Primary Sidebar

Hello, and welcome! I'm Adrianne, an artist, author, designer, and blogger in mid Michigan. I work from home, chase my two kids, and this once-city-girl is learning how to care for chickens and adjusting to life out in the country. I have a compulsion for daily creativity... sometimes it's jewelry-making, paper crafting, metal stamping, mixing and baking, or giving new life to recycled items. But with 2 young kids, time is short! My goal here at Happy Hour Projects is to share projects and tips that you can do in an hour or less. The ideas you find here are designed to add a little creativity in your day, no matter how much (or how little) time you have!

BUY MY BOOKS!

Copyright © 2022 Happy Hour Projects on the Brunch Pro Theme