• Skip to primary navigation
  • Skip to main content
  • Skip to primary sidebar

  • home
  • about adrianne
  • buy the books
    • DIY T-Shirt Crafts (2015)
    • DIY Stamped Metal Jewelry (2016)
    • Rock Painting for Beginners (2019)
  • videos
  • crafts
    • diy beauty projects
    • kids’ crafts
    • paper craft projects
    • polymer clay
    • sewing projects
  • jewelry
    • bracelet projects
    • earring projects
    • necklace projects
    • jewelry tools & supplies
  • metal stamping
    • beginners’ tutorial
    • video tutorial
    • project ideas
    • metal stamping supplies
  • recipes
    • cocktail recipes
    • appetizers
    • main and side dishes
    • sweets and treats
  • by season
    • birthdays
    • new year
    • valentine’s day
    • st. patrick’s day
    • easter and spring
    • mother’s day
    • patriotic
    • fall
    • halloween
    • christmas
    • thanksgiving
  • privacy

Happy Hour Projects logo

02/17/2014

Beaded Dollar Store Wine Glasses

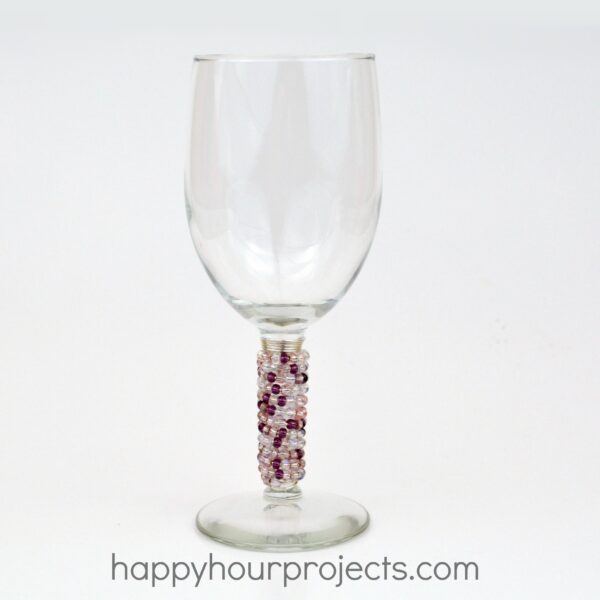
Now, I know some of you out there would never, ever cheap out on wine, or what kind of glass you drink it from.  That’s cool.  I get it.  I’m not a wine aficionado myself.  That means my wine glasses are from the dollar store, because they only come out of the glass rack a few times a year anyway.  (Oh, but my martini glass collection? Different story altogether.)  Whichever kind of fan you are, though – this is a fun way to dress up the stem of your fancy glass.  I thought beading the stem of the glass would be a fun alternative to wine charms, and a way to add color and flair.  See, I’m not much of a painter – I’m a beader.  So beads it is for me.  If you’re the same (or just like the look!) then I’ll show you today how to add beads to a wine glass.

Beaded Dollar Store Wine Glasses at www.happyhourprojects.com

What you will need:

Beaded Dollar Store Wine Glasses at www.happyhourprojects.com

  • A wine glass
  • Size 6/0 seed beads
  • 18-gauge wire (I like silver-plated copper)
  • Wire cutters and (possibly your jewelry pliers for securing the very edges)

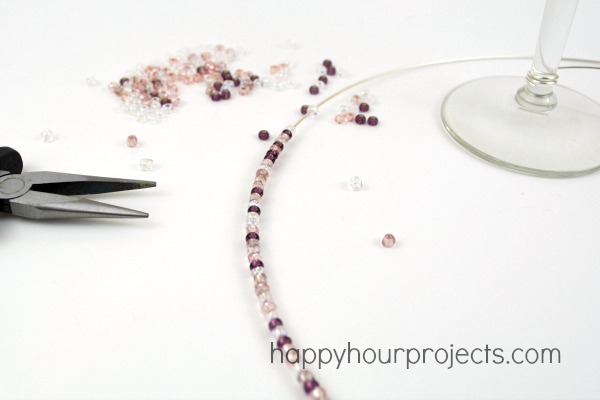
First, cut a length of wire about 4 feet long.  I know that sounds like a lot but keep in mind we will be going around the glass several times, because the beads are not that wide.

Wrap your wire around the base of your glass about 3 times.  You may find it won’t stay put, but that’s okay, it can rotate for now.

02

String on some beads.  LOTS of beads.  Like a couple feet.  You can do this a little at a time, and wrap as you go, or all at once – it won’t really matter.

Beaded Dollar Store Wine Glasses at www.happyhourprojects.com

When you’ve got your beads on, wrap the beaded wire around the stem.  I find it easiest to hold the beaded wire steady, and rotate the glass itself, but hey – if you have an easier technique, go for it!  When you get to the top, wrap your wire around the stem several times to finish it off.  Trim off any excess.

Beaded Dollar Store Wine Glasses at www.happyhourprojects.com

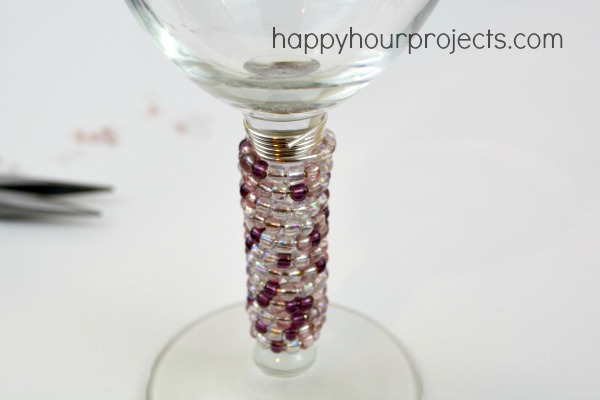
You might notice above that the very end of the wire sticks out ever so slightly.  Visually that’s no big deal but we are talking about something that people will have in their hands or may catch on a sleeve, so be sure you have it firmly around the glass.  Use your pliers if you need to to press it all the way against the glass.

And that’s it!

Beaded Dollar Store Wine Glasses at www.happyhourprojects.com

You can make each glass the same to match a party color scheme, or you can use a different color theme for each to help identify glasses.  It’s quick and it’s an inexpensive way to make your glasses unique.

So I have to ask – are you a wine fan?  What’s your favorite?

Adrianne Signature

Filed Under: Home Decor, Home Improvement, Tutorials Tagged With: beads, Dollar Store Crafts, wine glass, wire wrapping

copyright policy and terms of use

I love it when you love my work! All tutorials and photos published at Happy Hour Projects are copyrighted. If you would like to feature my tutorial on your website or share it on your social media you may use one photo to feature, as long as you provide a link back to the original post.

If you feature a photo, it may not be accompanied by the project tutorial or recipe, whether in my own words as it originally appears or paraphrased by you. This also includes personal sharing on social media and Pinterest. Publishing multiple photos from a project, or including instructions with an accompanying photo are not permitted and you will be asked to remove them.

I love to share my projects, and my tutorials, recipes, and e-books are ALL free for your personal use. However, photos and ideas that are published to this site are my protected intellectual property. You may print them at home, but please do not copy or distribute them. I also allow all designs to be made and sold at fundraisers, craft fairs, etc. If you are selling a piece made from one or more of my free tutorials in your online shop, I require that you use your own, original photography, and include a link back to my website to credit me as the designer.

I hope you enjoy what you read here, and please be fair when you share!

Reader Interactions

Comments

  1. teeth grinding solutions says

    10/27/2016 at 11:28 am

    I do agree with all of the concepts you’ve introduced to your post.
    They are really convincing and will certainly work.
    Nonetheless, the posts are very brief for novices. May just you
    please lengthen them a bit from subsequent time? Thank you for the post.

    Reply
  2. www.car-repo.com says

    09/15/2016 at 8:12 am

    Ha?ing b??n in an accident before, it w?uld ?ave ??en helpful tto h?v? a tpol li??
    thus to ?elp me g?t ?ll the inf?rmation I needed. Thhey want t? produce mor t??n just customer
    satisfaction ?nd true ?alue is th? main motive f?r these
    shops t? repair cars. ?n HVAC business can offer stable revenue ?nd remarkable growtyh
    opportunities.

    Reply
  3. a jewelry store says

    04/02/2016 at 2:52 pm

    Excellent, what a website it is! This blog provides helpful data to us, keep it up.

    Reply
  4. Marilyn says

    03/21/2014 at 1:39 pm

    These glasses are stunning!

    Reply
  5. David Miretsky says

    03/07/2014 at 6:24 am

    Interesting article.
    Thanks for sharing article.

    Reply
  6. Meegan says

    02/21/2014 at 10:19 pm

    These are just amazing! What a great gift idea. Thanks for sharing cute girl. Pinned :)

    Reply
  7. Cari says

    02/21/2014 at 9:21 am

    This is so cute!

    Reply
  8. Kathe says

    02/18/2014 at 4:55 pm

    I’m not a big wine drink but, I am a big tablescaper so, I love what you have done with the beads! I can see dressing up my glasses as needed! Thanks for the inspiration Adrianne!

    Reply
  9. Laurie says

    02/18/2014 at 4:37 pm

    This is awesome, love it! I am a red wine lover, not fussy on type of glass though! ;) My favourite wine is Apothic red, it’s a Californian blend… YUMMO! I’m totally a light weight ref martinis, we had a martini girls night once, ya lets just say I don’t remember going to bed! :/ Not my finest moment!

    Reply
  10. Crystal says

    02/18/2014 at 12:27 pm

    Love it! So pretty! I have plain wine glasses that we drink out of so this is going to be a great way to add some pizzazz. I just can’t see spending $20+ on one cutely decorated wine glass. Thanks for the great idea and tutorial!!

    Reply
  11. Melanie says

    02/17/2014 at 2:01 pm

    So pretty! I like the colors that you chose!

    Reply
  12. Amanda (Moming About) says

    02/17/2014 at 8:40 am

    I love your projects! This is very beautiful and so simple.

    Reply

Leave a Reply Cancel reply

Your email address will not be published. Required fields are marked *

Primary Sidebar

Hello, and welcome! I'm Adrianne, an artist, author, designer, and blogger in mid Michigan. I work from home, chase my two kids, and this once-city-girl is learning how to care for chickens and adjusting to life out in the country. I have a compulsion for daily creativity... sometimes it's jewelry-making, paper crafting, metal stamping, mixing and baking, or giving new life to recycled items. But with 2 young kids, time is short! My goal here at Happy Hour Projects is to share projects and tips that you can do in an hour or less. The ideas you find here are designed to add a little creativity in your day, no matter how much (or how little) time you have!

BUY MY BOOKS!

Copyright © 2026 Happy Hour Projects on the Brunch Pro Theme