
Good morning friends! We are coming up on warmer weather in my neck of the woods (finally!) which means we’re venturing out a bit more to visit the park, take walks, and all those other things that it’s difficult to do with a foot of snow on the ground. I mentioned a few months back that it’s my goal to get my family to drink more water, and I became an Absopure brand ambassador, sharing the things I love about our home delivery service. It has been wonderful having a water cooler in our home, and they also deliver bottles that we can take on-the-go. Today, I’m sharing a project that makes it even easier to bring a bottle of water along – a DIY water bottle sling for both kids and adults. This sewing project only takes about 15 minutes to make (less, if you’re really familiar with your sewing machine) and you’ve got a hands-free way to bring your water with you!

Now, it may not seem like much, but simple things like letting my daughter choose her own pattern for her own sling really got her excited about carrying her water. Anytime you can make it easy and fun to choose water over those less healthy alternatives, it’s a win. We rarely drank water when I was a kid, and it’s hard for me to choose water some days. I’m trying to make it easy for my kids, and Absopure makes it easy for me by bringing it right to my door once a month. So, let me show you how to make up a sling – or a whole set for your family – that’s perfect for field trips, hikes, and traveling.
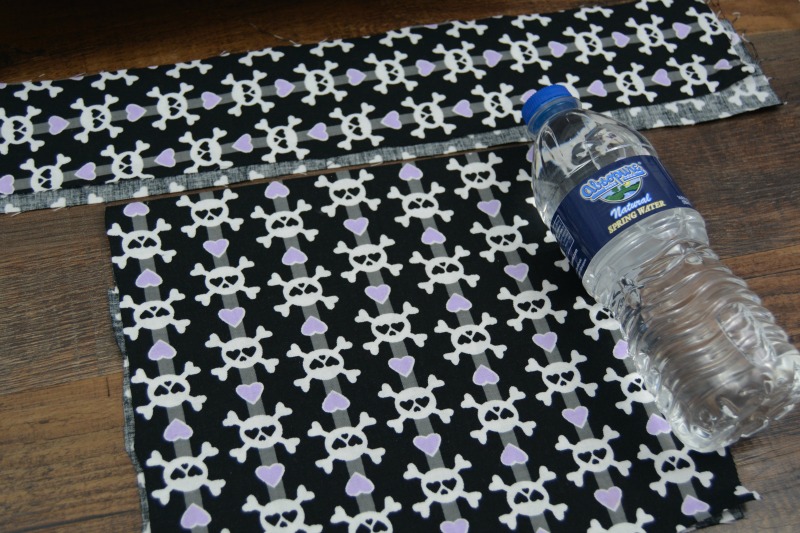
For this project, you will need to cut the following pieces from any kind of cotton, flannel, or canvas.
- 1 piece 18″ x 10.5″
- 1 piece 3″ wide x 48-72″ (strap length can be fitted to anyone)
- 1 piece batting (or felt) 9″ x 10.5″
I made the pouch more sturdy by quilting it, but if you are using a heavy fabric like canvas, you can skip this step. The quilting not only makes it look more polished, but it also offers a little bit of insulation as well. Iron all pieces out flat before beginning.
I mentioned above that you can use a bit of felt instead of batting. Because this is such a small project, I can’t justify buying even a craft size roll of batting. Unless you keep batting on-hand in your craft room, or you plan to make several slings, a $1 sheet of craft felt will do the job just fine.
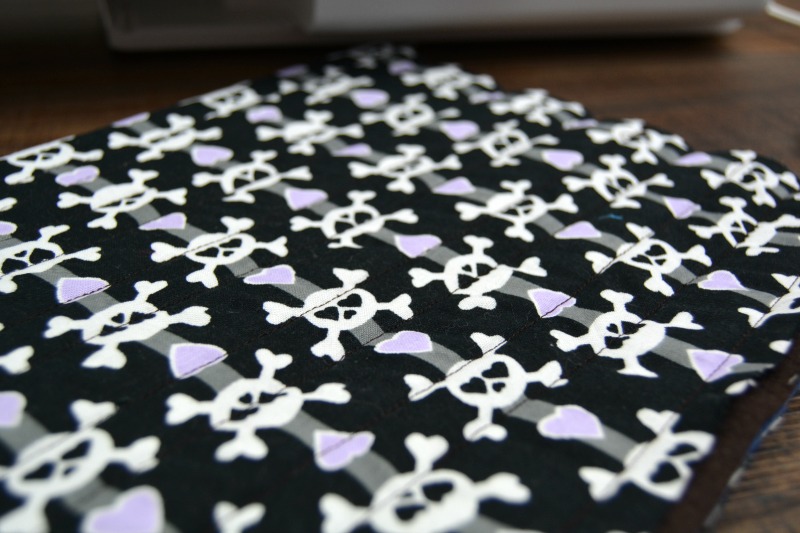
Fold the 18″ x 10.5″ panel in half so that you have two sides measuring 9″ x 10.5″. Slip the batting inside, between the sides of the fabric. I quilted quick horizontal lines for my sling, but you can be as creative as you want to be here! Trim away any uneven edges and square up your quilted panel.

Next, sew the two 9″ sides together, creating the sleeve for your water bottle. If you have a specific inside and outside, be sure that you’re sewing with the inside layer facing out. We’ll be turning this pouch right side out at the end. Stitch along the bottom edge (the rough edge where the batting shows) as well.

Next, prepare your strap. The strap can be fitted to any size person – just measure from the hip, up over the opposite shoulder, and back down to the hip. Add 6 inches to this length. For my 5 year old daughter, 48 inches was the magic number. (You can also make the strap adjustable by adding a slide, but I’m keeping the pattern ultra-simple for beginners.)
Fold the strap in half so that the long edges line up with the wrong side of the fabric facing out, and stitch along the edge. Turn the strap right side out – I like to use a big safety pin for this. Just secure it to one side of the fabric, close the pin, and feed it back through the tube. It will likely be wrinkly after you turn it, so press the strap flat with an iron before continuing.
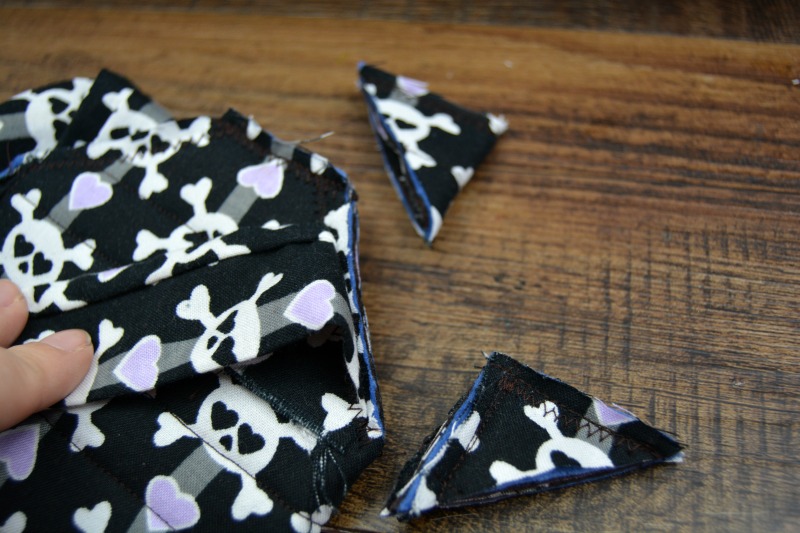
Arrange the strap along the bottom edge of the pouch, allowing 1.5 – 2 inches to overlap the pouch. Then, make a diagonal stitch 2 inches from the corner of the pouch. This will both secure your strap to the inside of the sling and also round the bottom of the pouch.
Cut away the excess from the corners, being careful not to cut the straps. Turn the sling right side out. Finally, stitch along the top edge of the pouch, securing the straps in place at the top of the pouch.

Now, slip a full water bottle inside, and bring it along with you next time you’re on the go! It’s also a great way to carry your empty bottle until you spot a recycling bin, or until you find a place to refill and re-use your bottle.
This pouch is designed to hold a 16.9 oz size bottle, but it can easily be re-sized to accommodate your favorite size bottle.

Thanks for joining me for today’s project, and I’ll see you guys again soon. Have a great week!

Note: As an Absopure blogger, I get occasional free Absopure products in order to share crafts and ideas involving water initiatives and recycling with you, my awesome readers. This post was not a paid promotion, and the ideas and opinions I share are all my own.
I love the idea of a DIY water bottle sling! It looks super easy to make and would be perfect for hikes or outdoor events. Can’t wait to try this out for my next adventure—thank you for the great instructions!
This DIY water bottle sling is such a clever idea! I love how easy it is to make and the fact that it can be personalized with different fabrics. Can’t wait to try this out for my next outdoor adventure! Thanks for sharing!
I love this idea! It’s such a simple yet practical DIY project. I can’t wait to try making my own water bottle sling for my next hiking trip. Thanks for sharing the step-by-step instructions!
What a clever and quick DIY project! I love how functional this water bottle sling is for outdoor activities. Can’t wait to give it a try for my hikes! Thanks for sharing!
This DIY water bottle sling is such a clever idea! I love how simple and quick it is to make. Perfect for carrying my water while hiking or just going for a walk. Can’t wait to try this out! Thank you for sharing!
What a fantastic idea! This water bottle sling is not only practical but also super stylish. I love how quick and easy it is to make. Can’t wait to try this out for my next outdoor adventure! Thanks for the great tutorial!
I love this idea! The water bottle sling is both practical and stylish. Can’t wait to try making one for my upcoming hikes. Thanks for the easy-to-follow instructions!
This DIY water bottle sling is such a clever idea! I love how easy it is to make and the fact that it keeps my hands free. Perfect for hikes or just running errands. Can’t wait to try it out! Thank you for sharing this project!
What a fantastic idea! This DIY water bottle sling is not only practical but also super cute. I can’t wait to try it out for my next outdoor adventure. Thanks for sharing such a quick and easy project!
I love this idea! The 15-minute DIY water bottle sling is not only practical but also super stylish. I can’t wait to customize mine with some fun fabrics. Perfect for keeping my hydration close during outdoor activities! Thanks for sharing this quick and easy project!
This DIY water bottle sling is such a clever idea! I love how easy and quick it is to make. Perfect for staying hands-free during outdoor adventures or picnics. Can’t wait to try it out! Thanks for sharing!
I love this idea! It’s such a simple yet creative way to carry a water bottle, especially during outdoor activities. I can’t wait to try making one for my upcoming hike! Thanks for the great tutorial!
I absolutely love this DIY water bottle sling idea! It’s so practical and easy to make. I can’t wait to try it out for my next outdoor adventure. Thanks for sharing such a fun and creative project!
I love this idea! It’s such a simple and fun DIY project. Perfect for keeping my water bottle handy while I’m out and about. Can’t wait to try it this weekend—thanks for sharing!
I love this DIY water bottle sling idea! It’s perfect for keeping my hands free during outdoor activities. The step-by-step instructions are super easy to follow, and I can’t wait to customize mine with some fun fabrics. Thanks for sharing!
This DIY water bottle sling is such a clever idea! I love how quick and easy it is to make – perfect for taking on hikes or just daily outings. Can’t wait to give it a try! Thanks for sharing!
I love this DIY water bottle sling idea! It’s such a practical and fun project, and the colorful fabric choices make it even better. Can’t wait to try it out for my next outdoor adventure! Thanks for sharing!
I love this DIY water bottle sling idea! It’s such a practical project, and I can’t believe it only takes 15 minutes. Perfect for my hiking trips! Can’t wait to try it out. Thanks for sharing!
This DIY water bottle sling is such a clever idea! I love how quick and easy it is to make, and it’s perfect for keeping my hands free while hiking or running errands. Can’t wait to try it out with some fun fabric! Thanks for sharing!
This is such a clever and practical DIY project! I love how quick and easy it is to make a water bottle sling. Perfect for outdoor activities or just to stay hands-free while running errands. Can’t wait to try this out! Thanks for sharing!
This DIY water bottle sling is such a clever idea! I love how quick and easy it is to make. It’s perfect for keeping my hands free during hikes or walks. I can’t wait to try out this project – thanks for sharing!
This DIY water bottle sling is such a creative and practical idea! I love how quick and easy it is to make. Perfect for staying hydrated during my outdoor adventures. Thanks for sharing!
Thank you for this simple project. My friend uses a cane and this is perfect for her days out and about!
I too am confused about attaching the straps to the bottom. Contrasting fabric for the strap would make it easier to see how the straps are placed and sewn. I still can’t figure out where the 1 1/2 to 2 inches of strap went.
Thank you for this pattern. I appreciate your work. I have made two holders now for myself. The second one I added a small pocket.
Been sewing for over fifty years this is one of the worst pattern I have every used from on line..way to big.does not come out like pic.shame,shame
That’s so uncalled for and mean. If you don’t have anything nice to say, keep it to yourself. This pattern never costed you anything, so if you didn’t like it, you should have just found a different one that is more suited to your needs
I like the pattern! I am just trying to figure how to put a little pocket for some cash. I paid 8.00 for a cell phone pattern that I had to keep redoing for bad instructions
????
If I pay you can you make me one….beautiful work…
Can’t wait to try this! What a great idea! Think I’m going to try to add a pocket for my cell phone..
I CUT THE FABRIC THE EXACT MEASUREMENTS YOU MENTIONED, BUT EVERYTHING SEEMS TOO BIG FOR A 16 OUNCE WATER BOTTLE !
Could you add more pictures of attaching the strap? The directions are not super clear and I’m not sure where to attach it.
I found the strap instructions confusing and the picture was not very clear
nice post
wow looking good
Thanks for great instructions. I handsew and this will look nice carrying water on walks. Happy day to you.
Thank you! I made this yesterday afternoon.
I have checked your website and i’ve found some duplicate content,
that’s why you don’t rank high in google, but there is a tool that can help you to create 100% unique articles, search for: Boorfe’s tips unlimited content
Hello,I log on to your new stuff named “15-Minute DIY Water Bottle Sling – Happy Hour Projects” daily.Your humoristic style is witty, keep doing what you’re doing! And you can look our website about proxy list.
OK…please help – where do I lay the strap at the bottom when I go to sew it on?
Thanks – Tami
Very sorry, but the sewing instructions are not very clear. I am a seasoned stitcher and it’s easy for me to figure out in my head, but if I were new to sewing, I would skip this tutorial because it isn’t clear enough for a beginner to understand. Maybe more pictures would help? Thank you for the great idea! It’s a lovely project.?
I’m new to seeing and videos are what I find most helpful…could a video tutorial be added to these written instructions?
Super cute idea! I’m trying to picture it in my head, are the straps coming up the entire length of the carrier on the inside and only attached at the bottom?
Yes, attached at the bottom, and reinforced again at the top so they’re secured in 2 places. I *almost* only attached them at the top, but I was afraid that over time the weight of the water might pull too heavily on those seams. You probably could by sewing the typical “X” reinforcement, but I also didn’t want the stitching to be evident on the outer quilting. So you could do this several ways! But I hid my stitching by sewing the straps into the bottom, then running a final line of stitching to secure it along the entire top edge of the pouch part.
My daughter used this sling ALL summer, anytime we went walking. It hasn’t shown any wear and tear except a little kid-dirt! So while you should feel free to make any modifications or simplifications, this passes the durability threshold I had in mind when making it up!
Would like to see a picture of the bottom. I’m like Amy, got down to the exact same place with your instructions and was lost with how to finish. Need picture of the bottom and help with:
Arrange the strap along the bottom edge of the pouch, allowing 1.5 – 2 inches to overlap the pouch. Then, make a diagonal stitch 2 inches from the corner of the pouch. This will both secure your strap to the inside of the sling and also round the bottom of the pouch.
Cut away the excess from the corners, being careful not to cut the straps. Turn the sling right side out. Finally, stitch along the top edge of the pouch, securing the straps in place at the top of the pouch.
Thanks for your help. Maybe it is the pattern on the fabric you are using that is making it confusing for me.
This is a brilliant idea I have sewn one before but had problems with securing the strap, so was well happy when I saw your tutorial for a water bottle sling I have made three so far for my grandchildren I put a slider on the strap and made it longer so there can use it as they grow, now making one for myself thanks for such as easy to follow tutorial , I have signed up for your newsletter and look forward to seeing your future tutorials thanks Janet for sheerness in Kent England x
I got it. Just having a moment. haha!
novice here. I’m almost done, but I’m having trouble with this part.
Arrange the strap along the bottom edge of the pouch, allowing 1.5 – 2 inches to overlap the pouch. Then, make a diagonal stitch 2 inches from the corner of the pouch. This will both secure your strap to the inside of the sling and also round the bottom of the pouch.
can you help?
I, too, am having trouble with this step. I feel a step is missing! I have sewn together the 2 sides, but am unsure how to attach the strap. Do I attach it along the entire length of the bottom 10 inches? Then the top has to be finished, but no instructions. I sure could use some more pictures. THANKS
I’m so jazzed to have found this project! and its a recent post.
I have a question about the bottom of the bottle holder. I think I am a little confused on how to sew the bottom. It seems like a circle should have been cut out & sewn to the bottom of the holder. I know I must have missed where the bottom is sewn, since no one else have questioned it. Can you tell me how the bottom gets sewn? Thank you.,
You certainly can cut and sew a circle, but I wanted to keep the design very easy for beginners and pinning and sewing a circle can be tricky when you do it for the first time. When it’s inside out, just stitch across the bottom to close it off – and at this point, you should also sew the strap to the bottom of the pouch as well. Then, sew diagonally across the two corners about 2″ from the side and bottom. Cut off those triangles. This will give you a more square bottom than round, but as it’s a soft pouch, those corners won’t be very visible and they won’t be uncomfortable.
Thank you for sharing this wonderful project. I have a question though. If I wanted to use a product called Insulbright to keep the water cold longer would I have to use it in addition to the batting or would I be able to use the Insulbright alone? Thank you!
I haven’t worked with Insulbright at all, but I looked it up to try to answer your question. Now, I’m not sure how easily you could quilt that type of layer? But I would use that instead of batting inside. The batting I used (and cheated by just using felt) was almost strictly for a stiffer form with the extra padding. So this design is exremely flexible about what you can put inside – I’d just use the insulbright if I were in your shoes. Hope that helps!
This is so easy to make and something new can be made so easily. Nice Idea shared. thanks
What a great idea! I usually don’t bring water on walks because between the leash, bags and phone I’m usually out of pockets or hands.
I need a couple of these for our family. I have lost a few water bottles (the refillable kind) in the past few years. I love this idea.
Looks cool and trendy. Love the whole look and style of this bottle sling.
You make this look so easy and with so many types of fabric the sky is the limit to what I could do with this – how fun!
You make things looks so easy. i wish I know how to use a sewing machine. If I’d sit down and spend the time I would get it.
That’s super cute! Good idea and good job making it!