
So as I’m going through my daughter’s backpack, I pull out the October calendar to discover, today is “green” day. At her preschool, every Thursday there’s a color the kids are supposed to wear. She owns zero green things, because she’s 3, and it’s meltdown-inducing to even suggest an article of clothing that is not pink or purple… I don’t even buy anything but pink or purple, it’s a waste of money, haha. But still, the theme is green, so I thought I’d whip up a quick accessory for her so that she can participate. Okay, I confess, I just don’t want to give the impression that I’m the mom who totally forgot. Like on “red” day. Ahem. But this is a win-win because it doesn’t mess with her pink-is-my-favorite-color insistence, it broadens her pint-sized horizons ever so slightly, and hey, it also sparkles.

And with that, color day is saved. Assuming I remember to have her put it on for school this afternoon, I mean.
While you may not be battling the same color dilemma, I did want to share my design tips when it comes to jewelry for kids. First of all, it needs to be as indestructable as possible. So instead of using standard jump rings (which can pull apart if not cared for) I used split rings (which is just a tiny version of the way a key ring operates). I also opted for a magnetic clasp so that she can put it on and take it off by herself. And finally – sparkle is good. :) These are just a couple of crystal rivets I set, and it’s also not even real leather. it’s synthetic (because at 3, you don’t care anyway, haha).
I’m going to leave links in case you’re looking for what I used to put this bracelet together. If you make a purchase from Goody Beads using these links, it does benefit my blog at no extra cost, but I really leave you product links as more of a convenience so you can grab specs or even do some quick shopping if you’ve been having trouble locating the products I use in stores.
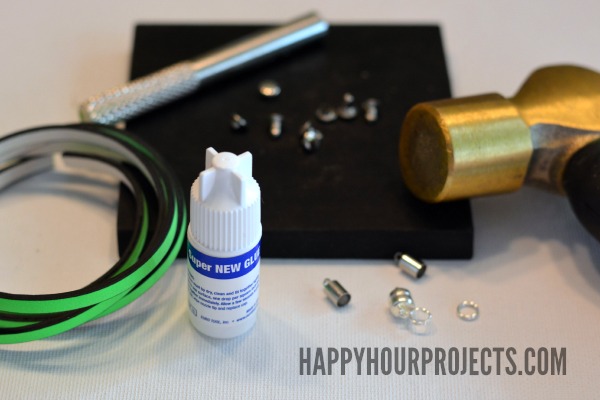
You will need:
- 5mm flat leather (or in my case, synthetic leather) – I needed 4 inches for my 3 year old but this will vary a lot depending on the size of the child.
- Glue-on end caps, a magnetic clasp, and split rings (because this was very very last minute, I used a basic 4mm cap and a separate magnetic clasp, but this would make up even more easily with a magnetic flat leather clasp like this one)
- Super New Glue
- Leather punch for a 3/32 hole
- Crystal Rivets
- Rubber block and crystal rivet setter
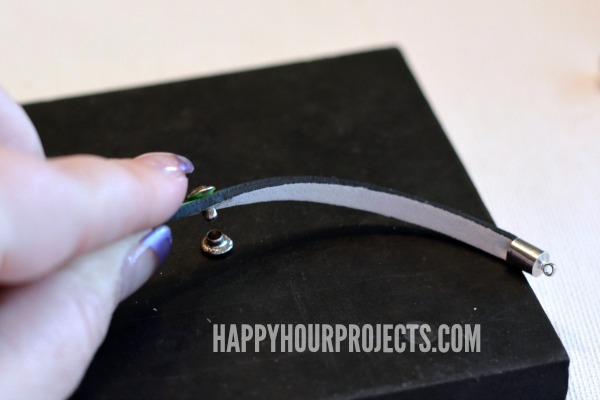
First, I measured little miss’ wrist and found I needed a tiny length of 4″. I glued on the end caps – and you can either do the same and add a basic magnetic clasp, or get a clasp set that glues on directly to the leather. Had I more time to plan, I would have bought a special clasp, because it’s easier and finishes more nicely. But, fortunately for me, my daughter doesn’t mind anyway. :)

I added the clasp on with the split rings as soon as the glue set (it only takes about 5 minutes), and then I punched holes at the center to set the rivets.
You need 3/32 size holes for these rivets, you can use a leather pnch for this, or I was lazy and just used my metal punch since I had it handy at my table. I punched three holes for three sparkly rivets.
To set the rivet, just push the crystal side through the hole and snap the backside on.
Then, turn it facedown on your rubber block, place the setter tool on the back side, and hit the top of the tool with your hammer a couple times to set it permanently. The rubber is to protect the crystal from cracking.

Then, all that was left was to let my daughter put on her special new accessory! (Which I do not have a photo of because she wasn’t about to stand still – and besides, I’ll spare you the messy hair, half set of jammies, and where she managed to color her own chin with marker. It’s adorable to me and indicates a day full of fun, but it’s not a sight for the masses, lol!)

This bracelet could easily be made in a 7-7.5 inch adult size as well, and adults can generally manage any type of clasp. But for kids – the magnet is perfect! (Just don’t let them near your LCD TV with magnets!)

[…] Easy Kids’ Crystal Riveted Bracelet – 1 freebie(s)? […]