
Hey friends! I have an upcycled project for you today that’s easy and fun, just raid your goodwill pile for a t-shirt. With a few strategic cuts, you can turn an old tee into this mesh produce bag with just one line of stitching – OR, I’ll show you a no-sew alternative!

See, if you read here often, you may have noticed I haven’t been sharing as many posts these past couple of weeks. It’s not because I’ve been cutting back on the quick and easy crafts – it’s actually the opposite. I’ve been hard at work on a book about ways to recycle your old t-shirts (stay tuned this summer!) and I wanted to share a quick idea with you here today!
Here’s how to make a mesh produce bag from a t-shirt:
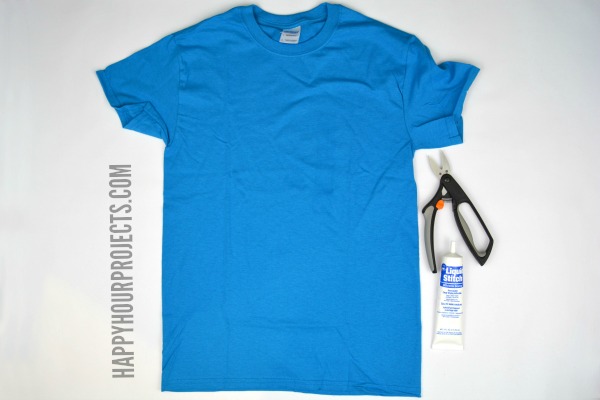
You will need:
- A t-shirt (this is a men’s medium, though any size shirt will work, you’ll just get a different size bag)
- Sharp scissors (I have been using my spring-loaded ones lately, but regular scissors are fine too)
- Permanent fabric glue like Liquid Stitch – or whatever your favorite brand is
First, cut the body of the shirt away from the top just under the armpits. About 3 inches from the bottom hem of the shirt, cut a small strip of fabric out that will become your handle. My strip is about 1/2 inch tall by 4 inches wide, and you can see from the photos I’ve included in this post that it stretches to make a handle large enough to slip over your arm. If you just want a hand-carry handle, I’d make the strip no more than 2 inches wide.

Cut through both layers of the shirt in rows, making 1-1/2 inch cuts horizontally about 2 inches apart. For each row, move down the shirt about one inch, and stagger the cuts so that they are offset in between the row above it. Keep in mind that the holes will stretch, and you can always make the holes larger if you want, but you can’t make them smaller once you’ve cut! Stop cutting about 4 inches from the raw edge you cut, which will be the bottom of your bag.

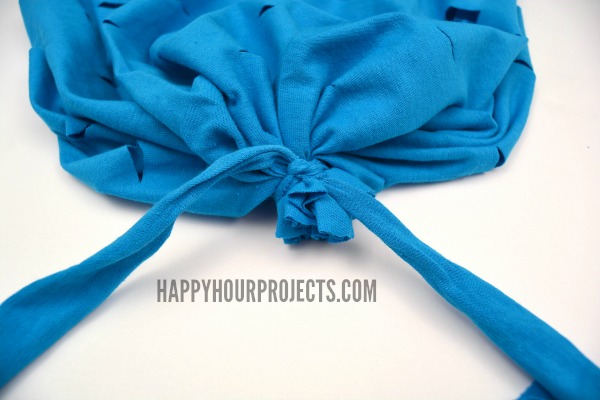
Now, turn your bag inside out to close the raw edge. If you sew, that’s the most secure way to finish it! Adding a simple zigzag stitch will increase the weight the bag can hold. That said – I know not everyone can sew or has access to a sewing machine. There’s an easy way to finish the bottom without any sewing required!
Gather the raw edge together, and liberally add fabric glue at the gathered folds. Cut a 3-inch wide strip of fabric from the top part of your shirt (the length doesn’t matter much, just make it at least 6 inches or so, to give you plenty of room to tie it off) and tie a double knot very tightly around the gathered folds. Add a dot of fabric glue to the knot as well. Leave about an inch or so for the tails, but you can cut off the excess. Let the glue dry overnight before using the bag.
As you can see, I used the tie-off method to finish my bag. I added 8 lbs of oranges to my bag, and it didn’t give at all! I am totally confident about that amount of weight, but I didn’t test it to see how much more I could carry. (That many oranges wouldn’t fit on my “model” without falling off, though – this half-full bag as pictured only weighs 4 or 5 lbs.)

The mesh holes allow for air flow around your produce, but the holes aren’t so large that most kinds of fruits or veggies would fall through. I did get a little low with my bottom-most row of holes, so I certainly can’t put a bunch of carrots in here – but if you keep your holes at least 4 inches up from the bottom of your bag, you won’t have that problem.
This bag took me less than 10 minutes to make, which, you know is my kind of craft project! I will have the book draft finished up in the next couple weeks and I’ll be back to my normal schedule around here, but if you liked this project then stay tuned this summer for a WHOLE collection of ideas for recycling your old t-shirts!
See you guys soon ~

Great projects… I’d love to see more.
Hello there I am so excited I found your webpage, I really found you by accident, while I was researching on Askjeeve for
something else, Nonetheless I am here now and would just like to say kudos for
a marvelous post and a all round interesting blog (I also love
the theme/design), I don?t have time to read it all at the minute but I have
saved it and also added your RSS feeds, so when I have
time I will be back to read a great deal more, Please do keep up the awesome jo.
Wond?rful items from you, man. I’ve tak? note your st?ff previou? to and you’re just extremely great.
I really lik? what you have acquired right here,
certainly lik? what you are saying and the w?y in which in which you say it.
You are making it entertaining and you still tak? care of to stay it smart.
I can not wait to learn much more from you.
That is rea?ly a wonderful website.
This produce bag is an awesome bag for most anything especially when going to the farmers market or flea market. I have one bag with holes and one without. Looking forward to more ideas on your T-shirt project creations. ? ?
Expertly organized, these traveller shirts
continue by the current appreciation and world vogue standards.
He said he was fine with that, but there was one person who couldn’t live there.
Leah withdrew from her classes, against the advice of her
academic counselor.
I really like this idea. I haven’t found very many recycled T-shirt ideas that I really like. but this is one I will get good use from. I have an idea about the no sew bottom that might help give a little more strength to it. About an 1 1/2″ to 2″ from the raw edge make another row of slits about 1/2″ long horizontally around the whole shirt and take the 3″ wide strip of fabric you cut to gather with and cut it to make a long string like piece, thread it through the slits you just cut, then gather it all together as you said and glue with the fabric glue and pull it tight and tie a knot in it let it set over night, then when it is dry you can tie it in a bow at the bottom.
You know I love this, Adrianne! Any way to keep a plastic bag from coming home with me is something I like!
Are you shopping with this bag? I am thinking about the weight, when weighing your fruit or produce. LOVE recycle ideas!