
I guess in addition to being on a glass tile kick, I’m also on a basket kick lately. Let me just say – I am in LOVE with making these woven baskets!

They are surprisingly sturdy! I had leftover yarn from my last yarn basket project, and since I don’t knit or crochet… what in the world do you do with leftover yarn? So I did a little searching for more yarn projects. After ruling out all the kid crafts, and I’ve already done a tutorial on yarn balls, I finally hit on an Etsy shop that sells these woven baskets and I loved the look of the baskets. In true DIY-spirit, I thought, I could try that! So I finally found a tutorial at The Crafty Tipster. That particular tutorial was awesome for pointing me in the right direction, but it didn’t have very many photos, and of course, I made a few tweaks of my own to the instructions.
Now, this is definitely more time-consuming than my usual projects – set aside three or four hours for a small basket, more time for a larger one. And while I can’t speak firsthand since I don’t knit or crochet, I would assume it shapes up like most weaving projects – repetitive, but simple enough to set down anytime and come back later. (Important when you have a kiddo who likes to wander off looking for trouble!)
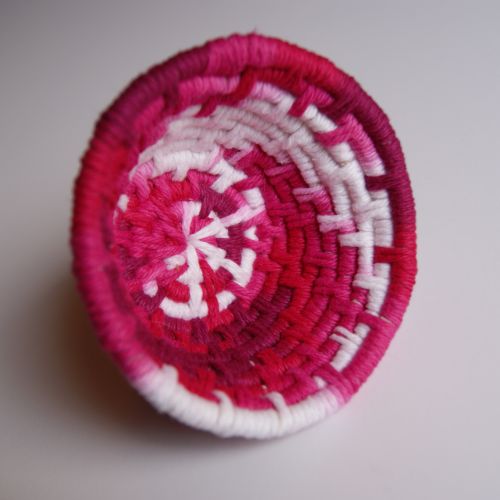
I showed off the brown basket above because it’s my favorite. I love that earthy brown color. The tutorial will feature this pink and white one, which was my first attempt. The two turned out totally different just by making a few adjustments.
Time: 3-5 hours
Supplies:
- Yarn – I didn’t use anywhere near a whole skein on either small basket
- Clothesline, Cord, or Rope
- Large, blunt needle
- Scissors
For my initial attempt, I just picked up a 50′ clothesline from the dollar store. I think it was 3/16″ in diameter. I went thicker for the brown one (I picked out ten feet of some 3/8″ rope at the hardware store for the brown one) and I liked the “chunky” look better, but choose whatever you like or whatever is available. Just keep in mind, the smaller diameter rope you use, the more rounds you’ll have to wrap, and the longer it will take.
Now, if you checked out the other tutorial I referenced, I took issue with the very first step. The suggestion is to thread your yarn on a sharp needle and thread it through the clothesline. It says you will need pliers for this. I thought that sounded like an excellent way to accidentally stab myself. So I did not thread it, and I thought it worked just fine to wrap the tail – with an extremely slim chance of injury that way too.
First, I cut off a length of yarn that I felt would be manageable to work with. It was about 6 feet. You don’t need to be exact – it needs to be short enough you can stitch securing loops, but long enough you don’t have to add more yarn any more often than you have to. Thread your blunt needle with one end of your cut yarn.
Then I just held the other end of the yarn close to the cord:
And wrapped it.
Then I bent the end in half (I tucked the little tail against the cord so it got wrapped up too – you’ll see in a few photos):
And wrapped up where the two pieces of cord touched, so that I had a rounded end on a single cord, basically. It’s easier to show you than to explain:
I hope it doesn’t get confusing – I’m using a variegated colored yarn. So expect the shade to change as I work. The contrasting colors do help illustrate in some places. :) Anyway – back to work. When I had a little bit wrapped down the cord, I started rolling it, creating the round center of my basket.
When I had made a few wraps, I made two securing stitches with my needle, one:
Two.
Then I wrapped my yarn a few more times around my cord (maybe 4 or 5 loops?) and then placed two more securing stitches.
(I didn’t mean to throw you off by turning it around, I was trying to get a good in-focus photo – but I guess I was just having a shaky night or a bad setting or something! Sorry some of these photos turned out so blurry… these are sadly the better ones. Maybe I will take some replacements and update the next one I make.)
Anyway – there’s the original tail sticking out where I’m wrapping – I never bothered to trim it, I just wrapped it up. Then, just keep alternating – wrapping the cord, then two stitches. It doesn’t matter which direction you wrap – as long as you are consistent through your whole basket. When your circle begins to get bigger, I did go a bit farther between my securing stitches. You can stagger your stitches however you like the looks of them, as long as your base feels secure.
Easy. Easy, easy. Repetitive, but easy. The only thing you really need to watch out for is to keep your wrapping tight, so that the cord underneath doesn’t show. I found as I worked that the first loop I made after my securing stitches was the most susceptible to gaps showing. So just keep that in mind, and adjust your loops a little tighter if you need to.
At some point, you will run out of the length of yarn you cut and will need to add more to keep going. Rather than tie your ends together (because a knot will create a bump) you will just wrap the ends under your loops (the same way I started the center).
Again, this is more difficult to explain than it is to do. Basically, point the end of your old yarn down your cord, in the direction you are working. Cut a new length of yarn (again, I used around 6 feet at a time) and thread your needle. Lay your new yarn down along your cord, with the tail facing the same way.
Begin wrapping again, getting those tails secured under your loops.
At some point, you’ll decide your base is large enough, and begin building the sides of your basket. All you need to do is raise the cord slightly, and position it on top of the last row you finished.
I didn’t plan my first basket well enough – I should have woven a bigger base. I think I was just anxious to begin work on the sides, and see my basket take shape! :P So it turned out to be more cone-shaped than I originally envisioned. It’s deep enough, but the base is narrower than I like – you’ll see what I mean in the next few photos. I made the correction when I made the brown basket – wider base, straighter sides – and I was so much happier with the shape.
Now – all you do is just keep weaving, and add more yarn whenever you need to. Eventually, you’ll decide your basket is done. When I got to that point, I cut off my cord. It immediately frayed. If you are using a plastic cord, you might choose to singe the edge to keep it from fraying (be really careful if you do!) but that wasn’t even an option for me with my cotton cord.
So, I wrapped it in a little bit of masking tape. I tried to taper the end so that it would blend better into the rim.
I wrapped to the end, and when I got nearly there, I also wrapped the end and the next row down. I kept going until my end was totally covered. I made a few stitches to the underside of the row, and knotted it off.
I’m sorry you can’t see my knot, but that’s kind of the point. :P
You’ll note that there are places where you can see my cord through my weaving. I was much more careful on my next attempt – but I point it out as a what-not-to-do. Make sure all your wrapping covers your cord!
But with my basket finished…
…there was nothing left to do but make another, after learning from my mistakes!
I used the same yarn throughout my basket, but you’ll need to add new pieces several times before you’re done. I didn’t use anywhere near a whole skein on either attempt – so if you have leftover yarn from other projects, you can try weaving in strands of other colors, creating stripes. I can see weaving lids, too – or just different shapes, out of different yarns or even fabric strips. I’d love to see your version if you make one, drop me a note!
I link up to these great parties!
~ Adrianne
So glad I found this! I had one a couple of these in high school 35 years ago (Gulp). These are fun to make and with so many new yarns available these days the possibilities are endless.
Hi! Th?s ?s my first comment here so ? just wanted
to give a quick shout out and tell yo? I
r?ally enjoy reading through your posts. Can you suggest any other b?ogs/??bs?tes/fo?ums that
deal with the same topics? Thanks!
Too bad the photos aren’t visible any more. I guess I’ll have to go to the site you mentioned instead.
The photos would definitely be helpful. I’m a visual learner so my search for a tutorial continues.
This is cool ?
Yes it is. They are pretty sturdy depending on how tight you wrap and depending on the color scheme you choose, very nice decor.
I really like the brown basket. I can’t wait to try! Thanks for sharing!
I want to make a child’s toy basket but want to put two handles on either side. Would it be sturdy enough to hold up if the base was about 15″ wide? And would I just make two handles out of the same covered rope?
It depends on what you expect out of the basket It will definitely hold toys in, but for toddlers leaning on it, it wouldn’t support weight on the edge of the basket.
For handles – I might just try leaving a “slit” in each side – instead of connecting one of the upper rows to the row beneath it, wrap it individually in that spot for a few inches, you’d be able to fit a hand in for carrying that way.
Hi! Thankyou so much!I crochet and sew and embroider and do one stitch of knitting so I have quite a bit of yarn.I am going to do this as soon as I finish my crochet shawl and do the embroidery on it.I love this,and I have all the things needed.I apologize for all my punctuation mistakes and such I am only 11.I love Josefina Montoya ,the American girl,so I have wanted to basket weave forever.Thanks again.
how stiff are these? I was thinking that they would be great for the harvest in my garden, if they were a bit taller, i would also braid a strap to go around my neck so i could use both my hands to pick berries or whatever. this is really cool and i am going to the dollar tree next time i make a trek into the village down the mountain.
i don’t know how stiff they are but you could also tie the basket around your waist so the yarn wouldn’t be up against your neck. you would also have to be careful because you could stain the basket
how do you make a lid for it?
you start to do the base and you do not raise the cord up keep going and then end it
Ooooh! I love this idea, Adrianne!!
Pinned and will be trying this soon! I crochet and so I have TONS of yarn :) Thanks so much for sharing at Mom On Timeout!
Really lovely. Thank you for teaching me something new today. I had no idea how these kinds of baskets were made. Lots of work indeed.
Thank you for linking it up at our Valentines party. A new party will open today at http://www.finecraftguild.com/party/, and we hope you will submit new projects/tutes and show off your wonderful work!
Rose
Cute, Cute!! I defiantly have the yarn for it! Thanks for sharing with us at Link It Up Thursday.
That is SO cool! I'm not sure I'd have the patience to do it, but I just love how they look! Thanks for the tutorial!
I have always started these and NEVER finished one! They are so time consuming and hard on the hands when you want to make a curve. (I always use raffia though, I like the brown you used! Looks like twine.) Kudos to you for completing not one but two!!!
Love these baskets. Thanks for showing me how to create them!
Oh, just checked out a couple of your other posts…great blog! I'm now your newest follower and added your freestyle friday button to my blog. I plan to link up this week. I'm so glad I found you!
Marilyn
4you-withlove.blogspot.com
I have always wanted to learn how to make this kind of basked….THANK YOU!!!!
I love these. And maybe these are baskets I could actually make. Thanks for sharing.
I really like how that turned out. That brown one would look great in the bathroom filled with little soaps and the like. Cute.
What a cute idea! I might just have to try that!
Oh my is that neat! I'm going to try making this with my daughter, thanks! I hope you stop over and share at Mix it up Monday:
http://flourmewithlove.blogspot.com/2012/02/mix-it-up-monday.html
I hope to see you soon:)
I can see how this took a long time! It came out really cute though! Very nice :)