• Skip to primary navigation
  • Skip to main content
  • Skip to primary sidebar

  • home
  • about adrianne
  • buy the books
    • DIY T-Shirt Crafts (2015)
    • DIY Stamped Metal Jewelry (2016)
    • Rock Painting for Beginners (2019)
  • videos
  • crafts
    • diy beauty projects
    • kids’ crafts
    • paper craft projects
    • polymer clay
    • sewing projects
  • jewelry
    • bracelet projects
    • earring projects
    • necklace projects
    • jewelry tools & supplies
  • metal stamping
    • beginners’ tutorial
    • video tutorial
    • project ideas
    • metal stamping supplies
  • recipes
    • cocktail recipes
    • appetizers
    • main and side dishes
    • sweets and treats
  • by season
    • birthdays
    • new year
    • valentine’s day
    • st. patrick’s day
    • easter and spring
    • mother’s day
    • patriotic
    • fall
    • halloween
    • christmas
    • thanksgiving
  • privacy

Happy Hour Projects logo

06/09/2014

Hammered Wire and Leather Bracelet

Last week I showed you a quick pair of hammered wire earrings, and promised I’d have more to match this week.  I incorporated a little bit of leather cord into this bracelet to match with the organic look of the hammered metal, and I couldn’t stop at just one cord!  Take a look today, and I’ll show you how to make these simple hammered wire bracelets.

HAmmered Wire and Leather Bracelet at www.happyhourprojects.com

You can add as many cords as you like to this design (and you can certainly stop at one, if you prefer a more minimalist look).

What you will need:

  • 1mm leather cord
  • Fold over cord ends
  • Jewelry glue
  • Clasp and jump rings
  • 12 gauge aluminum wire
  • Wire cutters
  • Chasing hammer
  • Bench block or anvil
  • 1/16″ (1.6mm) metal hole punch
  • Optional but helpful, nylon pliers

Hammered Wire and Leather Bracelet at www.happyhourprojects.com

I’m going to borrow the photos from my earring post to show you how to create your metal accents for the bracelets.  If you read that post, you’ve seen this already, but if you’re seeing this post first, then let me share again!

If you’re working off a coil, you may want to straighten your wire with nylon pliers before you get started.  Any curve in your wire will be retained once you start banging on it.  It will take on a more organic shape once you start manipulating it, but I wanted it as straight as possible to start.  Cut off equal-length pieces of wire for each cord you’re planning.  I cut mine about 1.5 inches – anything between 1-2 inches will work.

Hammered Wire and Leather Bracelet at www.happyhourprojects.com

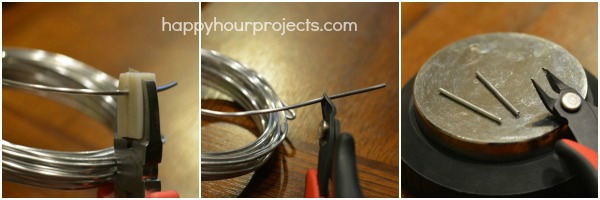
Next, I started at the ends of each piece, flattening with the flat end of my hammer.  The flatter it gets, the wider it gets, and that’s what will accommodate a hole being punched.  I also hammered the center, but not as much, so it’s got a thinner appearance in the middle.  Once I had a shape and size I liked, I turned my hammer over and texturized with the rounded side.  Finally I popped a small (1/16?) hole in both ends with my screw-down hole punch.  (If you have a hand punch, that’s fine too – this is just what I have for making holes.)

Hammered Wire and Leather Bracelet at www.happyhourprojects.com

Next, it’s time to add the accents you just made onto your cords.  Cut 7.5 inch cords for each metal accent.  Feed an end of the cord so that the ends come up through the bottom of your piece, as shown below.  Center it on the cord.

Hammered Wire and Leather Bracelet at www.happyhourprojects.com

Next, glue on the cord ends.  This style of end cap folds over and crimps on.  Just add a drop of glue for security, and then crimp onto the end of your cord.  Do this to all the ends, so that you have a ring to work with.

Finally, just attach your clasp with a jump ring – you can add just one cord, or you can do like I did and add several.  I used three for this project, in two colors.

Hammered Wire and Leather Bracelet at www.happyhourprojects.com

Jump add a jump ring to the other end of your cords to finish it off, and that’s it!  You can experiment with different colors, different lengths of wire, and more or fewer cords for a look all your own!

Hammered Wire and Leather Bracelet at www.happyhourprojects.com

Adrianne Signature

Filed Under: Bracelets, Featured, Jewelry, Metal Stamping, Tutorials Tagged With: accessories, bracelet, layered, leather, metal, metal stamping, wire

copyright policy and terms of use

I love it when you love my work! All tutorials and photos published at Happy Hour Projects are copyrighted. If you would like to feature my tutorial on your website or share it on your social media you may use one photo to feature, as long as you provide a link back to the original post.

If you feature a photo, it may not be accompanied by the project tutorial or recipe, whether in my own words as it originally appears or paraphrased by you. This also includes personal sharing on social media and Pinterest. Publishing multiple photos from a project, or including instructions with an accompanying photo are not permitted and you will be asked to remove them.

I love to share my projects, and my tutorials, recipes, and e-books are ALL free for your personal use. However, photos and ideas that are published to this site are my protected intellectual property. You may print them at home, but please do not copy or distribute them. I also allow all designs to be made and sold at fundraisers, craft fairs, etc. If you are selling a piece made from one or more of my free tutorials in your online shop, I require that you use your own, original photography, and include a link back to my website to credit me as the designer.

I hope you enjoy what you read here, and please be fair when you share!

Reader Interactions

Comments

  1. Debra says

    06/19/2014 at 4:07 pm

    I’m loving your site and all of the great info. This is making me want to try my hand and metal stampings and metal hammering.

    Thank you so much and I will be coming back!!!

    Reply
  2. Debra says

    06/19/2014 at 4:05 pm

    I’m loving your site and all of the great info. This is making me want to try my hand and metal stampings and metal hammering.

    Thanks and I will be coming back!!!

    Reply
  3. Ashley Nicole says

    06/13/2014 at 1:31 pm

    Those look so fun and easy. :D

    Reply
  4. Kelsy with Loose Ends says

    06/10/2014 at 10:59 am

    Cute bracelets. I loved the earrings you made the other day too.

    Reply
  5. Rebecca says

    06/09/2014 at 9:10 pm

    This is such a good idea! I’ve made the simple earrings before but never though about using it in a bracelet! So fun :)

    Reply
  6. Alli says

    06/09/2014 at 7:42 am

    I love how the silver adds a little bling to the bracelet. I’m in awe at how the wire was hammered out! Incredible and beautiful!

    Reply
  7. Danielle says

    06/09/2014 at 7:31 am

    These are so pretty! Bet they make great gifts.

    Reply
  8. Mitzi says

    06/09/2014 at 7:20 am

    I love the ‘light’ feel of this bracelet, so it can worn as is or layered. Love it :)

    Reply

Leave a Reply Cancel reply

Your email address will not be published. Required fields are marked *

Primary Sidebar

Hello, and welcome! I'm Adrianne, an artist, author, designer, and blogger in mid Michigan. I work from home, chase my two kids, and this once-city-girl is learning how to care for chickens and adjusting to life out in the country. I have a compulsion for daily creativity... sometimes it's jewelry-making, paper crafting, metal stamping, mixing and baking, or giving new life to recycled items. But with 2 young kids, time is short! My goal here at Happy Hour Projects is to share projects and tips that you can do in an hour or less. The ideas you find here are designed to add a little creativity in your day, no matter how much (or how little) time you have!

BUY MY BOOKS!

Copyright © 2026 Happy Hour Projects on the Brunch Pro Theme