• Skip to primary navigation
  • Skip to main content
  • Skip to primary sidebar

  • home
  • about adrianne
  • buy the books
    • DIY T-Shirt Crafts (2015)
    • DIY Stamped Metal Jewelry (2016)
    • Rock Painting for Beginners (2019)
  • videos
  • crafts
    • diy beauty projects
    • kids’ crafts
    • paper craft projects
    • polymer clay
    • sewing projects
  • jewelry
    • bracelet projects
    • earring projects
    • necklace projects
    • jewelry tools & supplies
  • metal stamping
    • beginners’ tutorial
    • video tutorial
    • project ideas
    • metal stamping supplies
  • recipes
    • cocktail recipes
    • appetizers
    • main and side dishes
    • sweets and treats
  • by season
    • birthdays
    • new year
    • valentine’s day
    • st. patrick’s day
    • easter and spring
    • mother’s day
    • patriotic
    • fall
    • halloween
    • christmas
    • thanksgiving
  • privacy

Happy Hour Projects logo

07/10/2014

Ultra-Easy, 2-Knot Ribbon Wrap Bracelet

I love sharing projects with you that are so easy, they feel like cheating – and today is one of those.  I’ve seen a lot of ribbon wrap bracelets around lately and took the plunge myself – spending all of about two minutes putting this one together!  Seriously, it took me longer to haul out my supplies than it did to actually make this.  This is definitely one of the fastest jewelry projects that I have ever shared.  It takes 2 knots, minimal supplies, and no special tools – and check it out:

Ultra Easy, 2-Knot Ribbon Wrap Bracelet With Charm at www.happyhourprojects.com

Goody Beads sent me these supplies to see what design I’d come up with, so I’ll leave links to the products in case you want to make your own!  This bracelet is earthy, it’s trendy, and it only takes these supplies:

  • 36″-40″ ribbon (depending on your wrist size)
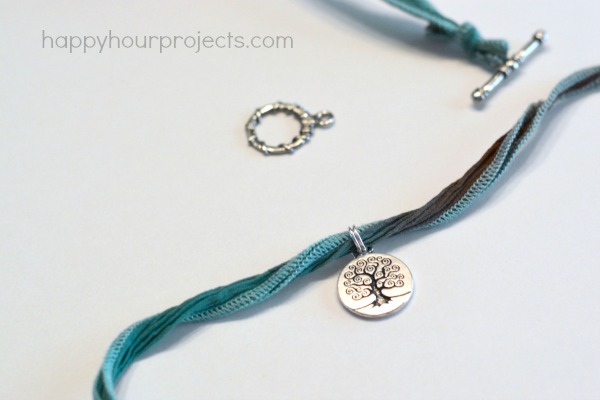
  • 19mm Tierracast pewter tree charm
  • 6-7mm Jump ring(s)
  • Toggle clasp (or clasp of your choice, it just needs a hole large enough to accommodate your ribbon)

Ultra Easy, 2-Knot Ribbon Wrap Bracelet With Charm at www.happyhourprojects.com

You’re barely going to believe this is all it takes, but here goes.  Thread one end of your clap through the ribbon, and tie an overhand knot to secure it.  You can trim off the excess or not, as you like.  (I did.)

Ultra Easy, 2-Knot Ribbon Wrap Bracelet With Charm at www.happyhourprojects.com

Next, add a jump ring (or two, I like the look of a double ring) to the charm.  Thread that onto the ribbon.

Ultra Easy, 2-Knot Ribbon Wrap Bracelet With Charm at www.happyhourprojects.com

Now, add the other end of the clasp to the other end of your ribbon.  You may want to take a moment before tying it to make sure it’s the right length when you wrap it.  I like my wraps to be snug, but design yours in whatever way feels most comfortable to you.

Just like the first end, tie an overhand knot to secure it.

Ultra Easy, 2-Knot Ribbon Wrap Bracelet With Charm at www.happyhourprojects.com

Trim the ends, if you like, or leave them loose.  And that’s it – it’s ready for wear.  My finished length was about 28″ total, for 4 wraps.

Ultra Easy, 2-Knot Ribbon Wrap Bracelet With Charm at www.happyhourprojects.com

It’s a really simple but stylish statement piece.  Kind of bohemian – and I really love it!!  It screams SUMMER to me.

Ultra Easy, 2-Knot Ribbon Wrap Bracelet With Charm at www.happyhourprojects.com

All the designs I share, I encourage you to put your own spin on – but this can be made really personal by choosing your favorite color, mixing ribbons, and finding that charm that’s special to you.  If you read here often, it should come as no surprise that I picked a tree. :) I love trees!

What’s your style?  What kind of charm do you see on this design?

Adrianne Signature


Filed Under: Bracelets, Fashion, Featured, Jewelry, Tutorials Tagged With: 10-minute project, accessories, bracelet, charms, ribbon, wrap

copyright policy and terms of use

I love it when you love my work! All tutorials and photos published at Happy Hour Projects are copyrighted. If you would like to feature my tutorial on your website or share it on your social media you may use one photo to feature, as long as you provide a link back to the original post.

If you feature a photo, it may not be accompanied by the project tutorial or recipe, whether in my own words as it originally appears or paraphrased by you. This also includes personal sharing on social media and Pinterest. Publishing multiple photos from a project, or including instructions with an accompanying photo are not permitted and you will be asked to remove them.

I love to share my projects, and my tutorials, recipes, and e-books are ALL free for your personal use. However, photos and ideas that are published to this site are my protected intellectual property. You may print them at home, but please do not copy or distribute them. I also allow all designs to be made and sold at fundraisers, craft fairs, etc. If you are selling a piece made from one or more of my free tutorials in your online shop, I require that you use your own, original photography, and include a link back to my website to credit me as the designer.

I hope you enjoy what you read here, and please be fair when you share!

Reader Interactions

Comments

  1. Aundrea Barnhart says

    05/04/2017 at 4:34 pm

    So cute!! Can you tell me where you find the Sari ribbon with the surged edges? Thanks!!!

    Reply
    • Karie says

      08/20/2018 at 10:14 am

      Did you get your answer on where to find ribbon?

      Reply
      • Kathy says

        03/29/2019 at 4:01 pm

        I would love to know too!

        Reply

Trackbacks

  1. Easy DIY Projects With Ribbons - Drency Ribbons & Crafts Community says:
    12/29/2016 at 4:34 am

    […] (Full tutorial in Happy hour projects) […]

    Reply
  2. Easy DIY projects with ribbons | Drency says:
    08/28/2016 at 5:22 pm

    […] (Full tutorial in Happy hour projects) […]

    Reply
  3. Best DIY tutorials of the week - Andrea's Notebook says:
    07/13/2014 at 11:59 am

    […] Ribbon wrap bracelet by Happy Hour Projects. […]

    Reply
  4. Ribbon Wrap Bracelet | One Artsy Mama says:
    07/12/2014 at 9:30 am

    […] have to.  I’ve also included instructions for non-stampers, or you can check out this great tutorial from my buddy Adrianne over at Happy Hour Projects.  Here’s a look at how I made […]

    Reply

Leave a Reply Cancel reply

Your email address will not be published. Required fields are marked *

Primary Sidebar

Hello, and welcome! I'm Adrianne, an artist, author, designer, and blogger in mid Michigan. I work from home, chase my two kids, and this once-city-girl is learning how to care for chickens and adjusting to life out in the country. I have a compulsion for daily creativity... sometimes it's jewelry-making, paper crafting, metal stamping, mixing and baking, or giving new life to recycled items. But with 2 young kids, time is short! My goal here at Happy Hour Projects is to share projects and tips that you can do in an hour or less. The ideas you find here are designed to add a little creativity in your day, no matter how much (or how little) time you have!

BUY MY BOOKS!

Copyright © 2026 Happy Hour Projects on the Brunch Pro Theme