
I whipped up a pretty leather bracelet over the weekend that I want to share with you as a great quick project. This is another fantastic beginners’ jewelry piece, because all you need to be able to do is cut and glue to make it happen! I put this together in about 5 minutes – no joke! You’ll want to wait an extra 5 minutes before wearing it for that glue to set all the way, but I’m not exaggerating when I tell you, this takes no time at all.

Because the supplies are specific, I’ll leave you links below in case you’re going for the exact same look. I got mine from Goody Beads, and these are affiliate links. (That means if you make a purchase, it supports my blog, at no extra cost to you. Win-win.)

- 5mm flat leather – you will need about 18 inches, depending on your wrist size. I bought 24 inches to be safe, mainly because I thought I would braid it, at first – and braiding takes a few extra inches of length. But once I got started, I decided I wanted it to lie flatter, so I ended up leaving it in strips. (I used green because I wear a lot of green, but there are lots of other colors available!)
- Flat Leather Buckle Clasp – this is a gorgeous 2-inch clasp that’s meant to be the star in this piece.
- Jewelry glue, like Super New Glue
- Scissors
All you need to do is cut and glue! The clasp adds just a little over an inch to the overall length, so measure your wrist and decide how long you want it to be. If it’s a gift, then I usually make bracelets 7 – 7 1/2 inches. So your cords will need to be cut at 6 inches each, unless your wrist is much larger or smaller than the average woman’s wrist.
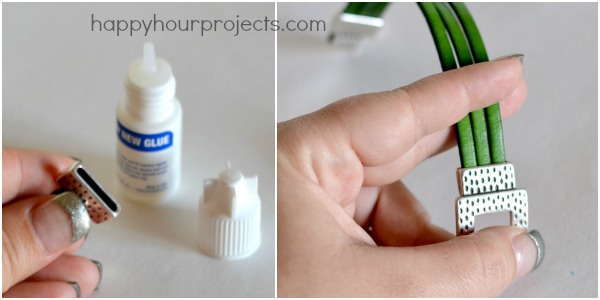
Add a few drops of glue to the inside of one end of the clasp. I used probably 5 drops on each side. Slide in your leather, and hold it in place for about 60 seconds. It dries really quickly, but it’s not an instant bond. Once it feels secure (ie. the cords don’t just fall out) you can move on to the other side and repeat the process.

Let the whole thing dry on its own for about 5 minutes (or, longer is fine) to be sure the glue sets. To wear it, you’ll just buckle it on!

I love the buckle-as-embellishment. There are sliders and charms that you can add along the leather to make it less plain, and wear the buckle on the inside of your wrist instead. But I didn’t want to hide the clasp on the bottom, I wanted to show it off!
If you make one, I’d love to see your take on it! Be sure to share!

Adrianne, I love the clean lines of this beautiful bracelet…and it’s so quick and easy too!
Adrianne: You seem to get more great projects done in such a short time and still meet the needs of your family. I admire your attitude that you can do it all and still have your creative outlet with wonderful, wearable, lovely jewelry that you share so willingly with all of us. Thank you for your generous spirit!
Oh Terri, that’s so sweet of you to say! I really do love the craft time. I swear, it’s the only thing that kept me from going crazy when I first had my daughter. I was happy to be a mother, but at the same time, being alone in the house all evening with a baby who was either screaming or sleeping – it wasn’t allowing me to interact much with others because I couldn’t even get out of the house. I found blogging as an outlet to reach out from home, and as long as I keep projects *really short* like these, I’ve got time to be me, and plenty of time to be mom and wife, too. Balance is so important. (My kids deserve a sane mom, after all, haha!)
Love it! And you always have the cutest manicure!
I have done a few of these glue and go type bracelets, and they are right up my alley! :)
That’s ADORABLE! Great idea! Love how easy it is.