

It’s a lot less expensive than I expected, and it’s easy to make! However… it’s really experimental. Let me tell you what I’ve had success with, and I’ll share my basic recipe I found worked well.
One resource that was really helpful was from an old post over at Bleu Arts on how to make your own lip balm recipe. I used it as a jumping-off-point, to create this basic recipe:
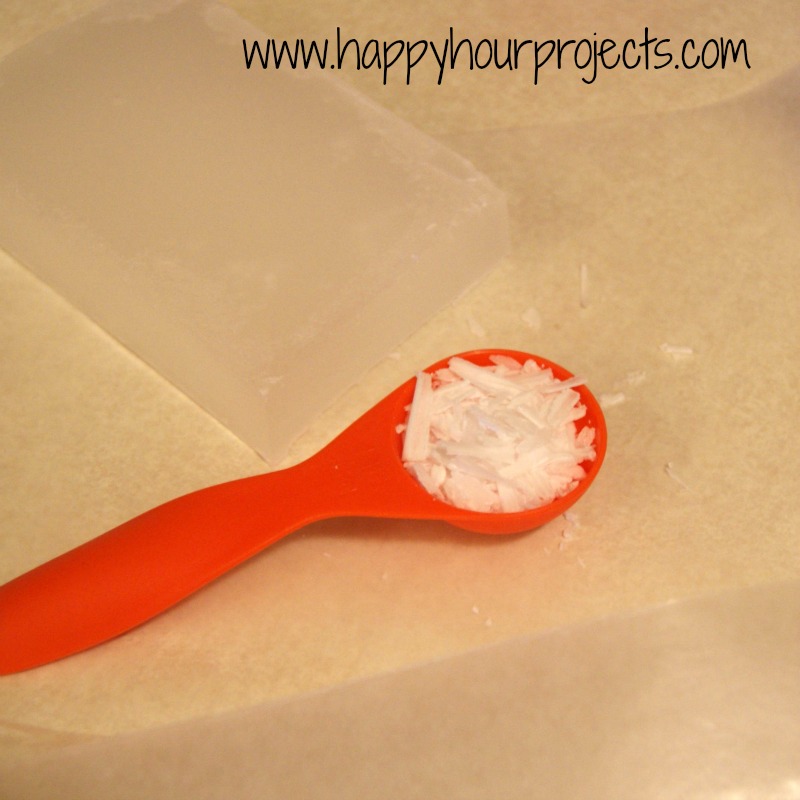
1 Tbsp. Paraffin Wax
1 Tbsp. Coconut Oil
2 tsp. Petroleum Jelly
1/4 tsp. Vitamin E oil (I used 5,000IU – you could also just add a capsule or two but my store didn’t have any. This is also totally optional, the vitamin E just helps to preserve whatever you make.)
From here, I add my extras. Sometimes they work, sometimes they don’t. LOL. Today’s recipe worked. ;)

So for the basics: I got the paraffin wax at Hobby Lobby in the make-your-own-candle section. It freaked me out a little that it was for candles, but there’s instructions right on the box for using it in canning food, to seal your jars. So while it’s not edible per se, it is food safe, so I feel okay about putting it on my lips. I used my 40% off coupon, so this 1 lb (that will last me for all eternity, I suspect) was only like $2.50. The petroleum jelly I picked up at the dollar store. That’s 2/3 of your recipe for less than $3 and will last for many, many batches. The coconut oil is straight from my cupboard, but you can find it at pretty much every supermarket in the baking aisle. You could also use olive oil. Heck, you could probably use any vegetable-based oil, though don’t quote me 100% on that as I haven’t tried it.
Now, the Vitamin E oil is going to be the “specialty” ingredient, and the most expensive. I found my bottle (it’s not pictured) in the skin care area at my supermarket. I picked it up when I wanted to try a bath cookie recipe (which turned out totally gross) so I had it already. You can omit it, but it’s a preservative that’s also good for your skin. So it’s nice to add if you really want your lip balm to last. I understand most drugstores have the capsules, though I haven’t bothered to buy any because I have my $7 bottle that is about 12 oz. so I am not going to run out anytime soon. So while it is a bit pricey and you may not want to bother if you don’t think you’ll make much lip balm, over the long run the cost-per-batch is really low. Just keep an eye on your balm if you choose not to use it, and if it starts to smell funny or changes color, throw it out. I would definitely add vitamin E to anything you plan to give as a gift.
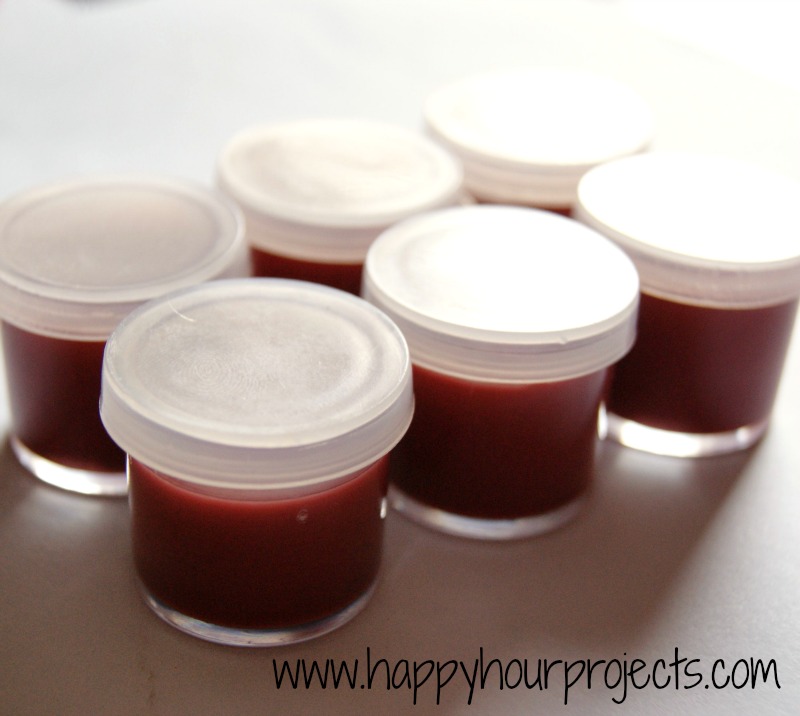
Aside from the vitamin E, the place you’ll spend money on lip balm is honestly the little tubs you’re going to pour it into. I found a few different options while at Hobby Lobby – and coupons will definitely help. The paint aisle has some tubs that are intended to store mixed paints. These were $3 for a dozen ($0.25 each). Those just have a pop-on, pop-off lid. What I liked a lot better were some screw-cap bead storage containers, but at $3 for just a pack of 4, that’s a bit more expensive. (The drawback to those was the hot-pink lids. Fine, if your gloss is clear or pink, but kind of clashy if you’re going for the cinnamon red I made.) I’m sure an online search will find you plenty of places that sell lip balm supplies.
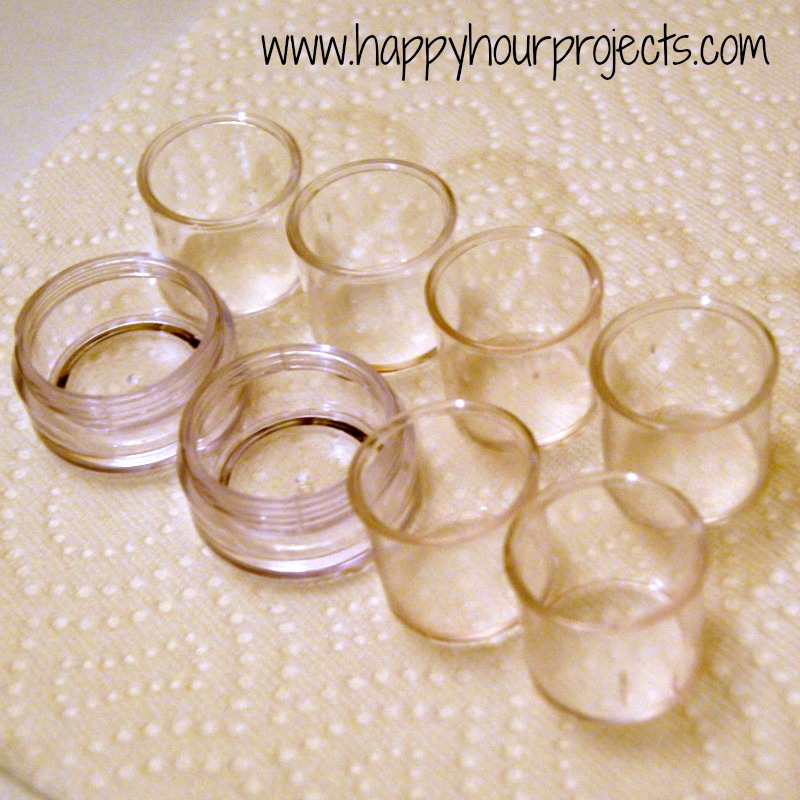
In my reading I have seen people recommend things like old film containers and recycled jewelry… I would not go there, personally, it’s not worth it being potentially toxic to save that whopping $0.75, to me. No matter what you buy, wash it very well, with soap, in the hottest water you can stand. Anywho… back to the recipe and some things you can do.
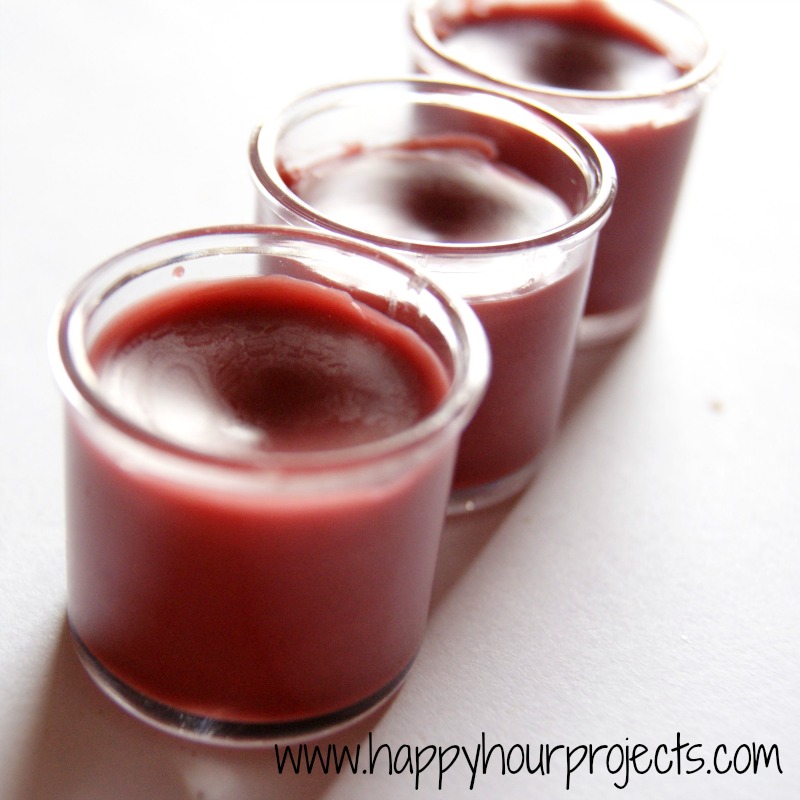
My recipe made up 8 of these little tubs. Here is what I added to the cinnamon one that worked out so nicely:
1/2 tsp. honey (to make it taste good)
1/2 tsp. cinnamon (to make it smell/taste good)
a little chunk of a dollar-store lipstick (to make it tinted slightly)
Instructions:
break up your wax so that it will melt up more easily. I just sliced mine into think slices and crumbled them up.
You can either mix these things in a heat-safe bowl or pyrex measuring cup that’s sitting in a small saucepan of hot water – making sure not to get any actual water into your recipe. You will probably want to get some sort of dropper to pour your balm into those tiny containers if you go that route. Or you can do what I did, just be really careful not to scald or burn yourself:
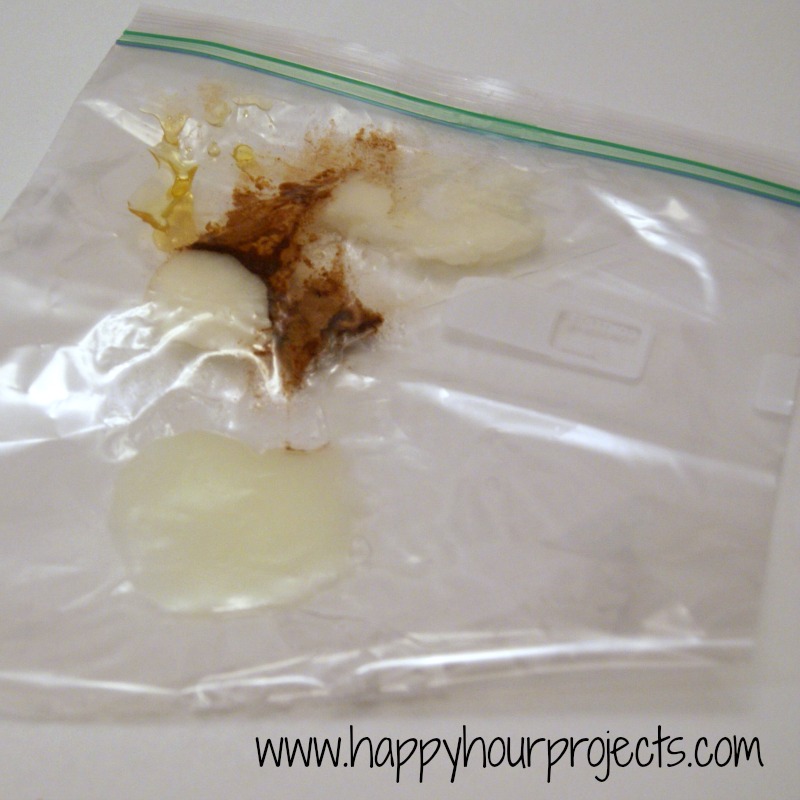
Put all your ingredients into a freezer bag and seal it up. You don’t need a big bag, I was just out of quart-size ones. Run it under hot tap water for a couple minutes, to soften up the oils. Go get your tubs ready for pouring. You don’t want to hassle with it when you have hot balm. :) Put them on a protected surface like an old towel, or a few sheets of paper towel. It can get messy. Make sure they are as level as possible.

The melting point on paraffin wax is 135 degrees (F) so those probably won’t melt in your bag. But mix it all up as well as you can – the tap water will liquefy the oil and petroleum jelly. Do NOT burn yourself when you do this next part (seriously, I can’t be responsible for how hot you heat your water, here – just sharing how I did this next part). I heated up about a cup of water in the microwave for 60-90 seconds. The water should be hot but not boiling. If you’re nervous, use a thermometer here.
Then, I just dipped my bag into the hot water. I used a spoon to stir it… sort of. It was still inside the bag, it just mixed it up inside there better.
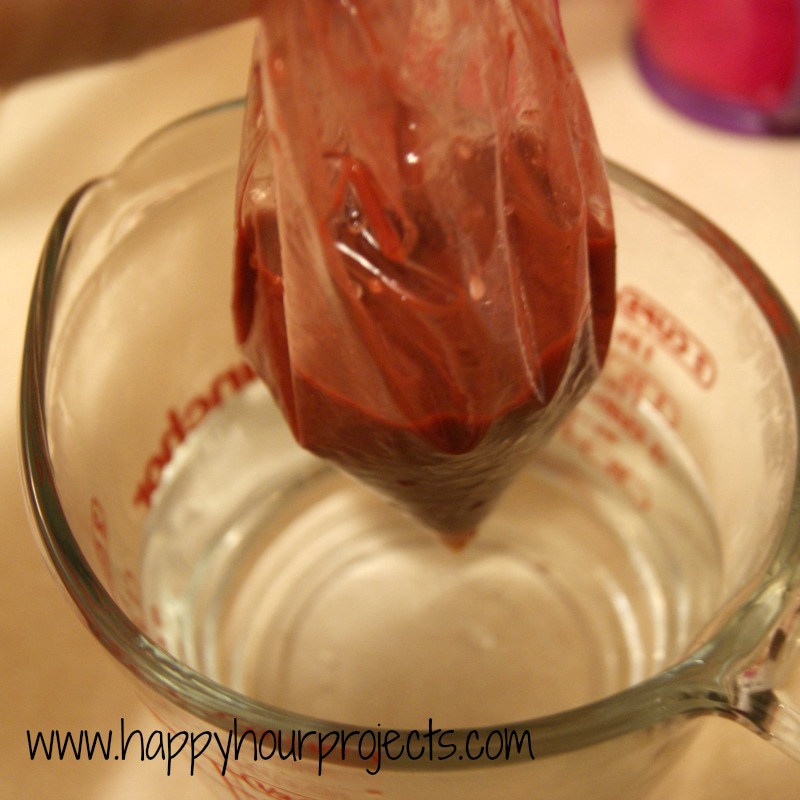
It should be totally liquid in there now. Handle with care from here on out. You want to be able to maneuver the bag, without burning yourself, of course.
Nip a TINY corner off the bag. Remember, it’s pretty liquid in there.

Now, pour it into your pots. I made a little bit of a mess. This is why you want a few layers of paper towel down first. And I can’t imagine straight-up trying to pour this from a measuring cup.
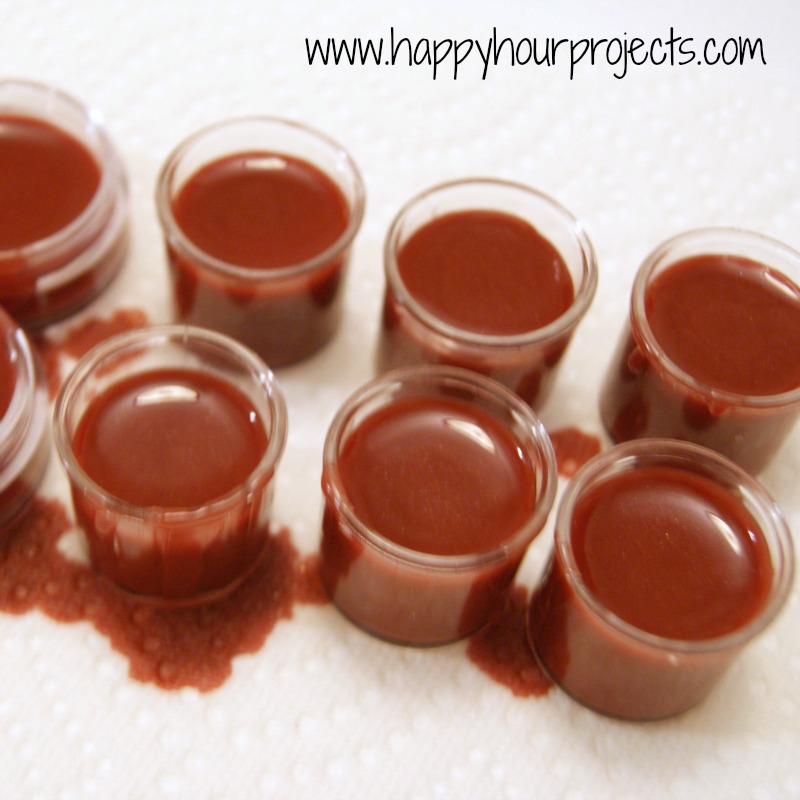
You can clean up the drips with a Q-tip, and wipe the pots with paper towel. If you invest in a dropper, you likely won’t have this mess, but I went the cheap route. ;)
When you’re done, you have a nice, inexpensive beauty product you can gift easily, you’ll just need to invest in a couple of ingredients. You will probably want to add a label, if you plan to give these away.
I link up to these great parties! 
Love the idea and I’m making it tonight still.
At first, until I read the comments, was wondering why you didn’t use beeswax. I’m sorry to hear that your daughter is allergic.
I’ve been making lipgloss and lip balm for awhile now and couldn’t figure out how to do cinnamon, so thank you very much.
Just an FYI, I got my little tubs from Hobby Lobby for under $5 for 18.
While I already have a recipe for lip balm that I love, I will try the plastic bag idea. Might be less messy!
NO!!!!! parrifin wax and patroleum jelly are TERRIBLE for your skin!!!! plz plz plz plz plz plz do NOT use those in lip balm!!!!!
Ms. Jenkins, I mean no disrespect but, paraffin wax that is earmarked for canning comes in direct contact with food & is often eaten, like wax lips, when there is a fabulous jam under it. It is food safe.
The objections to it’s use is that it is not a natural product, like bees wax. It is man-made from petroleum derivatives; as are Vaseline or petroleum jelly, if you prefer. However, when you have 40 children with enough different allergies to drive a doctor crazy, you use Paraffin.
Bees eat where they eat. They bring it back to the hive. They store it in the wax honeycomb cells. This is how the wax becomes contaminated with all of these various ‘natural’ products.
I would rather use products where I can control all of the allergens, than have one child possibly die from anaphylactic shock. I love children too much to risk that.
When I didn’t know any better, I bought my daughter an expensive lip balm. One of those ‘all natural, 100% organic, beeswax’ lip balms. I rode in an ambulance with my teenaged daughter, because we didn’t know the bees had been feeding in thistle fields. She’s deadly allergic to thistles. She made that trip 4 times before we figured out that the bees wax was contaminated from the bees feeding in thistle fields. Great for honey, terrible for allergies. We almost lost her the 4th time. She wasn’t breathing when the ambulance left with her, without me. It finally took a lab test to tell us that the “all natural, 100% organic, Beeswax” lip balm was what was killing our child. She would get better & then crash. They started testing everything she had at the hospital. That’s how they found it. It was a very close call.
Our lip balms & lip glosses are fabulous & the one thing we can say that you can’t is that they are allergy free. Yours are organic and natural, & that’s great. It just doesn’t work for the severely allergic. We can’t even use Almond oil, because of nut allergies. I love Almond oil. We go the allergy free way, or no way. Many of these kids are getting their very first lip balms this way. I think they’d hurt someone if they couldn’t have their lip balms now. FYI, we don’t use Vaseline in our lip balms, only in the glosses.
Check your store bought, non organic containers; they use it as well. They just give it a big long chemical name. Same argument goes for Vaseline or Petroleum Jelly. It’s part of what makes a nice, non allergenic lip gloss. Man-made from a petroleum derivative, but non allergenic.
Thanks for reading this. Sometimes, people have good reasons for doing things differently.
P.S. I have 28 children that are going to make their own lip balms & lip glosses for the first time, next week. Can’t wait!
OH NO!!!!! parrifin wax is NOT good for skin in the least!!! nor is patroleum jelly!!! please please please please please please please do NOT use that in lip balm!!!!!!!!!!!!!!!!!!!!!!!!!!!!!!!!!!!!!!!!!!!!!!!!
I just made a batch, but it looks like the cinnamon has pooled at the bottom of my tubs. Has anyone else had this problem? I followed your recipe exactly.
Did you tint it? I’m wondering if that covered up any pooling in mine, because I didn’t get any – that I could see. Or if it changed the recipe just enough to suspend the cinnamon while it cooled.
I have bombed every time I’ve tried adding chocolate like some recipes suggest you can do. Every time, the chocolate melts and the cocoa sinks to the bottom and the balm stays on top, like what you’re describing. Would love to know if anyone’s a science geek enough to help us out on this one. :)
I did. I added some lipstick like you suggested. I wonder if I should have let the mixture cool a bit before adding the cinnamon.
That makes sense. I didn’t have a thermometer on the batch to know how hot I had it. Maybe mixing it close to the melting point so that it solidifies more quickly would help.
I know this post is old, but though I’d send this anyhow. If you want chocolate, use cocoa powder. Mix 1/4 tsp at a time into the liquid base. When it is chocolatey enough, stop. One sweetener that is used is, Stevia. Mix the Stevia powder in with the Cocoa Powder until it is as chocolatey & sweet as you like. Be sure to add Vitamin E oil to this. It helps with lip health & it acts as a preservative. Others have stated that their pot of chocolate goodness is still fabulous a year to a year & a half later. I have read about others that didn’t use Vit. E, reporting their chocolate lip balm went bad 6-9 months later. 1/8-1/4 tsp in the base should do it. Hope this helps the chocolate lovers.
why balk at using old film canisters when your already using questionable products? this is almost a tutorial on what not to do / use. as someone who has a home business making products that are organic/hand made/ home grown I urge you to do some more research so you can share better quality and safer recipes :)
Adrianne, I need to try the “under hot water” method to see if it works.
Just use ground cinnamon and vasaline. Put the vasaline in a cup, then put ground cinnamon in it. Put it in the microwave for two minutes, stir, then pour into a little cup like the ones above and put in the fridge for an hour. your welcome!!!
LOVE making my own skin care and beauty products. Thanks for sharing. When I made my last batch of lip balm, I got some super cute little containers at the Container Store. $2.29 for one dozen. They come in colors or clear :)
Featuring YOU today at Artsy Corner!
Just wanted to stop by to let you know I'm featuring this today on Practically Functional! You can check it out and grab a button here: http://practicallyfunctional.net/2012/10/the-fun-in-functional-link-party-23/
awesome!, sometime ago I saw on tv that cinnamon + oil make your lips thicker, it was in a program “secrets stars” (or something like that) in E!
Awesome! I've seen around that you can make this yourself but I've never been brave enough to try it. But you make it look easy so maybe I will! Thanks for sharing at The Fun In Functional!
Bahaha, I wouldn't be much for the “potentially toxic” stuff either…lol. Cinnamon sounds so good. I think peppermint is my fave lip balm flavor.
Oh that looks so easy, and so yummy!
Oh this looks great! They would be awesome Christmas Gifts!
Carlee
http://www.ladybirdln.com
YUMMY! I want some of that on my lips :) Great tutorial! I've never tried making my own beauty products but this is one that I would use daily!
These are awesome! I have been toying with the idea of homemade lip balm for Christmas presents, so this post is perfect. Thanks for sharing!
I'm sure you could! I'm not sure where you would buy that and how much that would cost, but if you have some I bet it would work great.
This looks like a fab Christmas pressie idea – pinning :)
Sarah @ A Cat-Like Cusiosity
These looks so fun!! I love cinnamon and have everything but the vit.E on hand. Must mean I need to make some.:)
I'm wondering…perhaps you could use cocoa butter instead of the petroleum jelly?
Too cool. Very tempting idea. I wish I had more time.
Super cute and love the cinnamon flavour.
Mmm!!! That looks so yummy and what a great gift idea :)Pinning!
Oh that looks like a fun project! Not as hard as I thought it would be. You are right, a personalized label and some cute packaging and these would make great gifts at Christmas! Nice one Adrianne!