• Skip to primary navigation
  • Skip to main content
  • Skip to primary sidebar

  • home
  • about adrianne
  • buy the books
    • DIY T-Shirt Crafts (2015)
    • DIY Stamped Metal Jewelry (2016)
    • Rock Painting for Beginners (2019)
  • videos
  • crafts
    • diy beauty projects
    • kids’ crafts
    • paper craft projects
    • polymer clay
    • sewing projects
  • jewelry
    • bracelet projects
    • earring projects
    • necklace projects
    • jewelry tools & supplies
  • metal stamping
    • beginners’ tutorial
    • video tutorial
    • project ideas
    • metal stamping supplies
  • recipes
    • cocktail recipes
    • appetizers
    • main and side dishes
    • sweets and treats
  • by season
    • birthdays
    • new year
    • valentine’s day
    • st. patrick’s day
    • easter and spring
    • mother’s day
    • patriotic
    • fall
    • halloween
    • christmas
    • thanksgiving
  • privacy

Happy Hour Projects logo

06/26/2015

One-Minute, Instant Charm Bracelet

Today’s DIY is practically a cheat, because you can literally put it together in one minute.  If you’ve had your eye on a Pandora-style charm bracelet but haven’t wanted to accept the price tag on the charms, then you’ll be happy to hear that you can find large-hole beads for TONS of interests out there.  I recently made this piece up for a good friend of mine, and I’m sharing because you may not realize how easy it is to make your own charm bracelet.  (Hint: the hardest part is deciding which beads are your favorites!  Everything else is WAY easier.)

Instant Charm Bracelet | A 1-Minute DIY Pandora-Style Charm Bracelet, great for gifts (or gifts to yourself!)

So I just picked out a bracelet base and then chose some beads that reminded me of my friend.  I shopped Goody Beads for this project, and I’ll leave you affiliate links below in case you’re looking to do a little shopping yourself!

You will need to choose the following:

  • A bracelet base (or any other add-a-bead component)
  • Up to 15-20 large-hole beads

I used 11 beads, and there’s room for about 7 more on the 7.5 inch bracelet base I selected.  (7.5 is the length I choose for most women’s jewelry projects when I’m not sure, though larger and smaller sizes are available.) This way, my friend can still add beads that are special to her later, or I could even send along a bead here and there to congratulate her on a new achievement or wish her luck.  The number of beads will depend not only on the bracelet length, but also on the size beads you choose.  They’re all different widths, because each is different and unique.

Instant Charm Bracelet | A 1-Minute DIY Pandora-Style Charm Bracelet, great for gifts (or gifts to yourself!)

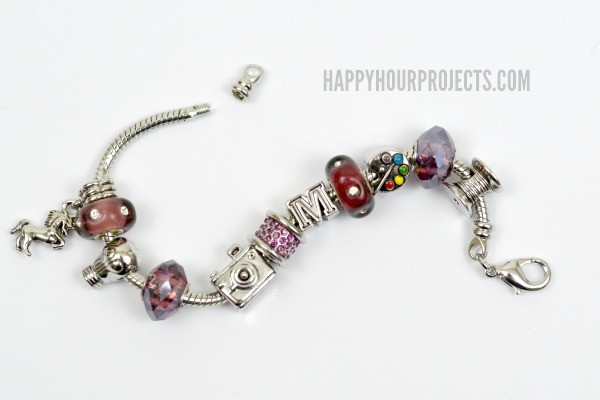
The style bracelet I chose has a screw-off end so that you can easily add beads, and they’ll be stoppered on the chain when it’s un-clasped.  If you’re totally certain you’re done adding beads, adding a drop of superglue to the end cap will ensure that it never accidentally comes unscrewed.  I’d like to leave the option open for her – she can glue it closed herself once she fills it, or decides to keep it as it is.

Instant Charm Bracelet | A 1-Minute DIY Pandora-Style Charm Bracelet, great for gifts (or gifts to yourself!)

I wanted to incorporate some color, so I chose a color theme to start.  Then, I selected silver-tone beads that represent our common interests and things that I think are special about her (like the light bulb – because she has brilliant ideas).  The key to this style is to embrace that each bead is different, so don’t try too hard to force a pattern!

It’s so easy that EVERYONE can make this style bracelet – even the kids.  I know Mother’s Day has come and gone this year, but feel free to pin this idea to file it away for next year, for Christmas, for birthday, or any other special occasion.  There are SO many different interests for beads available to choose from.  I focused on crafty kinds of beads, and still filled out the bracelet quite nicely.  The individual beads do add up, but not nearly as quickly as a trip to the jewelry store does.  You can always start with just a couple beads, and add to it as you go.

Thanks for joining me for today’s instant project as I’m gearing up for the weekend, and I hope you all have a great one!

Adrianne Surian

Filed Under: Bracelets, Fashion, Jewelry, Tutorials Tagged With: 10-minute project, accessories, bracelet, charm, DIY, easy, gifts, jewelry, personalized

copyright policy and terms of use

I love it when you love my work! All tutorials and photos published at Happy Hour Projects are copyrighted. If you would like to feature my tutorial on your website or share it on your social media you may use one photo to feature, as long as you provide a link back to the original post.

If you feature a photo, it may not be accompanied by the project tutorial or recipe, whether in my own words as it originally appears or paraphrased by you. This also includes personal sharing on social media and Pinterest. Publishing multiple photos from a project, or including instructions with an accompanying photo are not permitted and you will be asked to remove them.

I love to share my projects, and my tutorials, recipes, and e-books are ALL free for your personal use. However, photos and ideas that are published to this site are my protected intellectual property. You may print them at home, but please do not copy or distribute them. I also allow all designs to be made and sold at fundraisers, craft fairs, etc. If you are selling a piece made from one or more of my free tutorials in your online shop, I require that you use your own, original photography, and include a link back to my website to credit me as the designer.

I hope you enjoy what you read here, and please be fair when you share!

Reader Interactions

Trackbacks

  1. 320 Hilarious Brownie Puns, Jokes, and Captions to Sweeten Your Day says:
    05/01/2026 at 9:49 am

    […] Printable puns are perfect for bake sales, classroom parties, gift tags, kitchen signs, and everything in between. These are short, snappy, and designed to look great on a little card or label. Print them, cut them out, and attach them to your next brownie creation for instant charm. […]

    Reply

Leave a Reply Cancel reply

Your email address will not be published. Required fields are marked *

Primary Sidebar

Hello, and welcome! I'm Adrianne, an artist, author, designer, and blogger in mid Michigan. I work from home, chase my two kids, and this once-city-girl is learning how to care for chickens and adjusting to life out in the country. I have a compulsion for daily creativity... sometimes it's jewelry-making, paper crafting, metal stamping, mixing and baking, or giving new life to recycled items. But with 2 young kids, time is short! My goal here at Happy Hour Projects is to share projects and tips that you can do in an hour or less. The ideas you find here are designed to add a little creativity in your day, no matter how much (or how little) time you have!

BUY MY BOOKS!

Copyright © 2026 Happy Hour Projects on the Brunch Pro Theme