• Skip to primary navigation
  • Skip to main content
  • Skip to primary sidebar

  • home
  • about adrianne
  • buy the books
    • DIY T-Shirt Crafts (2015)
    • DIY Stamped Metal Jewelry (2016)
    • Rock Painting for Beginners (2019)
  • videos
  • crafts
    • diy beauty projects
    • kids’ crafts
    • paper craft projects
    • polymer clay
    • sewing projects
  • jewelry
    • bracelet projects
    • earring projects
    • necklace projects
    • jewelry tools & supplies
  • metal stamping
    • beginners’ tutorial
    • video tutorial
    • project ideas
    • metal stamping supplies
  • recipes
    • cocktail recipes
    • appetizers
    • main and side dishes
    • sweets and treats
  • by season
    • birthdays
    • new year
    • valentine’s day
    • st. patrick’s day
    • easter and spring
    • mother’s day
    • patriotic
    • fall
    • halloween
    • christmas
    • thanksgiving
  • privacy

Happy Hour Projects logo

10/03/2016

Silk + Pewter Heart Wrap Bracelet Tutorial

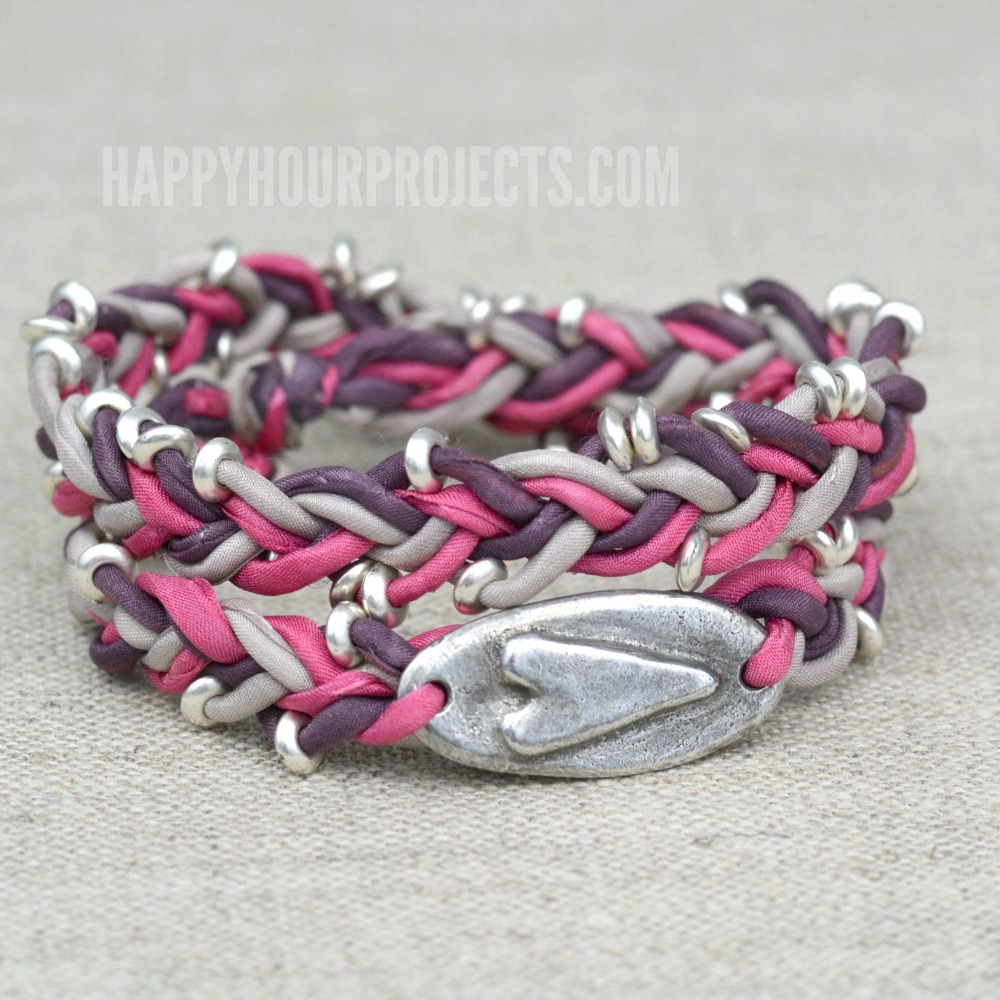
Hey friends!  I’ve got a soft and colorful wrap bracelet tutorial to share with you today that uses silk fibers and pewter components.  This boho-chic design adapts to you own favorite colors, and the best part is that if you can braid and tie knots, even a beginner can make this bracelet.

Silk + Pewter Heart Wrap Bracelet Tutorial at happyhourprojects.com

You won’t need any special tools to make this project, and all the supplies came from today’s post sponsor, Happy Mango Beads.  The links below will take there so that you can shop or learn more about the materials I’m using today!

Silk + Pewter Heart Wrap Bracelet Tutorial at happyhourprojects.com

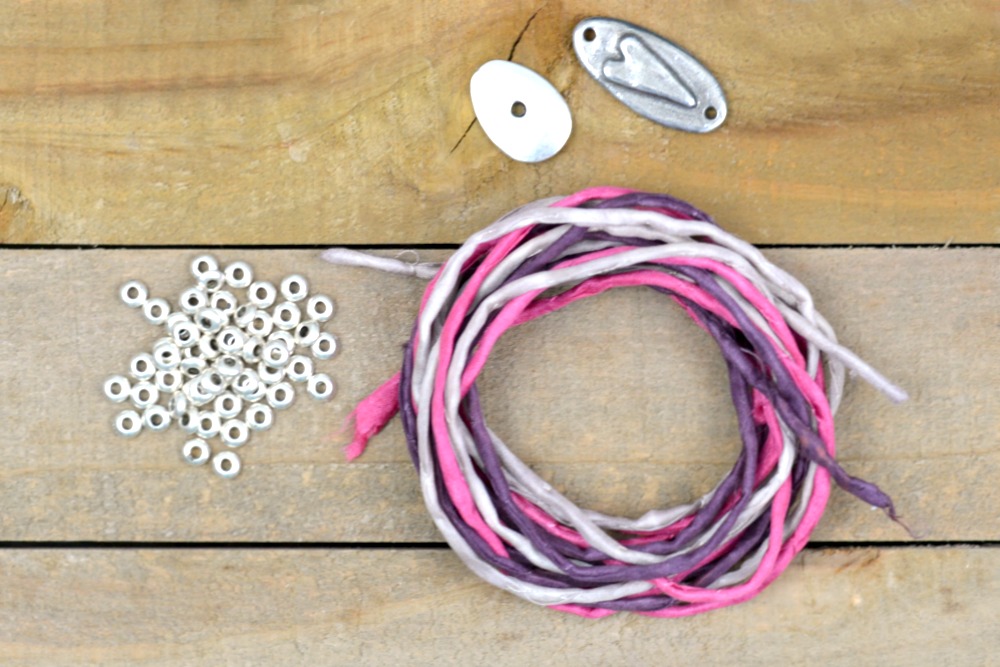
Here’s what you’ll need:

  • 3 – 42″ strands of hand-stitched silk, any color
  • 40 – 5mm spacer beads with 2mm hole
  • 29mm heart theme pewter connector
  • 18mm oval pewter disc bead
  • Optional: clipboard, or other means of securing your bracelet wile you work

Silk + Pewter Heart Wrap Bracelet Tutorial at happyhourprojects.com

First, group your three strands of silk together and double them in the middle.  Tie an overhand knot so that it creates a group of loops on the end with six strands of silk.  The loops are one side of your bracelet closure, so be sure that the oval button (the other half of your closure) slips comfortably through the loop.

Silk + Pewter Heart Wrap Bracelet Tutorial at happyhourprojects.com

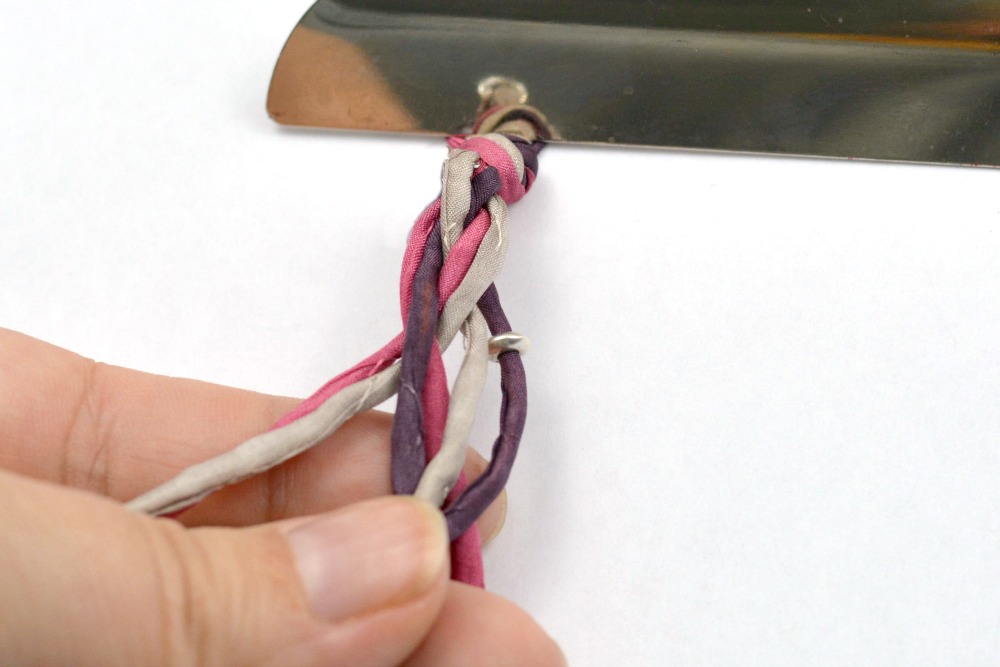
Next, secure the end of your bracelet to a clipboard, pin, or whatever your preference, and separate the six strands into three groups of two each.  Begin braiding them together, and as you work, slip a pewter bead (or two!) onto the outermost strand.  I prefer a random, organic look but if you prefer, you can follow a pattern and space the beads at regular intervals.

(Alternately, if you know how to braid a six part braid, you may certainly do that instead!  I am designing for beginners, though, so a three part braid CAN give you a soft, full look when you’re using two strands in each part.)

Silk + Pewter Heart Wrap Bracelet Tutorial at happyhourprojects.com

When you have reached a braided length of 3 – 3.5 inches, slip one of the silk strands through the top side of the heart connector.  Continue to braid as normal, and when you have braided another inch and your weaving reaches the bottom hole of the connector when laid flat, pass the same color silk strand through the hole from the backside.

Continue braiding, adding beads along the way, until you reach a braided length of approximately 14.5 inches.  (You can test this length around your wrist before making any knots, wrapping the bracelet twice around your wrist.  Adjust shorter or longer as necessary.)

Silk + Pewter Heart Wrap Bracelet Tutorial at happyhourprojects.com

Tie an overhand knot at the end of your 14.5 braided inches, and ensure that all strands are secured tightly.  Trim away four of the strands, leaving just two (and preferably, the longest two for ease of manipulation).

Feed one of the silk cords through the center hole of the flat oval bead.  Then, through a 5mm spacer bead.  Finally, pass it back through the center of the flat bead.  The spacer bead acts as a stopper to hold the flat bead in place.  Tighten this cord so that the flat bead is as close as it can be to the end of your braid, and using the other silk strand that you reserved, tie a square knot (or a double knot) with these two strands.  Finally, trim away the excess.

Silk + Pewter Heart Wrap Bracelet Tutorial at happyhourprojects.com

This will leave you with a button-style loop closure, where you will slip the oval disc through the loop to secure it and to take it off.

Silk + Pewter Heart Wrap Bracelet Tutorial at happyhourprojects.com

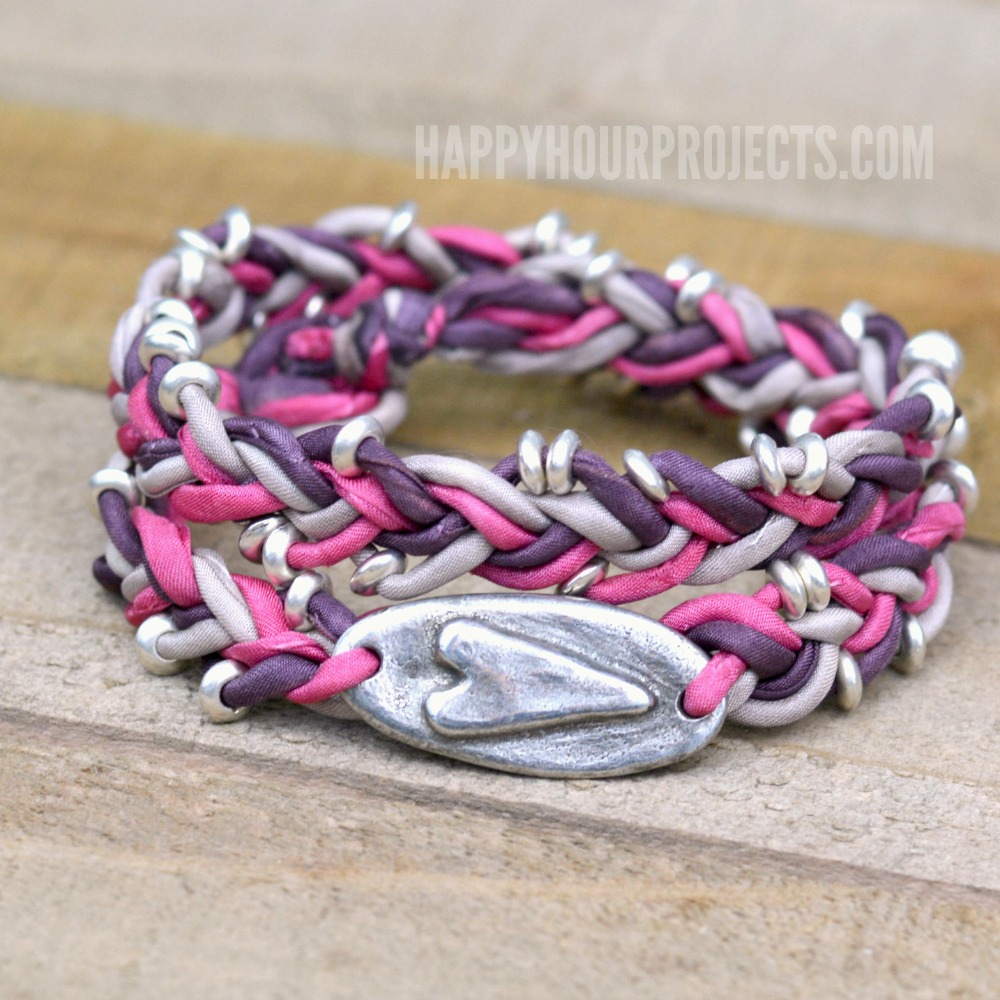
While I catered to may daughter when I made this bracelet pink and purple, a monochromatic wrap bracelet would probably be even more striking, and I might just have to try it out!

Thanks for joining me for today’s wrap bracelet tutorial, and I hope you all have a great week!

Adrianne Surian

Filed Under: Bracelets, Fashion, Jewelry, Tutorials Tagged With: accessories, beads, bracelet, braided, DIY, fashion, gifts, Happy Mango Beads, jewelry, love, silk, woven, wrap

copyright policy and terms of use

I love it when you love my work! All tutorials and photos published at Happy Hour Projects are copyrighted. If you would like to feature my tutorial on your website or share it on your social media you may use one photo to feature, as long as you provide a link back to the original post.

If you feature a photo, it may not be accompanied by the project tutorial or recipe, whether in my own words as it originally appears or paraphrased by you. This also includes personal sharing on social media and Pinterest. Publishing multiple photos from a project, or including instructions with an accompanying photo are not permitted and you will be asked to remove them.

I love to share my projects, and my tutorials, recipes, and e-books are ALL free for your personal use. However, photos and ideas that are published to this site are my protected intellectual property. You may print them at home, but please do not copy or distribute them. I also allow all designs to be made and sold at fundraisers, craft fairs, etc. If you are selling a piece made from one or more of my free tutorials in your online shop, I require that you use your own, original photography, and include a link back to my website to credit me as the designer.

I hope you enjoy what you read here, and please be fair when you share!

Reader Interactions

Comments

  1. snowrider says

    04/15/2026 at 11:08 pm

    This tutorial looks so fun and beginner-friendly! I love the boho style and how customizable the colors and beads are.

    Reply
  2. kanchipuram sarees says

    08/18/2018 at 3:06 am

    nice post

    Reply
  3. golu dolls chennai says

    08/18/2018 at 3:05 am

    wow looking good

    Reply
  4. Kim says

    01/03/2017 at 5:54 pm

    So cute!

    Reply

Trackbacks

  1. CraftCrave | DigiFree | CraftCrave says:
    10/04/2016 at 7:02 am

    […] Silk + Pewter Heart Wrap Bracelet Tutorial – 1 freebie(s)? […]

    Reply

Leave a Reply Cancel reply

Your email address will not be published. Required fields are marked *

Primary Sidebar

Hello, and welcome! I'm Adrianne, an artist, author, designer, and blogger in mid Michigan. I work from home, chase my two kids, and this once-city-girl is learning how to care for chickens and adjusting to life out in the country. I have a compulsion for daily creativity... sometimes it's jewelry-making, paper crafting, metal stamping, mixing and baking, or giving new life to recycled items. But with 2 young kids, time is short! My goal here at Happy Hour Projects is to share projects and tips that you can do in an hour or less. The ideas you find here are designed to add a little creativity in your day, no matter how much (or how little) time you have!

BUY MY BOOKS!

Copyright © 2026 Happy Hour Projects on the Brunch Pro Theme