
Hey friends! I’ve got a happy little design for some hand stamped jewelry today – this stamped cuff not only sport a few lyrics from “You Are My Sunshine” but I’ll also be showing you how to fill empty space with designs, and teach you my favorite trick for when you’d like to stamp along a curved line.

I’m excited to share some brand-spanking-new fonts from today’s post sponsor, ImpressArt. Those of you who read here often know that I’ve loved this brand for years, and I’m always excited to show off what’s new and hot in jewelry stamping! Well, the trend is moving toward creating designs (mandala-style) out of a combination of design stamps, so I’ll be sharing a quick and easy way to begin practicing that, and I’m also using the brand new Melody font – a whimsical, handwritten-style font.
As always, I’ll provide links to learn more in the supply list below. Just click to learn more about any of the ImpressArt products (and if you’re excited to see something fresh, then I can’t wait to show you what’s arriving next month)!

Supplies Used:
- Steel bench block and stamping hammer
- ImpressArt 1-1/2 x 6 inch 14-gauge aluminum bracelet blanks
- ImpressArt bracelet bending bar
- NEW 3mm Uppercase Melody Stamp Set
- NEW 3mm Lowercase Melody Stamp Set
- Stamp Enamel and Paper Towel
- Scrap of Craft Vinyl and Scissors
- 6mm Large Dot Little Dot Border Design Stamp
- 6mm Large Teardrop Stamp from Mandala Set #2
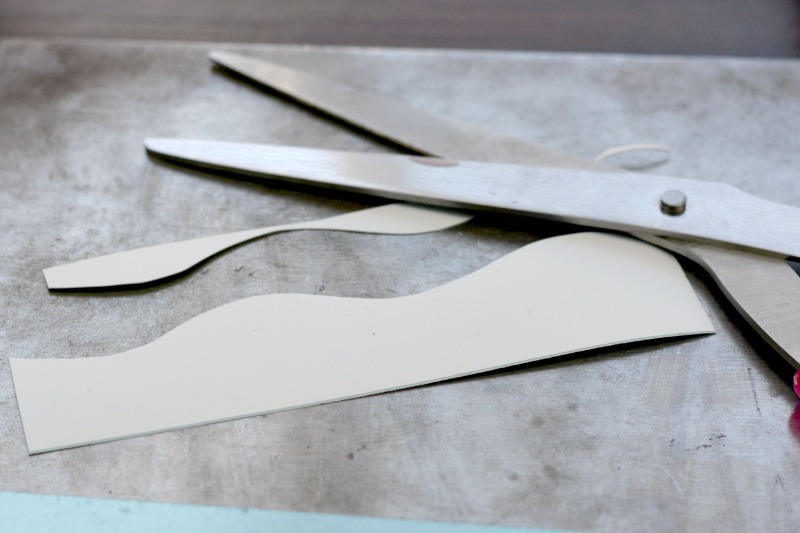
So we’re going to start right off with my favorite “hack”. I imagine others are probably using it as well, but I have long been using shape punches and craft vinyl to help guide my stamping when I want to spell something that’s not in a straight line. Stamp Straight Tape is a great product for curves too, because it can bend and flex, but for two lines of text, it’s faster to trim your own shape. I used a scrap of removable craft vinyl and cut a gentle wave to guide my text.

I placed it along my cuff blank where I wanted my text to be, and I stamped. If you’re new to stamping, I have lots of resources for you, including my book DIY Stamped Metal Jewelry (which you can get on Amazon or in your local bookstore. Book sales are just one way I make a living and I’m able to bring you more free tutorials, so thank you for your support)! You can also check out my YouTube channel where I have lots of videos to show you stamping in-action, with tips along the way throughout each project.
The best tip I can give you is hold the stamp straight upright, near the base, and give the top one firm tap with your hammer. The amount of force you use will vary depending on the type of metal you’re using, but the aluminum cuffs are a nice, soft metal that takes a great impression.

After stamping your message, fill in the blank spaces with a sunny looking design! I’m using the 6mm large drop stamp from the Mandala set #2, and the 6mm Large Dot Little Dot Border stamp here. First, I drew a guide with a fine marker onto the cuff (ImpressArt bracelet blanks come with a plastic coating that helps to prevent scratches, but I like to leave it on until I’m done stamping because I can draw on it or wipe off the ink easily, until I’m happy with the look!
I drew radiating lines as my guide to stamp the line of dots on, then filled in between with the drop stamp. The curve of the letters made perfect openings to alternate adding patterns to the top and bottom of the cuff. Fill as many empty spaces as you like! I stretched mine all the way to each end of the cuff.
When you’re finished stamping your design, use stamp enamel to darken your impressions. Stamp enamel makes quick work of large stamped areas like this big cuff blank – you simply squirt it onto the designs, use a paper towel to rub it in, wait ten seconds and then polish it clean with a clean paper towel.
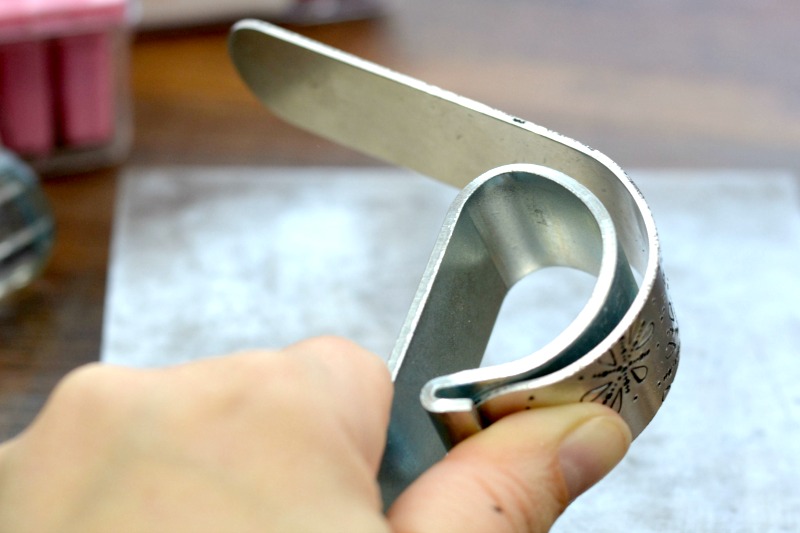
Finally – turn your blank into a cuff using the bracelet bender tool! Place one end of the blank in the groove of the tool, and hold it firmly in place with one thumb. With your other hand, bend the cuff around the curved part of the tool. Then, turn the cuff over and repeat for the other side.

In the end, you’ll have a unique piece of jewelry that makes a great gift for someone you love, or keep it for yourself! (Hey – I’m keeping mine! I love how this piece turned out!)
Thanks for joining me for today’s project meant to help you expand your designs beyond straight lines. I hope you enjoyed!

Note: As an ImpressArt blogger, I occasionally receive new products to incorporate into my designs free of charge. As always, the ideas and opinions here are all my own, and I only share products that I’m proud to stand behind.
I absolutely love how this cuff turned out! Thank you for the detailed tutorial. The hack with the vinyl to guide the curved text is a game-changer, and I appreciate you showing us how to use the new design stamps to fill the empty space. It’s a wonderful way to use the new Melody font. Thanks for the inspiration!
What a delightful and inspiring tutorial! Your clever curve-stamping hack and sunny mandala designs create such whimsical beauty. The step-by-step guidance makes curved text look effortlessly achievable, and your passion for sharing techniques shines brightly. Eager to try this radiant project—thank you for the creativity!
This is really pleasing. I had never come across any of these things before, therefore I am grateful to you for bringing them to my attention. For what reason should we recreate something that already exists? Life is definitely made simpler when one works with the appropriate tools.
GOOD TIPS! WILL BE CHECKING OUT YOUR TUTORIALS.
THANKS FOR THE TIPS.
i like it
wow looking good
Good tips. Thank you.
Very nice. Have never heard of some of these products so thanks for mentioning them. Why reinvent the wheel? Working with the proper tools sure makes life easier.