• Skip to primary navigation
  • Skip to main content
  • Skip to primary sidebar

  • home
  • about adrianne
  • buy the books
    • DIY T-Shirt Crafts (2015)
    • DIY Stamped Metal Jewelry (2016)
    • Rock Painting for Beginners (2019)
  • videos
  • crafts
    • diy beauty projects
    • kids’ crafts
    • paper craft projects
    • polymer clay
    • sewing projects
  • jewelry
    • bracelet projects
    • earring projects
    • necklace projects
    • jewelry tools & supplies
  • metal stamping
    • beginners’ tutorial
    • video tutorial
    • project ideas
    • metal stamping supplies
  • recipes
    • cocktail recipes
    • appetizers
    • main and side dishes
    • sweets and treats
  • by season
    • birthdays
    • new year
    • valentine’s day
    • st. patrick’s day
    • easter and spring
    • mother’s day
    • patriotic
    • fall
    • halloween
    • christmas
    • thanksgiving
  • privacy

Happy Hour Projects logo

02/21/2012

Magnetic Recipe Holder

So I have been searching for a cool idea for a recipe holder, and there is no shortage of cute and innovative ideas out there.  The issue I take, though, is that supplies to make such cute and innovative things are all a little on the pricey side!  By the time I shell out $15 for supplies, I could have just bought a very cute, pre-made one.

But that’s not very fun for us DIY-mamas, is it?  In my browsing for inspiration, I found a lot of magnetic versions that required wood cutting, magnetic paint, sheet metal, etc. But when I saw that metal wall plaques were 50% off at Hobby Lobby last week, I spotted a great size sign and decided that just remaking it would be so much simpler.  The edges are finished, I don’t have to cut metal or paint, and it even has picture hooks on the back, so I have the option of hanging it right on the wall.

In fact, it was so easy, I feel like I can hardly call this a tutorial!  But I’ll still show you how I put it together. :)

Magnetic Recipe Holder

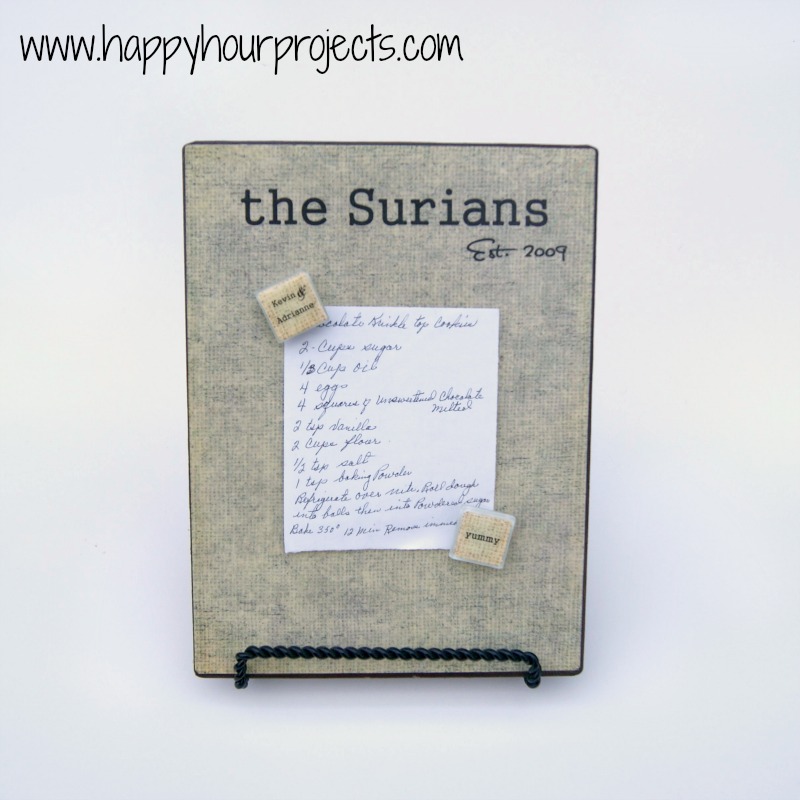
The hardest part was deciding what I wanted it to say. :)  I finally opted for our name – but not after mulling over a French cafe idea, an Italian cucina idea, or a playful print with sweets and goodies.

I bought a sheet of scrapbook paper that looked like burlap.  (I scanned it before printing on it, so I can print more anytime I like now.)  I trimmed it down to about 7×9″, the size of my sign.

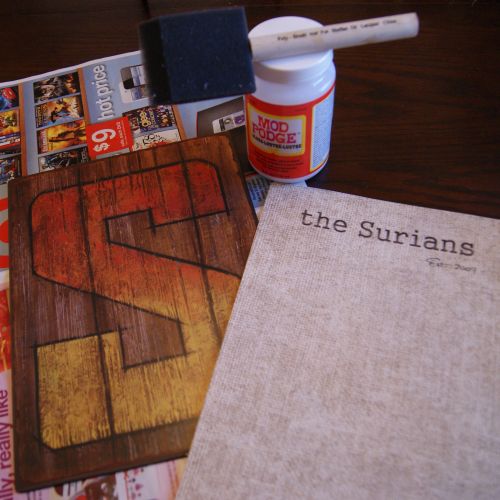
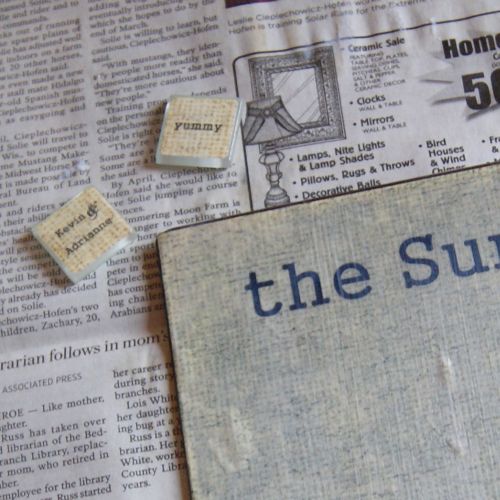
Then I Mod-Podged it on.  Yep, that’s all.  I did also make some matching magnets that I printed from my printer  too (you can find my tutorial for tile magnets here!)  I made one that says “yummy” for when I’m working in the kitchen, and another with our names, in case we just want to pin up a photo or a note.

The best part is the price – the sign was $2.99, the scrapbook paper 44 cents, and I used my 40% off coupon on the display easel (which you may or may not want, depending on your kitchen layout) for an extra $1.79.  Of course I have Mod Podge on-hand all the time, and I’ve had so much fun playing with the glass tiles that I’m just searching for reasons to make more, so that part didn’t cost me anything extra.  Having a fun, personalized piece for about $5 makes my day – it doesn’t make sense if going the DIY-route breaks the bank, after all.

And bonus, my husband LOVED how it turned out.  He actually suggested this would make a nice shower gift for friends getting married!  He’s always smart enough to say the right things when I’m in craft-mode, but I love when he genuinely gets excited about things I make. :)

I link up to these great parties!
~ Adrianne

Filed Under: Tutorials

copyright policy and terms of use

I love it when you love my work! All tutorials and photos published at Happy Hour Projects are copyrighted. If you would like to feature my tutorial on your website or share it on your social media you may use one photo to feature, as long as you provide a link back to the original post.

If you feature a photo, it may not be accompanied by the project tutorial or recipe, whether in my own words as it originally appears or paraphrased by you. This also includes personal sharing on social media and Pinterest. Publishing multiple photos from a project, or including instructions with an accompanying photo are not permitted and you will be asked to remove them.

I love to share my projects, and my tutorials, recipes, and e-books are ALL free for your personal use. However, photos and ideas that are published to this site are my protected intellectual property. You may print them at home, but please do not copy or distribute them. I also allow all designs to be made and sold at fundraisers, craft fairs, etc. If you are selling a piece made from one or more of my free tutorials in your online shop, I require that you use your own, original photography, and include a link back to my website to credit me as the designer.

I hope you enjoy what you read here, and please be fair when you share!

Reader Interactions

Comments

  1. Angela says

    03/01/2012 at 7:07 pm

    Great idea! I can't wait to make one for myself :)

    Angela @ A little about A LOT
    http://www.alittle-aboutalot.blogspot.com

    Reply
  2. Lisa says

    02/29/2012 at 6:14 pm

    What a cute idea! Thanks so much for sharing at Mix it up Monday :)

    Reply
  3. The Shady Porch says

    02/28/2012 at 5:32 am

    I loved both of your projects! Pretty bracelet & loved the recipe holder too! Thanks for sharing at the Rock ‘N Share!

    Reply
  4. Confessions of a Stay at Home Mommy says

    02/27/2012 at 11:31 pm

    Thanks for linking up to last week's Tuesday Confessional. You've been featured so stop by and grab a brag button!
    http://www.craftyconfessions.com/2012/02/incredible-tuesday-confessional.html
    ~Macy
    http://www.craftyconfessions.com

    Reply
  5. Jill says

    02/27/2012 at 8:08 pm

    That is a great idea!! I need to make me one for my recipes! Thanks for the inspiration. Thanks for sharing at Thursday's Temptation.
    Jill

    Reply
  6. Jessica Kielman says

    02/25/2012 at 3:49 pm

    What a great idea! I need one of these for my kitchen counter for sure! I am hosting my 2nd link party, and would love for you to add this along with anything else you like!

    http://www.mom4realky.blogspot.com/2012/02/4-real-friday-link-party-2.html

    Jessica @ Mom 4 Real

    Reply
  7. Marriage from Scratch says

    02/25/2012 at 3:28 am

    This is awesome! what a fun craft. I should make it for my chef hubby :)
    I’d love if you would come link this up at From Scratch Friday!

    ~Christina
    http://www.marriagefromscratch.blogspot.com

    Reply
  8. Danielle says

    02/24/2012 at 9:29 pm

    I need one. Perfect when baking. I love this! Thanks so much for sharing on Blissful and Domestics Feature Friday Linky Party:>

    http://blissfulanddomestic.blogspot.com/

    Reply
  9. Kelly says

    02/24/2012 at 6:05 pm

    This looks great. I love the idea of using a magnet to hold the recipe up. I'm usually flipping through the cookbook or searching on the computer for it. Thanks for linking up.

    Reply
  10. Leah Koenig says

    02/24/2012 at 1:56 pm

    I know you might not have felt like it was worth explaining, but I would have never thought of this! Some days I feel like there isn't anything that I haven't tried to make, and I love being wrong. I have NEVER used Modge Podge. Can't wait to try!

    Found you on Days of Chalk and Chocolate
    Visiting from Well Rounded leahkoenig.blogspot.com

    Reply
  11. Leah Koenig says

    02/24/2012 at 1:55 pm

    This comment has been removed by the author.

    Reply
  12. Trish - Mom On Timeout says

    02/23/2012 at 4:50 pm

    Very fun idea! I love the burlap looking paper too :) Thanks so much for sharing at Taking A Timeout Thursday!

    Reply
  13. MrsFoxsSweets says

    02/22/2012 at 1:22 pm

    This is so cute! Love it! You are just so crafty!

    Reply
  14. Shantalle says

    02/22/2012 at 12:55 pm

    This is a great idea, especially scanning the scrapbook paper, that is brilliant!

    Reply
  15. The Shady Porch says

    02/22/2012 at 12:51 pm

    Great project! That was clever to copy the paper for future use! Your hubby is right this would make a great gift! I have a linky party going on now…would love to have you share this!

    Reply
  16. Sarah says

    02/21/2012 at 6:02 pm

    So handy!!!! I really love your blog!

    your newest follower,
    Sarah @
    http://www.dottedlinecrafts.blogspot.com

    Reply
  17. Terry says

    02/21/2012 at 5:43 pm

    What a smartie you are, copying the burlap paper so you can print it out at will later. Brilliant. I really like this idea. I was thinking that in a larger size, you could use it in an office. Love it.

    Reply
  18. Kadie says

    02/21/2012 at 2:51 pm

    This falls under the category of “Why didn't I think of that?” I have a recipe holder but it is so small. I like the size of this one. Genius to cover a metal plaque!

    Reply
  19. 4you-withlove says

    02/21/2012 at 1:50 pm

    Very nice…looks so classy! :D

    Reply

Trackbacks

  1. Make Cooking Easier with a DIY Recipe Holder says:
    08/05/2014 at 9:39 pm

    […] Full tutorial at Happy Hour Projects. […]

    Reply

Leave a Reply Cancel reply

Your email address will not be published. Required fields are marked *

Primary Sidebar

Hello, and welcome! I'm Adrianne, an artist, author, designer, and blogger in mid Michigan. I work from home, chase my two kids, and this once-city-girl is learning how to care for chickens and adjusting to life out in the country. I have a compulsion for daily creativity... sometimes it's jewelry-making, paper crafting, metal stamping, mixing and baking, or giving new life to recycled items. But with 2 young kids, time is short! My goal here at Happy Hour Projects is to share projects and tips that you can do in an hour or less. The ideas you find here are designed to add a little creativity in your day, no matter how much (or how little) time you have!

BUY MY BOOKS!

Copyright © 2026 Happy Hour Projects on the Brunch Pro Theme