
First of all, don’t forget – there’s a Valentine party going on right now! Be sure to drop by and link up your projects and recipes at our “Share the Love” link party!
I know it seems I get stuck on certain projects and recipes, but that’s just what happens when you find things that are quick and easy winners. :)
I tried a variation on the Dipped Oreo Pops I’ve been making recently, and like a lot of my sweets, the idea came from Mrs. Fox’s Sweets. These just used an inexpensive mold (I picked mine up for $1.99 each at Michael’s), some candy melts (I used about 1/4 bag of red ones I had left from Christmas), a package of Candiquik and a bag of Oreos.
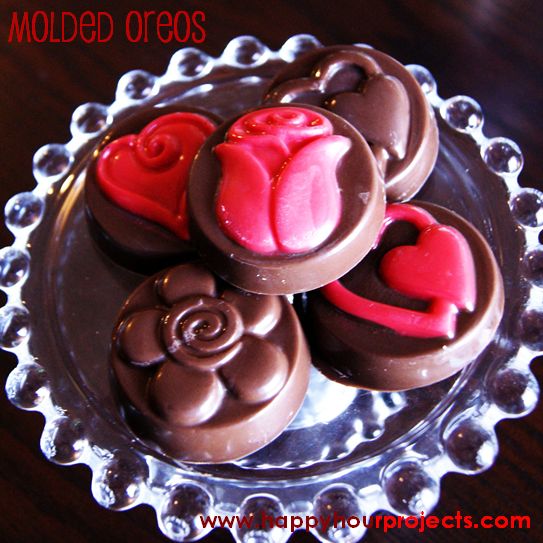
Adding the red was a little more fussy than what I usually like, but it was so worth it in the end. I settled on doing one batch (2 molds) with red accents, and one batch plain chocolate to give me the best mix of pretty and easy.
Piping the red melts in was a little intimidating. To give me more control, I really didn’t want to use a bag. But you absolutely can, if you want something disposable. But what I did was pickup a set of ketchup and mustard bottles at my dollar store.

At 50 cents each, if I don’t feel like washing it out when I am done, I can just throw it away. And I feel like it gave me enough control for me to feel confident in my piping. Just melt your melts, and spoon it into the bottle. (Wilton also makes similar bottles designed specifically for piping, they’re just a little more expensive.)
Anyway, go slowly and evenly to fill in your designs.
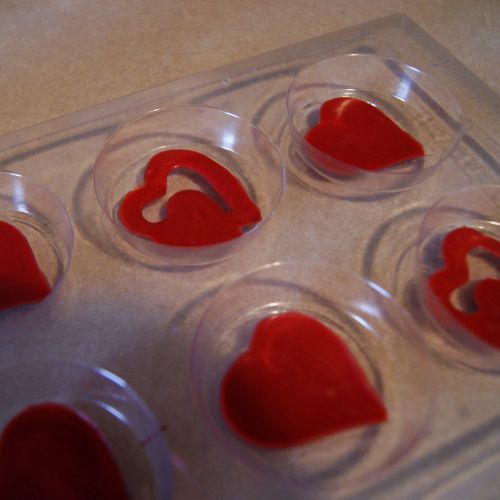
One of my molds had hearts, and the other one had flowers. Tap your tray a little to smooth it out and to fill in any bubbles. Let the red set.
Then, add your chocolate. Fill the molds about halfway.

Then press your Oreo in really gently.

I set mine in the frig, because I just don’t have a ton of time and patience. :) I intended to do a second batch, and I wanted to finish the whole thing in an hour or less (which I did). Do make sure they’re all the way set, though – if you take them out early, they stick to the mold just a little and will not have that shiny look. (Gee, how would I know that??)
But once they’re set, just pop them out – that’s it! I did put together a little bag of them for my mom who came to watch Raya while my husband and I had our date day yesterday (and did anyone else snag the free printable from Pick Your Plum this weekend? Such a cute touch to what would otherwise just be a plastic bag!)

So pretty for how little fuss they are!

I link up to these great parties!
~ Adrianne
These look amazing! I need to find some molds and try this. Thanks so much for sharing!
These look very professional! So glad that you linked this to Things I've Done Thursday~
http://www.bearrabbitbear.com
These look incredible! I am hosting my first link party starting today, and would love for you to add these!
http://www.mom4realky.blogspot.com/2012/02/4-real-friday-link-party-1.html
Jessica @ Mom 4 Real
they look so awesome, what a great idea!
They sure are pretty:@)
Oh wow, these look super yummy…I can't believe how simple the are to do. Thanks so much for sharing.
Wow, these look like SUPER SUPER impressive… but now I am on to your secret! I might have to try it! I might not even be able to mess these up! Thanks for sharing your secrets with us… I agree with Terri, I want to be your neighbor as well!
Carlee
http://www.ladybirdln.com
Hopped by to become your newest follower, those look so yummy but there almost to pretty to eat! Hope you will drop by kittycrochettwo.blogspot.com when you get a chance. Have a wonderful Valentine's Day!
I'll be joining you and Terry :) These look great – and two colors of chocolate!! I am impressed. I know you don't think you are very good at baking but I am thinking you might have to revise that!
I really wish that I lived closer to you so I could just happen to pop by while you're making cupcakes and chocolate-covered oreos. “Oh hi Adrianne, what are you up to? Oh really, that's so funny – I just picked up a bunch of coffees for us all. What timing, he he.”
These look amazing.. and simple! Now to find a way to make them healthy… Ugg!
I'm your newest follower from A Season for All Things and look forward to finding more great ideas.
Yum! Now you have me craving chocolate. :)
Gorgeous! I love the roses! These are such a simple but amazing looking treat! Thanks for the ketchup bottle tip! I am down to one Wilton bottle (busted through another) and it looks like your 50 cent option is made a little thicker! I sure hope they make these molds for St Pattys day!
O.M.G I love oreos. I already baked two batches this year.(next time I will take pictures, too:) Your's look yummy ~
Thanks for stopping by. Following you back on Linky.
They came out great! I have seen those and was wondering how to do them. It doesn't look to hard at all.