• Skip to primary navigation
  • Skip to main content
  • Skip to primary sidebar

  • home
  • about adrianne
  • buy the books
    • DIY T-Shirt Crafts (2015)
    • DIY Stamped Metal Jewelry (2016)
    • Rock Painting for Beginners (2019)
  • videos
  • crafts
    • diy beauty projects
    • kids’ crafts
    • paper craft projects
    • polymer clay
    • sewing projects
  • jewelry
    • bracelet projects
    • earring projects
    • necklace projects
    • jewelry tools & supplies
  • metal stamping
    • beginners’ tutorial
    • video tutorial
    • project ideas
    • metal stamping supplies
  • recipes
    • cocktail recipes
    • appetizers
    • main and side dishes
    • sweets and treats
  • by season
    • birthdays
    • new year
    • valentine’s day
    • st. patrick’s day
    • easter and spring
    • mother’s day
    • patriotic
    • fall
    • halloween
    • christmas
    • thanksgiving
  • privacy

Happy Hour Projects logo

02/12/2013

Simple Brooch-to-Headband

Today’s project is a nice simple one – just like gluing a cabochon, only bigger!  I’ve been buried under snow for a month here, so I have to admit – I’m thinking spring.  So a nice, spring-inspired headband seemed like a cheerful thing to work on. :)

Brooch to Headband

I was going through my stash looking for inspiration (and for those of you who ask where all my ideas come from – that’s usually where!  I’ll spot an item or two I loved in the store, bring it home… and think) and the yellow flower popped right out at me.  I decided it would make a great headband, so I got out my E6000, and also thought it could use a bit of fabric embellishment.  You can personalize this project any way you want, so if you don’t have fabric – no big deal!  You just need a headband blank, a charm, cabochon, pendant or brooch you love, and some heavy duty permanent adhesive.  This is a project you can do in 10 minutes or less.

Brooch to Headband

If you do like the looks of the fabric, what you will want to do is trace out 4 circles that are slightly larger than your focal piece.  I traced around a glass.  Now, fold each circle into quarters.

Brooch to Headband

Next, I stitched them together in the corners to hold them together a little more securely.  The stitching won’t show, so I didn’t worry about coordinating my thread or being terribly neat about it – I just want to make sure none of the fabric falls out later with wear.

Brooch to Headband

Now, if you are re-purposing another piece, you will need to remove the hardware from the backside.  I wanted mine to be permanent and secure, so I intended to glue it on.  If you are using a brooch you want to keep, you can leave the hardware intact and just pin it on.  If you do that, you will want to add several more lines of stitching to your fabric so that the base is very secure and the weight of it doesn’t rip off.  Personally, though – I picked this piece knowing I’d turn it into something else, so I didn’t mind using a pair of wire cutters to take everything off the backside.

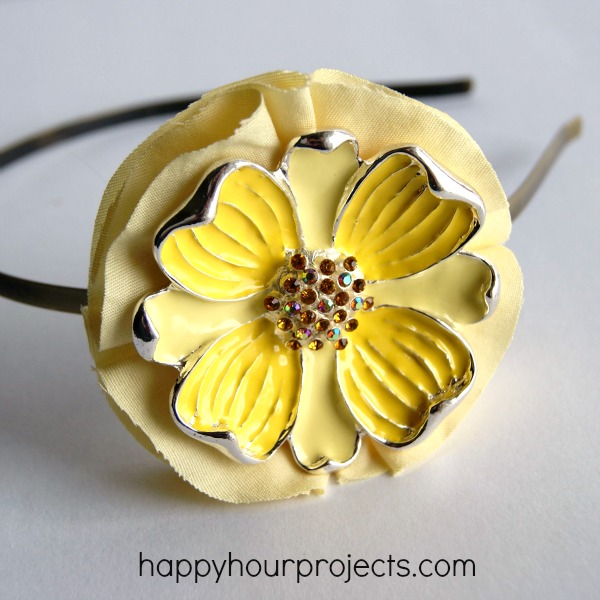
Next, glue your fabric circle onto the headband’s blank.  You don’t need much E6000, though you do want to make sure it’s glued all the way to the edges of the blank.  Then, I added glue to the backside of my flower, and glued that on.  You’ll need a place to allow it to dry so that your flower is facing up – otherwise it stands to slide off before the glue sets.  I just hooked it over the edge of an empty box.

Brooch to Headband

Give it at least an hour to dry – preferably more like 2-3.  Then – you’ve got a fun piece to wear or a lovely gift to bring a little spring to someone’s day!

Brooch to Headband

Adrianne

Filed Under: Jewelry, Tutorials Tagged With: 10-minute project, cabochons, headbands

copyright policy and terms of use

I love it when you love my work! All tutorials and photos published at Happy Hour Projects are copyrighted. If you would like to feature my tutorial on your website or share it on your social media you may use one photo to feature, as long as you provide a link back to the original post.

If you feature a photo, it may not be accompanied by the project tutorial or recipe, whether in my own words as it originally appears or paraphrased by you. This also includes personal sharing on social media and Pinterest. Publishing multiple photos from a project, or including instructions with an accompanying photo are not permitted and you will be asked to remove them.

I love to share my projects, and my tutorials, recipes, and e-books are ALL free for your personal use. However, photos and ideas that are published to this site are my protected intellectual property. You may print them at home, but please do not copy or distribute them. I also allow all designs to be made and sold at fundraisers, craft fairs, etc. If you are selling a piece made from one or more of my free tutorials in your online shop, I require that you use your own, original photography, and include a link back to my website to credit me as the designer.

I hope you enjoy what you read here, and please be fair when you share!

Reader Interactions

Comments

  1. Alecia says

    02/15/2013 at 6:19 am

    I love the brooch you used, its very vintagy and fun! Thanks for sharing, I’ve got lots of old pins I never wear that might enjoy a new life!

    Reply
  2. Sherry says

    02/14/2013 at 12:51 am

    What a pretty brooch and it’s even better with the added petals on the headband! The color is just so cheerful and brings spring to mind…oh how I pine for springtime! Thanks for sharing such a beautiful DIY. I’ll be keeping my eyes open for pretty old brooches now. :)

    Reply
  3. Marilyn says

    02/13/2013 at 11:19 am

    This project just screams “SPRING” to me every time I see it…and I’m sssssoooo looking forward to spring!

    Reply
  4. Maureen says

    02/12/2013 at 10:42 pm

    Headbands seem to be all the rage these days with the teenagers. I love the yellow. Maybe I’ll make some up for my girls. :)

    Reply
  5. Marilyn says

    02/12/2013 at 8:59 pm

    What a fun, easy, and pretty project to brighten the day! Come on spring!

    Reply
  6. kara says

    02/12/2013 at 8:12 pm

    It’s beautiful, Adrianne! Very Springy indeed :)

    Reply
  7. Kadie says

    02/12/2013 at 10:40 am

    Very pretty!! Love the sunny yellow flower. It would be great for the gray rainy day we are having today.

    Reply

Leave a Reply Cancel reply

Your email address will not be published. Required fields are marked *

Primary Sidebar

Hello, and welcome! I'm Adrianne, an artist, author, designer, and blogger in mid Michigan. I work from home, chase my two kids, and this once-city-girl is learning how to care for chickens and adjusting to life out in the country. I have a compulsion for daily creativity... sometimes it's jewelry-making, paper crafting, metal stamping, mixing and baking, or giving new life to recycled items. But with 2 young kids, time is short! My goal here at Happy Hour Projects is to share projects and tips that you can do in an hour or less. The ideas you find here are designed to add a little creativity in your day, no matter how much (or how little) time you have!

BUY MY BOOKS!

Copyright © 2026 Happy Hour Projects on the Brunch Pro Theme