• Skip to primary navigation
  • Skip to main content
  • Skip to primary sidebar

  • home
  • about adrianne
  • buy the books
    • DIY T-Shirt Crafts (2015)
    • DIY Stamped Metal Jewelry (2016)
    • Rock Painting for Beginners (2019)
  • videos
  • crafts
    • diy beauty projects
    • kids’ crafts
    • paper craft projects
    • polymer clay
    • sewing projects
  • jewelry
    • bracelet projects
    • earring projects
    • necklace projects
    • jewelry tools & supplies
  • metal stamping
    • beginners’ tutorial
    • video tutorial
    • project ideas
    • metal stamping supplies
  • recipes
    • cocktail recipes
    • appetizers
    • main and side dishes
    • sweets and treats
  • by season
    • birthdays
    • new year
    • valentine’s day
    • st. patrick’s day
    • easter and spring
    • mother’s day
    • patriotic
    • fall
    • halloween
    • christmas
    • thanksgiving
  • privacy

Happy Hour Projects logo

11/06/2012

Sea Glass Wire Wrapped Earrings from NorthShore Days

Hey Everyone,
I’m Natalie and I blog over at NorthShore Days where I share jewelry, crafts, tutorials, DIY, photos and funny stories about my loud sweet family.
 
 I love anything beachy and I’m lucky enough to live very near to the beach on the beautiful North Shore of Auckland, New Zealand.

  I’m so excited to be here at Happy Hour Projects, thank you Adrianne for having me….

We are headed into Summer here in New Zealand (love pointing that out!), so I want to share my latest beach inspired jewelry tutorial with you all today…

These sweet earring are so easy to make, once you start, you wont be able to stop….trust me!
 What you will need for 1 pair of earrings:
2 long headpins, 2 hooks, beads ( I used 2 seed beads and 2 glass beads)
A pair of long nosed pliers and a pair of round nosed jewelry plies.
You could totally make these earrings without the round nosed pliers if you don’t have any.


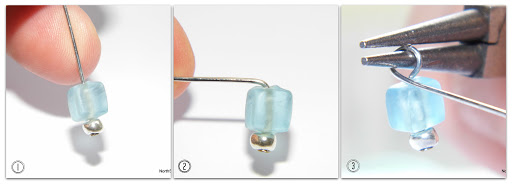
How to Make the Earrings: 
(following the step by step photos)
1. Thread the beads onto a long headpin.
2. Bend the headpin at a 90 degree angle.
3. Using the round nosed jewelry pliers bend the headpin back around to form a loop.
4. Twist the wire of the headpin around the loop once.
5. start another twist,  but instead of going around the loop, pull the wire across the bead, towards the bottom bead.
6. Twist the tail around the seed bead.
7. Using the long nosed pliers, tighten the end of the wire to the seed bead.
8. Open the earring hook and slip on the wire wrapped bead.
9. Voila  – your earring is complete…. repeat steps 1-8 for the second earring.

How simple were those to make? So easy right?

I actually made 4 pairs in under an hour.
It also depends a little on your skill level, obviously if you’re a beginner it will take a little longer for you to “whip” up a dozen of these. 
But what’s so great about them, is that ANYONE can make a pair!

 
You can use any type and shape of bead for these earrings and they will still look cute…
And of course I couldn’t resist a beachy photo shoot…. love my beachy props!

I really hope you enjoyed my tutorial and I hope I inspired you to try something new today. 
If you enjoyed this post – please pop on over to NorthShore Days, say hi and check out my other super easy jewelry tutorials.


 Thank you again Adrianne, 
Take care everyone,

xxx
 

Filed Under: Earrings, Guest Posts, Jewelry, Tutorials Tagged With: beads, earrings, easy, wire wrapping

copyright policy and terms of use

I love it when you love my work! All tutorials and photos published at Happy Hour Projects are copyrighted. If you would like to feature my tutorial on your website or share it on your social media you may use one photo to feature, as long as you provide a link back to the original post.

If you feature a photo, it may not be accompanied by the project tutorial or recipe, whether in my own words as it originally appears or paraphrased by you. This also includes personal sharing on social media and Pinterest. Publishing multiple photos from a project, or including instructions with an accompanying photo are not permitted and you will be asked to remove them.

I love to share my projects, and my tutorials, recipes, and e-books are ALL free for your personal use. However, photos and ideas that are published to this site are my protected intellectual property. You may print them at home, but please do not copy or distribute them. I also allow all designs to be made and sold at fundraisers, craft fairs, etc. If you are selling a piece made from one or more of my free tutorials in your online shop, I require that you use your own, original photography, and include a link back to my website to credit me as the designer.

I hope you enjoy what you read here, and please be fair when you share!

Reader Interactions

Comments

  1. Catherine says

    01/22/2014 at 4:50 pm

    Hi Adrianne,
    In line with your copyright policy, I’m going to include one photo of this tutorial along with links and full credit back to this website in a post that will go live on Thursday the 23rd. It’s part of a series of posts on all types of crafts that encourage us to drink more water and that help us appreciate clean rivers, lakes, and oceans. I hope you check it out! Thanks…

    Reply
  2. kfairyb says

    09/14/2013 at 1:40 am

    You have really inspired me with your easy-to-make and easy-to-follow tutorials!

    Thanks so much!

    Reply
  3. Judy says

    04/20/2013 at 1:06 pm

    Thank you for sharing your tutorial! Very cute. Judy

    Reply
  4. Chelsea Smith says

    02/14/2013 at 7:58 am

    This is a good start for me. I’m alone here now and I’ve got nothing to do. I’ve seen some beautiful sea glass pieces in a bottle. Glad to have come across your page.

    Reply
  5. Dana Caffrey says

    01/31/2013 at 1:18 am

    Love those earrings so much!!! I have some sea glass here and I’d like to make myself an earring like this. Thanks for sharing this easy and wonderful tutorial.

    Reply
  6. Mortisha Brown says

    01/30/2013 at 6:09 pm

    Wow! Very beautiful jewelry pieces! Love the work of art! I’d also like to do the same thing. Thanks for sharing this wonderful idea.!

    Reply
  7. Heather F. says

    11/07/2012 at 3:18 pm

    What a great tutorial. Love these earings!

    Reply
  8. Natalie says

    11/07/2012 at 8:30 am

    Thank you so much for having me Adrianne and thank you to everyone for your awesome comments – I hope you try these easy earrings, a great gift for the holidays xx Nat

    Reply
  9. Jenny says

    11/07/2012 at 2:58 am

    I love the colour!!! So pretty…thanks for the tutorial:)

    Jenny

    Reply
  10. Mel says

    11/06/2012 at 10:43 pm

    Gorgeous earrings, YAY for our Southern Hemisphere Summer! Great post!

    Reply
  11. Mary Neumann says

    11/06/2012 at 8:02 pm

    I LOVE these earrings and it's such a great tutorial, I think I could actually make them! Great Guest Post! Natalie makes most beautiful jewelry and has awesome tutorials! Looking forward to adding to my NorthShore Collection!

    Reply
  12. Terry says

    11/06/2012 at 4:59 pm

    Oooh, these are so pretty, and the technique actually looks easier than I might have thought.

    Reply
  13. Lindsay says

    11/06/2012 at 4:15 pm

    Loving those earrings!! Thanks for sharing your tutorial :)

    Reply
  14. Sherry says

    11/06/2012 at 3:37 pm

    These earrings are so lovely! Natalie makes the best jewelry and gives wonderful tutorials that make it easy for someone to make their own too. Thanks for sharing!!

    Reply
  15. Kadie says

    11/06/2012 at 2:46 pm

    How pretty! I have wondered how to bend the wire around stones like that! Thanks so much for sharing your wonderful tutorial and your beautiful jewelry.:)

    Reply
  16. Amy says

    11/06/2012 at 2:37 pm

    Those are GORgeous!! Pinning!

    Reply
  17. 4 You With Love says

    11/06/2012 at 1:34 pm

    This is a great tutorial…thanks for sharing, Natalie and Thanks to Adrianne for introducing us to Natalie!

    Reply
  18. Jill says

    11/06/2012 at 12:57 pm

    Beautiful Natalie! Great tutorial! I wish we were going into summer… =)

    Reply

Trackbacks

  1. Healthy Water Crafts - Part 6 Ancora CraftsAncora Crafts says:
    01/23/2014 at 5:06 am

    […] from NorthShore Days has a guest post on HappyHourProjects on how to make these quick and lovely wire wrapped sea glass earrings. She says that once you get a little experience, you can make lots of these earrings in very little […]

    Reply

Leave a Reply Cancel reply

Your email address will not be published. Required fields are marked *

Primary Sidebar

Hello, and welcome! I'm Adrianne, an artist, author, designer, and blogger in mid Michigan. I work from home, chase my two kids, and this once-city-girl is learning how to care for chickens and adjusting to life out in the country. I have a compulsion for daily creativity... sometimes it's jewelry-making, paper crafting, metal stamping, mixing and baking, or giving new life to recycled items. But with 2 young kids, time is short! My goal here at Happy Hour Projects is to share projects and tips that you can do in an hour or less. The ideas you find here are designed to add a little creativity in your day, no matter how much (or how little) time you have!

BUY MY BOOKS!

Copyright © 2026 Happy Hour Projects on the Brunch Pro Theme