• Skip to primary navigation
  • Skip to main content
  • Skip to primary sidebar

  • home
  • about adrianne
  • buy the books
    • DIY T-Shirt Crafts (2015)
    • DIY Stamped Metal Jewelry (2016)
    • Rock Painting for Beginners (2019)
  • videos
  • crafts
    • diy beauty projects
    • kids’ crafts
    • paper craft projects
    • polymer clay
    • sewing projects
  • jewelry
    • bracelet projects
    • earring projects
    • necklace projects
    • jewelry tools & supplies
  • metal stamping
    • beginners’ tutorial
    • video tutorial
    • project ideas
    • metal stamping supplies
  • recipes
    • cocktail recipes
    • appetizers
    • main and side dishes
    • sweets and treats
  • by season
    • birthdays
    • new year
    • valentine’s day
    • st. patrick’s day
    • easter and spring
    • mother’s day
    • patriotic
    • fall
    • halloween
    • christmas
    • thanksgiving
  • privacy

Happy Hour Projects logo

07/31/2012

Sewing Your Quilt Block, and The Confetti Block Tutorial

If you’re just getting started (or even still toying with the idea of getting involved in the quilt block challenge), the most basic method of creating a quilt block is to create or choose a pattern and sew it.

If you didn’t catch my post yesterday – let me invite you to join in the fun!  I’ve been really wanting to start another quilt project, and I would love for you to get involved.  The challenge is for everyone – seasoned quilters, and newbies alike.  This week I’ll have ideas ranging from traditional and customary to innovative and original.

If you haven’t ever quilted, we’re starting small with just one square, which is a really manageable project.  If you find it’s not for you – no problem.  If you love it, it’s my hope that it’s the first square in your first quilt!  If you quilt a lot, it’s your chance to get really creative, and perhaps try a technique you haven’t used before.

Today we’re talking sewing.  Traditionally, quilt blocks are a combination of geometric shapes – sewing triangles, squares, rectangles together.  It’s very formulaic and math-oriented, and traditional patterns carry history and heritage.  Pretty cool, right?  This is a method that is really appealing to the left-brain types out there.

Butterfly Block at McCall’s Quilting
A few resources I like if you really enjoy the geometric designs:
McCall’s Quilting – lots of free patterns
Free Quilt & Block Patterns links to over 2,500 free quilt and block patterns.
Quilt Blocks Galore! has many original patterns with tutorials.
For something more interactive, I like the Quilt Block A Day Facebook page who challenges you do create a single block every day.
Geometric designs are honestly not my strong suit, personally.  Although there are some very gorgeous quilts out there that make me strongly reconsider that stance, like this one from married to a bmw!  Sooo pretty!
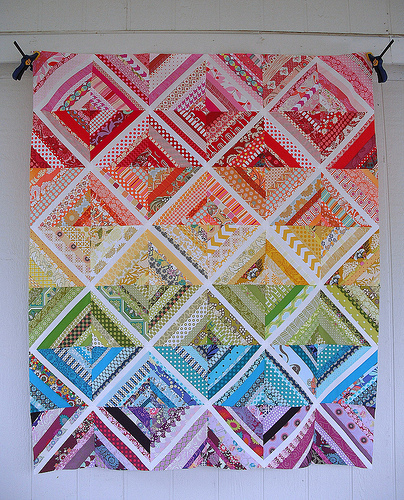
Scrappy String Quilt at married to a bmw
Blocks can be made to be sewn together to form a pattern, like the one above.  The stripes from each block line up with the other blocks to create a larger pattern.  Sewn blocks can also be a whole picture on their own, and they don’t have to be geometric!  I love the whimsical piecing ideas out there – these sites have several patterns they offer for free for personal use.  Check out how clever these are:
Adorable Giraffe block, at Sewhooked
Struttin’ Chick and Easter Egg at Patchpieces.com
Carlson Pine at Forest Quilting
Snowmen at Carol Doak
Today I’m going to show you a sewn block of my own.  It’s a great scrap buster, and all you need are the most basic of sewing skills.  This is one that will really appeal to you if you just like to get creative and wing it.  I’m calling this one the Confetti Block.

First, gather your scraps.  Get a good mix of at least 3 colors – more is even better!  Cut them into strips.  They don’t have to be symmetrical or even.  The crazier you cut them, the more random the look you will achieve.

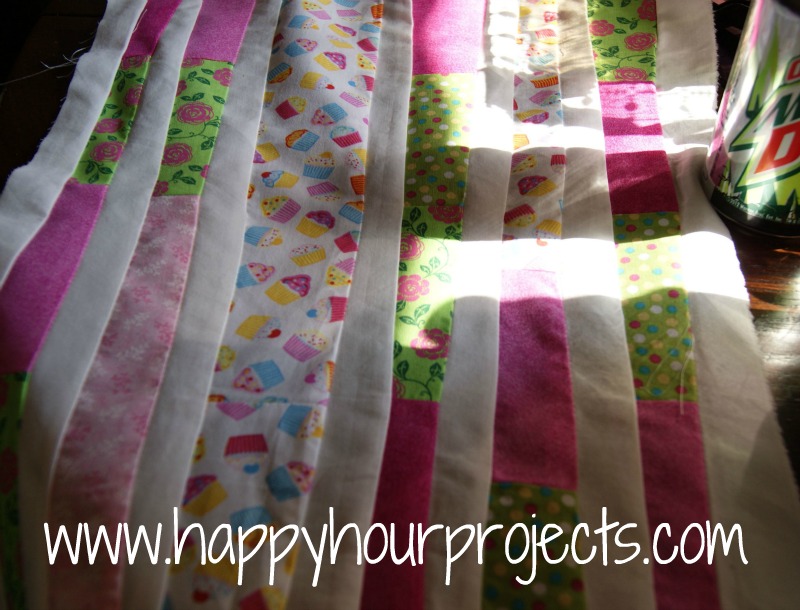
I didn’t bother to measure these because I am not really concerned with conserving my scrap supply.  The idea here is that these will be cut and sewn in a few different rounds, and at the end, we will be trimming the block down to 12″ square and getting rid of the excess – so we’re going to make it bigger to account for the seam allowances.  Each time you cut your square and sew it, you will lose some of the length into the seams, so it will get increasingly smaller as we work with it.  Make sure your strips are at least 15″ long.  If you are really planning to make them uneven, you might want to play it safe and make them more like 16″-18″.

If your strips aren’t somewhere between 15″-18″ when you start, then you will want to sew a few end-to-end to get them long enough.

Then, you can begin sewing them together side-by-side.   If you are still very new to sewing, remember that when you add a piece on to sew, you place the right sides of the fabric together and sew on the backside.  Then you open it up and sew another piece onto the new end.  Your block doesn’t need to be as wide as you made it long, because the seams are already accounted for.  You can get away with making it about 13″ wide.

Once you have all your pieces together in a stripey block, press them with a warm iron.  Be sure to press all the seams the same direction.  It will make your next step much, much easier and will help your block to lie flatter.  And pardon the lighting in these photos – the time I had to work on this was late in the afternoon, and I get a lot of glare.  I put this block together in about 30 minutes while Raya was eating her dinner.

Now, cut your block into strips again, either perpendicularly (hey, spell-check says that is a word) or diagonally.  You want to cut your long color blocks so that they are now small squares, rectangles, or diamonds.

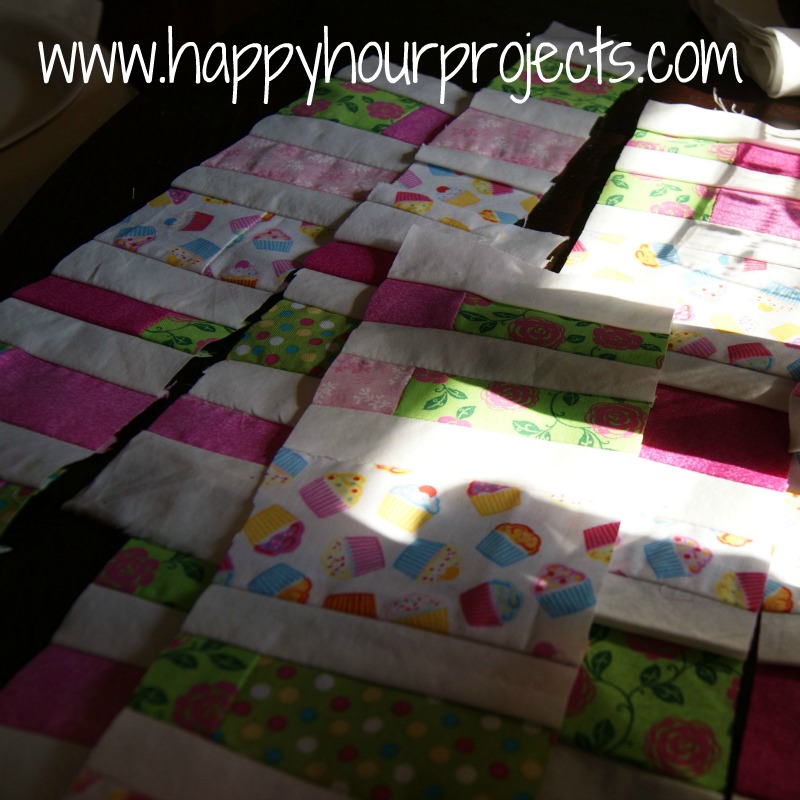
Switch up the directions that your strips are facing, and sew them back together.  Press your block again.

Now you should have a square that resembles a wonky checkerboard pattern.  If you like it how it is, trim it down to your finished size of 12″ by 12″ (or whatever size you’re using for your own quilt), and you are done!  If it’s still not random enough for you, you can make a few more cuts, turn the pieces different directions, and sew them back together again, pressing your block each time.

Now you have a crazy and colorful confetti block!

Stay tuned tomorrow – we’ll be talking about applique!

I link up to these great parties!

Filed Under: Quilt Block Challenge

copyright policy and terms of use

I love it when you love my work! All tutorials and photos published at Happy Hour Projects are copyrighted. If you would like to feature my tutorial on your website or share it on your social media you may use one photo to feature, as long as you provide a link back to the original post.

If you feature a photo, it may not be accompanied by the project tutorial or recipe, whether in my own words as it originally appears or paraphrased by you. This also includes personal sharing on social media and Pinterest. Publishing multiple photos from a project, or including instructions with an accompanying photo are not permitted and you will be asked to remove them.

I love to share my projects, and my tutorials, recipes, and e-books are ALL free for your personal use. However, photos and ideas that are published to this site are my protected intellectual property. You may print them at home, but please do not copy or distribute them. I also allow all designs to be made and sold at fundraisers, craft fairs, etc. If you are selling a piece made from one or more of my free tutorials in your online shop, I require that you use your own, original photography, and include a link back to my website to credit me as the designer.

I hope you enjoy what you read here, and please be fair when you share!

Reader Interactions

Comments

  1. Claire Jain says

    08/03/2012 at 2:16 am

    That scrappy string quilt is so cute!

    Reply
  2. mississippi artist says

    08/02/2012 at 10:59 am

    Very cute, love the choice of colors too.

    Reply
  3. Melissa says

    08/01/2012 at 2:46 pm

    Great tutorial! Thanks for sharing :)

    Reply
  4. Full Circle Creations says

    08/01/2012 at 1:31 am

    I love it. This is one thing I've never tried and have always wanted to. Thanks for sharing at the All Star Block Party!

    Holly

    Reply
  5. Melanie says

    07/31/2012 at 4:45 pm

    I like the combo of colors.

    Reply
  6. Kadie says

    07/31/2012 at 1:20 pm

    Cute! And easy because it can be wonky!:)

    Reply
  7. Kara at Petals to Picots says

    07/31/2012 at 10:57 am

    Love the cupcake fabric :)

    Reply

Leave a Reply Cancel reply

Your email address will not be published. Required fields are marked *

Primary Sidebar

Hello, and welcome! I'm Adrianne, an artist, author, designer, and blogger in mid Michigan. I work from home, chase my two kids, and this once-city-girl is learning how to care for chickens and adjusting to life out in the country. I have a compulsion for daily creativity... sometimes it's jewelry-making, paper crafting, metal stamping, mixing and baking, or giving new life to recycled items. But with 2 young kids, time is short! My goal here at Happy Hour Projects is to share projects and tips that you can do in an hour or less. The ideas you find here are designed to add a little creativity in your day, no matter how much (or how little) time you have!

BUY MY BOOKS!

Copyright © 2026 Happy Hour Projects on the Brunch Pro Theme