
Today’s project is one that beaders and jewelry makers will love, but it isn’t actually jewelry. I had this idea about beading a Christmas ornament, and I just love how it turned out! I made my own base from shrink plastic (yes, I’m a shrink plastic addict right now) and then beaded the with some basic wire techniques. Let me show you how!

What you will need:

For the base – clear shrink plastic, scissors, and a standard hole punch.
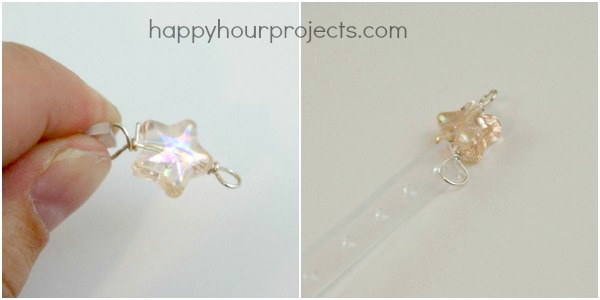
For the tree – coordinating beads, 18 or 20 gauge wire, round nosed pliers and wire cutters. You may also want to add a special bead for the top of your tree (like this little star!) and/or a bead for the tree trunk at the bottom.
First – the shrink plastic base. I made mine 8.5 inches (the width of the sheet) x 1 inch, and just punched a bunch of holes. It only takes a few minutes to bake it to have your hard plastic base. I made up a few in several sizes – I have other projects I’m working on this week that this technique worked perfectly for.

Then, bust out the beads! You will need to cut varying lengths of wire. If you are adding a charm at the top and/or bottom, you’ll use your round-nosed pliers to make a closed loop, thread the bead on, and make another closed loop attached to the plastic base. If you’re not adding a star/charm at the top, you can attach the wire ornament hanger directly to the top hole instead.

If you haven’t made a closed loop before, you just wrap your wire around your round pliers, and then wrap the short end around the long end under the loop you created. You’ll do this on both sides of the bead. You can either add the plastic base right onto the bottom loop, or attach the two pieces with a jump ring.
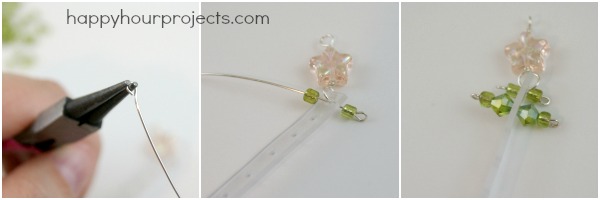
Next, bead your tree! Just make a simple loop on the end of a short length of wire, add a bead, thread it through the hole in the plastic base, add another bead, and make another simple loop to close it off on the other side. You’ll continue doing this on each row, adding one more bead each row to fatten up your tree.
At the bottom, you can make an additional charm (like you made at the top) with a bead to represent your tree trunk. Then, all that’s left to do is add a wire ornament hanger!

Are you making decor or ornaments with your favorite craft techniques this year? What’s your favorite piece you’ve made?


This ornament is absolutely beautiful! :D
Found your blog through the Canadian Home Decor and Lifestyle Facebook group. Just wanted to say Hi. Love your tutorial and I shared it on Pinterest and Twitter. I know what you mean about how much work tutorials are. But I do hope you appreciate the ‘blog love’ and supporting others. Take Care, Thea
I COMPLETELY understand where your coming from. Recognition and credit for your own work is very important. I\’ve been unemployed since the end of August and making crafts and trying to sell online to make a living cause the job market here STINKS!! I didn\’t have the materials to actually make this nor the funds to go buy more stuff but it was so cute I wanted to share. I have changed my post to include only one picture and your link. I follow the rule honesty is the best policy which is why I had to tell you about it ???? If you would like to verify the changes- my blog is rustickexpressions.wordpress.com Thanks and I hope you have a great Christmas!
I feel bad cause I didn’t read your thing about sharing first and I shared this tutorial on my blog :( I am new to this) but I did share your link and said I got it from your Blog. I like to share but in no way claim as my own. Is this ok or would you like me to remove it? Again my apologies -your blog is all over it and at the beginning I explained I got it from one of my favorite blogs- yours :) Let me know. Thank you.
Becki
Hi Becki,
Anytime you enjoy something, you are welcome to make it and share your own photographs, or to use just one photo from my site and direct readers to come here for the full instructions. The reason I don’t allow sharing of full tutorials is that even with credit – there’s no reason for them to come here and visit me if someone has already shared how to make it. Tutorials take me a lot of time to create, photograph, and write about. Anytime you also take the time to make and document a project, of course feel free to share it with your readers! I don’t claim to invent all the crafts, haha, but the work that appears here is always something I’ve made with my own hands. Laying them out in a step-by-step format with clear pictures is something I do to attract readers to visit my site, and it literally takes me hours to put together even one tutorial! If others share the full tutorial, even with credit, then I’ve done all the work but no one will bother to visit me – since they already have the full instructions. Giving credit for inspiration is only half of it when you share things – the other half is making sure readers have a reason to click that link back by not sharing all the details.
I hope that makes sense and I appreciate your understanding. I just want to give a little background of why it’s important to me that my work stays on my site only. Again, if you love the final craft but don’t make it yourself, you’re always welcome to feature one photo with a link – that way if others are interested in making it, they will come and visit me for it! So yes, if you have posted more than one photo or if you have copied any of the instructions, I’d appreciate it if you would remove the tutorial portion and just share one photo. Thanks for the note!
LOVE this! In the states, this stuff goes by the name Shrinky Dinks and can be found in the kids’ section of craft stores. Make sure to get clear! You can also color the edge with green sharpie first.
Adrianne, your limitless imagination never ceases to amaze me! Thanks for these ideas!
I love your tree and cannot wait to make some. I haven’t made any tree ornaments for a few years but enjoy being creative. We have two different ways we can decorate our tree. Each set of decorating ornaments are mostly homemade by me. Your little tree is just what I needed to get me started again. Thank you, Adrianne!
These are so pretty, i can’t wait to make some. I can give them as gifts. Thank You !!!!! I just love them
Super cute!! I’ve never heard of shrinky plastic stuff. Going to have to look for some now. Love it!!
This is soooo cute. I definitely want to make these. You are so creative. Where can we find the shrinky plastic stuff?