
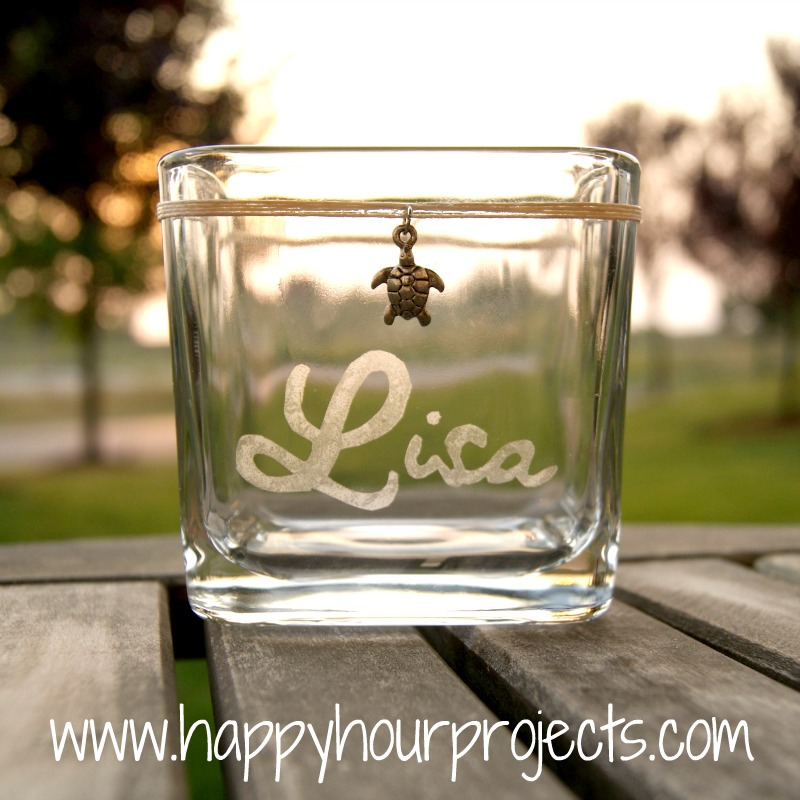
You don’t need anything fancy to make one (though if you do own a Silhouette, this project will be a piece of cake for you). This is a dollar store candle holder and I made my own stencil.
What you will need:
Glass piece of your choice
Armor Etch (available in craft stores)
Paintbrush
*Clear* contact paper (available at dollar stores) or any scrap of clear vinyl
Small utility knife
Self-healing mat or scraps of cardboard, to protect your work surface
Graphic/text of your choice and a pencil to trace it
Twine and optional charm(s)
You may possibly need water-based superglue, depending on the shape of your jar
Start with choosing your graphic or text. You will need to reverse it if you are using text. Lay your contact paper on top, and you should be able to see through to trace it. If you can’t see through your contact paper, you might be able to print your image directly onto the paper backing of the contact paper… I just didn’t want to risk it, just in case.

Now, use your utility knife on a mat or several sheets of cardboard to cut your image or letters out. If there are any “islands” (like in the “L” and “a” below) – cut those out and save them too.

Now, carefully remove the paper backing and stick your stencil to your glass. Be sure to replace the little islands back into the centers of your letters if you have any. Press your edges down as firmly as possible for a nice clean edge.

Now, with a paintbrush, add a thick layer of Armor Etch. I don’t bother with gloves now that I’ve done this a couple times, but if this is your first try etching glass, do take common sense precautions which certainly may include protective gloves. This is creating a chemical reaction that is actually eating the glass away, so it’s definitely not something you want to get on your skin. Just work near the sink, and rinse well if you get any on you.
However, that being said – don’t be nervous, because I’ve found Armor Etch to be really easy to work with! It’s OK if it goes over the vinyl, but I do try to stick close to the stencil openings just so I don’t waste any.

The instructions say to wait 60 seconds and rinse, but I honestly have the best luck waiting closer to 5-10 minutes for a nice, even etch.
Then, just rinse it off really well in the sink, and remove your stencil!
I wanted to add a little something extra, so I tied a few layers of natural-colored twine around the top and attached the little turtle charm. It was at this point I realized, it wasn’t going to stay put, because the jar I had chosen tapers downward. Argh.
So what I did to fix this problem was to lightly coat the twine with a water-based super glue. This isn’t necessary if your twine stays where you tied it. But if you have the same problem I did, here’s the fix. You want a water-based glue because you will be rubbing it into the twine and using a damp paper towel to wipe off any excess you get on the jar. Water-based glue takes longer to dry and doesn’t do that instant-bond like other glues. I have found that I really like using Crafter’s Pick, I found it at Michael’s.

Just make sure you’ve wiped up any glue that has gotten on your jar, if you have to use it, and if you’ve added a charm, make sure it’s straight before you leave it to dry!
This of course makes for a cute, personal candle holder, if you enjoy candles – but I can see this filled with a bit of sand and shells for a nice accent jar too – or just a catch-all for your bedside table or your craft area!

One last quick note – I have a giveaway going on today over at The Terpblog. I’m sponsoring a necklace of your choice from my Etsy shop, The Inkspired Collection. Come drop by and enter to win!


I link up to these great parties! 
I love this! The possibilities are endless. I have been trying to come up with make-ahead gifts for the holidays and this is an awesome idea!
I would love it if you would share this at my new Smart Solutions linky party. You can link up here:
http://theprudentpantryblog.blogspot.com/2012/07/prudent-projects-smart-solutions-linky_13.html
Have a great day!
So cute! Thanks for sharing at the All Star Block Party.
Holly
Way cool, I'm sure she loved it! And that turtle is adorable :-) I did something similar (the etching, not the turtle) with contact paper on a glass decanter as a Christmas gift for my parents. It worked out okay but it sure was easier on the flat glass vase I tested out first! Thanks so much for linking up to The Fun In Functional!
Love this, have always wanted to try etching, think this is going to inspire me to have a go. You made it look so easy, yet it looks very professional, well done.
Louise @ http://www.hullabaloulabelle.blogspot.com
That came out really good. I have tried it before but I can't get it to work like you did. Great job! Thanks for linking it up to our All Star Block Party :)
Shasta @InTheOldRoad
So cute! I love the addition of the twine with the little turtle! Come link up to centerpiece Wednesday and share your idea!
Karin
This is great! :D
Hopping by today via GFC blog hop. I skeemed your DIY project featured today and that's a cute idea, but this one got my attention the most as I'm kinda entertaining the idea of doing glass sketching for the first time. Thanks for the tips and I may take the plunge to do my own. BTW, I'm now following your blog & tweets! ^.^
I love the votive! I haven't gotten up the courage to try etching yet, but I'm getting closer! Thanks!
I really need to try a project with Armor Etch….. looks so simple! Thanks for sharing!
Very pretty! You always teach me something new :)
I love reading your tutorials. It's like we're sitting in the craft room just chatting, so casual but so insightful. This is a cute project.
Cute! I've bough the glass etching stuff but haven't broken it out yet!
This is so cool! I want to try it out :)
What a cute idea! I am pinning it :)