
As I was devouring an entire pint in one sitting, I decided to make jam. Which sounds like a very random project for someone who barely cooks and doesn’t have a garden, but when I was growing up, summertime was all about canning from our garden, so I’m actually pretty well-versed in preserving, and raspberry jam was always one of my favorites. I wanted to put a little twist on it, so I opted for a raspberry-pomegranate recipe.
Raspberry jam when I was growing up was just equal parts raspberries and sugar… though I cannot for the life of me remember how long to cook it, or whether my Gram used pectin to set it, so naturally I consulted Google for some sources. I found a really great post on pomegranate jam at CafeFernando, which got me started. Pomegranates aren’t grown here, so they’re pretty expensive – leaving me to opt for pomegranate juice instead, and superfresh Michigan raspberries.
Ultimately, the recipe I settled on was this. And it turned out so, SO good!
Raspberry-Pomegranate Jam (makes 4 half-pints)
I wanted to make it without pectin, mainly because when you cook jams and jellies with pectin, you have to add more sugar, which increases the calories and doesn’t give you as fresh a flavor in my opinion. So I settled in for a long stovetop session instead, and I will confess… I didn’t cook it long enough to gel as thick as I wanted. My husband came home to me making jam at midnight (hey, I’m not the only one who does these things when I’m having trouble sleeping, I’m sure!) and I decided that 40 minutes was probably long enough. It still spread, but it was more like a sauce at 40 minutes. You can salvage jam that’s too thin, though – I found fantastic instructions at Pick Your Own! Hopefully you won’t need to use them – it does involve adding some pectin if you have to “fix” thin jam. So I will just caution you, if you opt for pectin-free like what I’ve laid out here, you will probably need to cook this on the stove for about an hour.
All right, ready?
If you haven’t been around any sort of canning before – let me recommend going out to the Ball Website. They have a fantastic Starter Guide to Canning, that not only tells you about the tools you will need, but also addresses the adjustments you have to make if you are canning in high altitudes. I am below 500 ft. here, so my processing time is pretty short (5 minutes for this recipe) – but you’ll need to increase that time depending on your altitude.
Add your pomegranate juice and sugar to a saucepan, and cook it on medium-high heat until the sugar dissolves, stirring often. You’ll have to pardon the photos here – it was really late and my kitchen lighting leaves something to be desired. :)

Then, add your raspberries.

Once they heat up a bit, use a potato masher and squish them, so that you have small pieces.

Then, cook for another 45 minutes or so, until your jam has reached the right temperature and consistency – I’ll mention a little more about how to tell when it’s done below. In the meantime, if you haven’t done all your prep ahead of time, now is when you want to wash and sterilize your jars (and wash the lids in hot soapy water). You will need to boil the jars for at least 10 minutes. I did find it was easy to do this for my small batch while I cooked the jam.

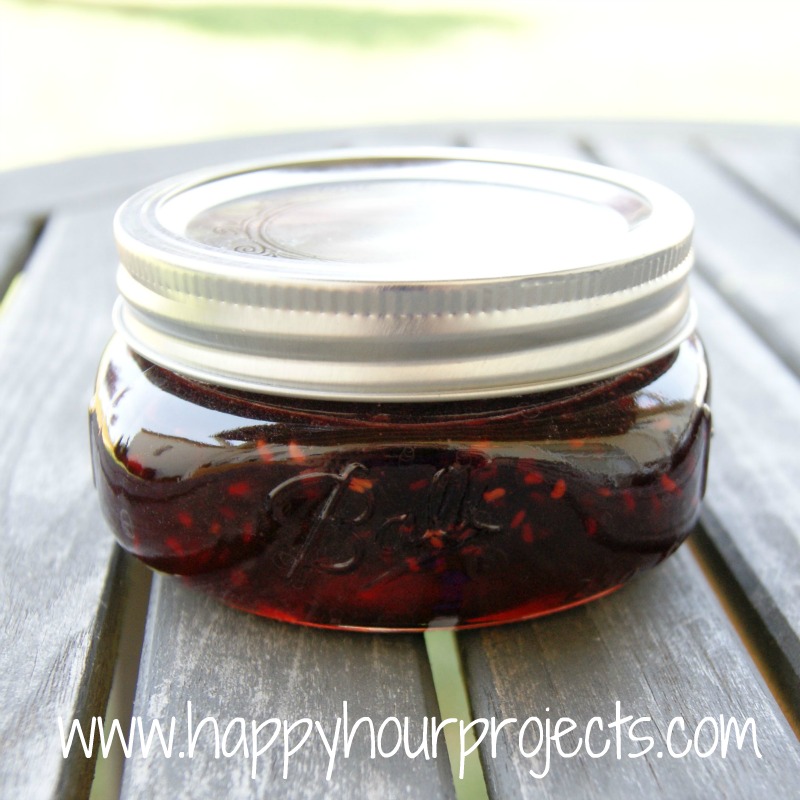
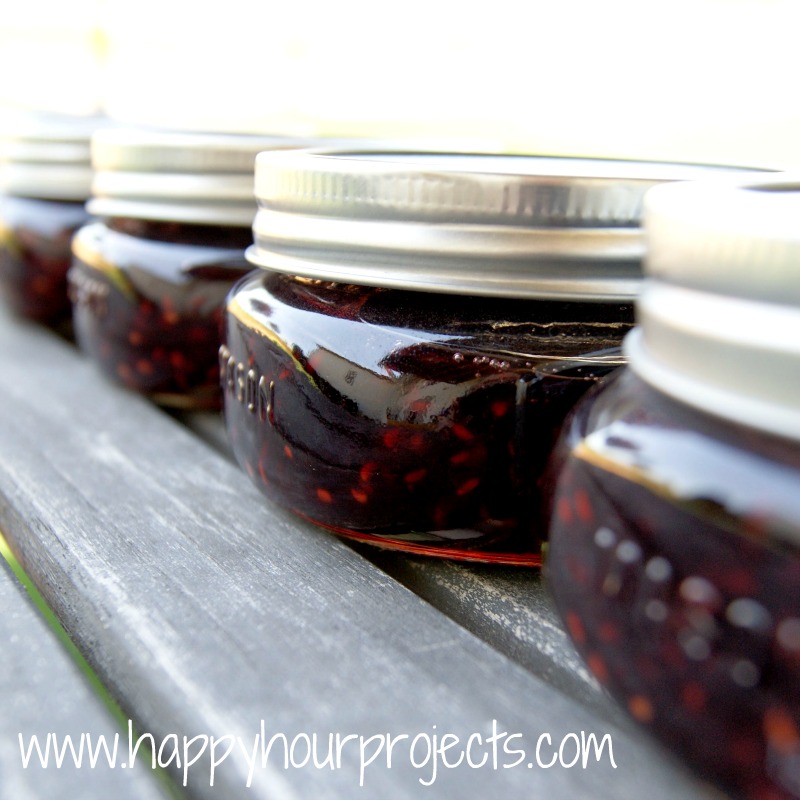
This recipe made me 4 half-pints, with just enough leftover for my English Muffin breakfast the next morning. :) I just used my regular stock pot to sterilize my jars. When I was done sterilizing, I filled up my pot again and got the water boiling for my processing bath. If you already sterilized your jars prior to starting, you still want to get your boiling water bath started and have it boiling by the time your jam finishes up.
There is great information at the National Center for Home Food Preservation about the “spoon test” to see if your jam is done. This is the method at which I failed, LOL – it’s easy to mistake if you haven’t done this before. I would really recommend using a candy thermometer (or apparently they actually have jelly thermometers?) and cook it to 220 degrees. If I make another batch, the thermometer is definitely something I’m going to buy. In the last 5 minutes or so of cooking, add your lemon juice. You really only need it in there long enough to get it hot and well-mixed.
Now, don’t be nervous with this next part, it’s seriously easy. Set your clean jars out at the ready. You may want to use a funnel to be sure you don’t drip, if you’re using small mouth jars. I apparently don’t have photos like this because I was concentrating on getting the hot jam into the jars without incident.
Pour in your jam until you get to the neck of your jar – where the threads start. Then cover your jars with the lids (make sure they’re centered) and screw on the rings. You don’t want the rings super-tight, just enough to hold the lid on so water doesn’t get in. They call it “fingertip tight” – as tight as you can do one-handed, basically. The remaining air will need to be able to get out of the jar when you process it, that’s why you don’t want to over-tighten it.
Now, put your jars in your stock pot for their boiling water bath. You will want to use your tongs for this! They also make canning baskets that you can put your jars into, and lower them in and raise them back out together. The water should cover the jars by about an inch or so.

Check the processing time for your elevation – for below 1,000 feet, you only need to boil the filled jars in this recipe for 5 minutes. Then, turn off the water and let it sit for 5 minutes in the hot water. Then take your jars out, and cool them on a wire rack or a towel. Just make sure it’s a level surface. Resist the urge to mess with the jars. As they cool, they are still processing. You should hear each jar pop as it seals.

Fair warning – it will look runny while it is hot like this. You won’t know until at least the morning if you have jam or sauce, just check how thick it is in your jars. Some jams and jellies can take as long as 2 weeks to fully set, but if it moves really slowly in your jars, you should be okay. :) In the morning, you can check your seals by pushing down on the center of the lid. If it’s already down and you can’t push it, that’s good. You can keep preserved jam for a year, so you will want to label it with the date (and contents).
If anything has failed to seal and is still domed (like if you can pop it up and down), you will want to keep it in the frig and start eating it, because it did not process and will not be preserved. You can tighten up all your rings now – chances are, they probably came loose while they were in their boiling water bath.
The whole process seems complicated and intimidating, but I promise – jam is easy, and it’s a GREAT beginner’s canning project. And I can’t wait to gift this batch of jam, it did NOT disappoint – it’s so delicious!

I link up to these great parties!

You are not alone. I often start cooking something after 11pm. My latest successful, late-night cooking venture started about 2:30am.
I FORGOT THE LEMON JUICE and my jars are already in the water bath. I know that acid is important, did I destroy this batch? :(
I honestly don’t know what happens, LOL – I just know it’s what you do because that’s what I was taught, but I’ll confess that I don’t know all the science behind it. I’m a novice canner – enough for jams and jellies, but that’s about it. Depending how big your batches are, I’d try to use it up fairly quickly. I know without lemon it will still be fine for a time. What I don’t know is whether you’ve got weeks, months, or a year.
I’m sorry I’m not more help – try one of the larger canning sites. I bet they have a FAQ that would cover this topic.
The lemon juice is to add enough acidity to prevent Botulism. So I’d keep it in the fridge if you forgot the lemon juice and if the top bulges or the seal breaks Don’t Eat IT!
Just made this jam! turned out just right. Thanks for the pectin free jam preserves, I’ll be making mixed berry tomorrow. Glad to have found your site!
Thanks for sharing this recipe….and all your helpful suggestions!
Yummy! I love pomegranate and raspberries! We'd love it if you'd share this at our Home is Where the Heart is! http://www.homesteadsimple.com/home-is-where-the-heart-is-link-it-up-wednesdays-1/
and any other posts you'd like to share that have to do with homesteading and homemaking!
Just wanted to let you know I featured this on my blog today! I totally want to try it, I'm just waiting for the weather to chill out a bit so I can actually use my stove again without suffering heat stroke! You can see the feature and grab a button here: http://practicallyfunctional.net/2012/07/features-from-the-fun-in-functional-6/
This looks delicious and your photographs are wonderfu
I love making jellies and jams and just canning. I think its the pioneer spirit in all of us to be able to stock up on food when its fresh for times when its not. But I have never made this unique flavor. Thanks for sharing at Freedom Fridays.
This looks so yummy!
Mrs. Delightful
http://www.ourdelightfulhome.blogspot.com
OMG yum! I've never made raspberry jam before but my dad I used to can our own applesauce from the apples on our tree each year and it was so much fun! Thanks so much for sharing this at The Fun In Functional!
This looks delicious!
Great recipe and tutorial. I have a Blog Hop, and I would love it if you would link this post. You can find it at
http://www.adornedfromabove.com/2012/07/3-face-masks-from-your-kitchen-and.html
It is called Wednesdays Adorned From Above Blog Hop.
I hope to see you there. Have a great Day.
Debi Bolocofsky
Adorned From Above
http://www.adornedfromabove.com
this looks so delicious! I hope you'll stop by and add this and any other posts you're proud of to my Wednesday What We Wore, Read, and Made Link party
marissa
http://raegunwear.blogspot.com
Great tutorial and it looks yummy! Thanks for sharing at the All Star Block Party.
Holly
Sounds yummy! and you're not the only one who cooks at odd hours. This past Saturday (Sunday technically) I was baking banana almond cookies at 2am because i couldn't sleep and i didn't want to waste two very ripe bananas.
This sounds amazing! I love pomegranate and raspberries; what a great flavor combination. Thanks so much for sharing at Mix it up Monday :)
Sounds soooo good! I'm the only person in my house that likes raspberries though. =S
Love these little mason jars. I just bought some too. I've never made homemade jam, but I seriously need to try it. Thanks for your great post.
Sounds like a fabulous combo! I love preserving jam as well. Last year we did strawberry jam that I enjoyed for breaky this morning, lol.
YUM!!! I gave you an award today…post will be up soon!
This looks good! Our raspberries are almost done (boo), but I might just have to buy some to try it out!
YUMMY!!!! I always make freezer jam a couple times a year but never real canning like this. But homemade jam is always the way to go!! So much better than store bought.
Wow! This looks awesome!