
Hey friends! Well, I promised another wire project this week, and I am actually REALLY excited to share this one with you. Some of you got a sneak peek on Instagram last week, but in case you missed it, I MADE TIARAS. Yes! My daughter is in love with her new crown, and I’m not going to lie, I’m a little smitten with my own! This DIY princess tiara makes up in about 30 minutes if you have some introductory wire wrapping experience, and since it’s just a few feet of wire and a single bead, each tiara will cost you well under $5 to make.

I’ve been using the Beadalon Thing-A-Ma-Jig to help me form my loops, and it has really gotten me thinking outside the box! I’m sharing how to make this tiara today with the assumption that you have worked with wire before, even if it’s just at a beginner level. While this IS an easy project, you might not want to tackle it as your very FIRST wirework piece. But if you take a look at the photo below and know your way around the supplies, I’ll show you how the jig makes quick work of this DIY princess tiara.

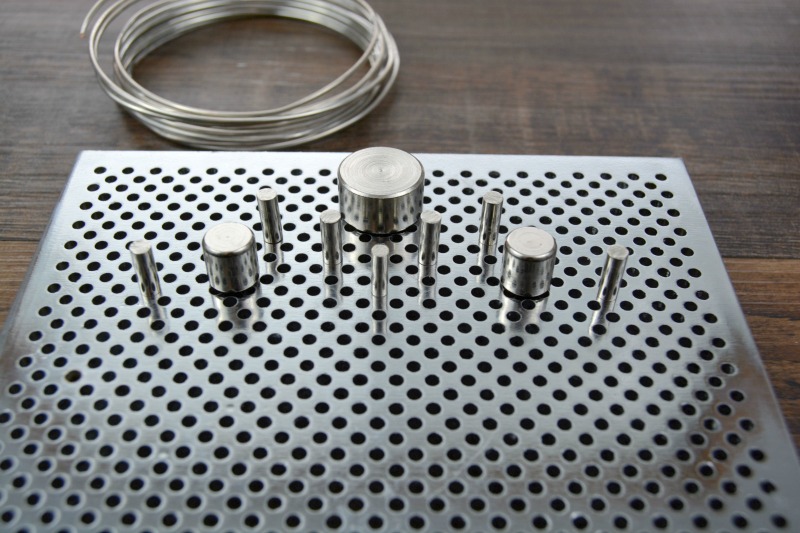
Here’s what you’ll need:
- 2m (6 feet)12-gauge aluminum wire OR 14-gauge tinned copper wire
- 1m (3 feet) 24-gauge silver plated copper wire
- Beadalon Thing-A-Ma-Jig
- 18mm Round Crystal Bead
- Wire Cutters
- Nylon Jaw Pliers
- Bent Nose Pliers
Begin by laying out your crown design on the thing-a-ma-jig. You will create this pattern by wrapping loops of wire around various sized loops and mandrels provided in the jig kit. Take a few moments to practice your wrapped design with a piece of string if you are new to wire wrapping.
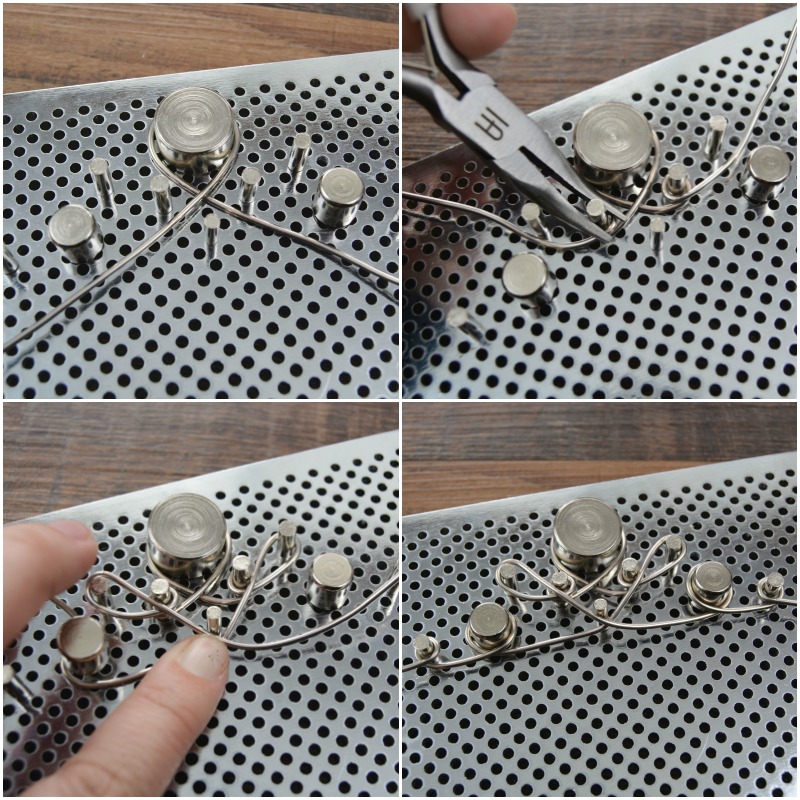
Cut a 2m (6 foot) piece of 12-gauge aluminum or 14-gauge tinned copper wire. At the center point of the wire, begin the topmost point of your crown’s design. Wrap the wire along the pins and mandrels, creating your crown’s pattern. Once wrapped, use the side of a pair of bent nose pliers to press all loops lose to the jig surface and flatten your design as much as possible.

Remove the center of the crown from the jig. Optionally, reset the pins to create a spiral or loop design along the sides of the crown. Repeat as necessary.

Measure the fully-wrapped design. Adult sized crowns should be approximately 24 inches round and child sizes between 20-22 inches, though this measurement can be custom fit to any size! Add a length of TWO INCHES to the final crown size, and cut away excess wire. Be sure the crown is centered along the wire.
Form the trimmed wire into a round shape, overlapping the two ending points by two inches. Cut 18 inches of 24 gauge silver plated copper wire, and wrap it over the overlapping wires, covering them. This will secure the backside of the design. (Alternately, crimp wire connectors can be used in this step, simply trim the wire from to the finished size, and crimp the ends together.)

Cut 6-8 inch segments of 24 gauge wire, and on the front of the tiara, wrap intersecting wires with 5-6 loops to stabilize the design. Trim excess wire away.
To add a bead (or beads), wrap the top loop of the location with 5-6 wraps of wire. String the bead on, and fit it into place. Secure the bottom with 5-6 wraps of wire. Trim excess wire away.

Thanks for joining me for today’s fun project! This DIY princess tiara tutorial has also been shared at FaveCrafts as an entry to their Best Craft Blogger contest – and if you loved this idea, then I’d love a quick click as your vote! Thanks, friends!

Hi,
I hope you are doing well.
My name is Richord, and I am a link builder. I provide backlinks from authority sites. I have 100+ premium sites that will improve the optimization of your site in Google SERPs. My first priority is client’s satisfaction.
If you are interested in my services please let me know your thoughts.
I am waiting for your positive response.
Best regards
nice post
wow looking good
I will make this for my self and my daughter
Adoarable
This is AMAZING! I want one for me! I never knew you could make your own like this.
I agree with you all
This is adorable! I even think I could make this for my daughter ;)
What a cute craft! Any little princess would absolutely love this!
I have a friend who has been making jewelry for years…. I just forwarded your post to her because she is absolutely going to flip over this! So cute and fun! LOVE IT!!
Absolutely love this craft! I’ll be on the lookout for the supplies next time I go to the craft store.
That is adorable! So creative too!
You are so creative. I love the tiara. So cute on the princess!
What princess doesn’t need a crown! This looks lovely. Well done!
This turned out lovely! She is so adorable!
Adorable! What a beautiful girl. Our granddaughter loves to wear tiaras. I’m booking marking this post. I bet she would enjoy helping to make her own.
I haven’t worked with wire…yet. But that looks like a super-fun project that would keep being played with around here! :)
What a neat idea, it looks tricky to do but it turns out really nice afterwards. I wonder if this is something my girls would enjoy doing they are 10 and 12 years old. Thanks for posting this.
When I first saw the title for this post I rolled my eyes but after scrolling through it I have to say I’m impressed. A very nice job with this diy project. I actually emailed a link to this to a few of my more crafty friends. I always enjoy reading your creative ideas on this blog!
Wow! Nicely done. Love how cute and elegant this tiara is. Love it.
Cute! I could see this being great for a wedding or Halloween, too.
Is that little princess cute or what?!!! She looks so adorable. Neat tiara that any little princess would love to have. Thanks for sharing.