
Hey friends! I’ve got a fun wire wrapped jewelry project today that’s perfect for beginners. Wire wrapping can be really beautiful, but it can also be intimidating when you see some of the gorgeous wire wrapped creations out there! I’m actually NOT that skilled at wire wrapping myself, but I love the look and I can pull off the basics – which is what I’m going to share with you today! Learn how to make a wire wrapped bead pendant with this quick tutorial.

The inspiration for this simple, understated piece came from my monthly Blueberry Cove Bead box. It’s a monthly bead subscription service that’s a collection of themed beads, often including stone, glass, and ceramic beads, which is exactly what I’m into when it comes to beads. Each month, the box is a surprise until you open it up. Here’s my haul this month!
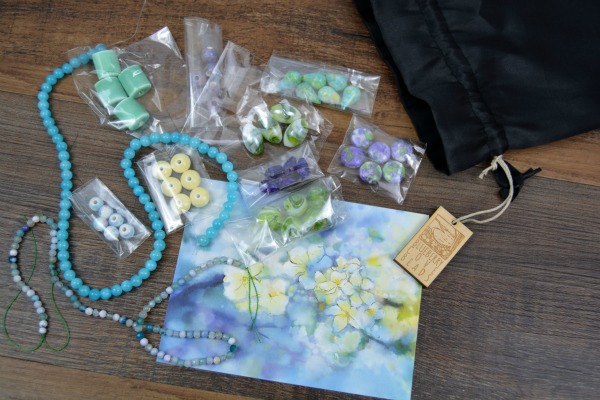
Now, full disclosure here – I get my bead box free each month, but Blueberry Cove Beads does not pay me to use the product or require me to make anything specific with the contents. So while I did get free beads to share today’s project with you, I’m not being paid to plug the bead service. It’s just really fun to get happy mail, and even better when it’s jewelry supplies! If you want to learn more, subscribe to the monthly box, or pick up a gift subscription for someone, you can read more about the service at Blueberry Cove Beads.
What’s especially fun for me is that each month, there’s a postcard with an optional challenge to participate in. This month, the challenge was just to make a piece of jewelry inspired by the photo! These teardrop beads with watercolor-styled coloring jumped right out at me. So total confession: I used ONE bead from my box to make this month’s project, haha. But it fits my style and I have all these beautiful beads to use in as many other projects as I want!
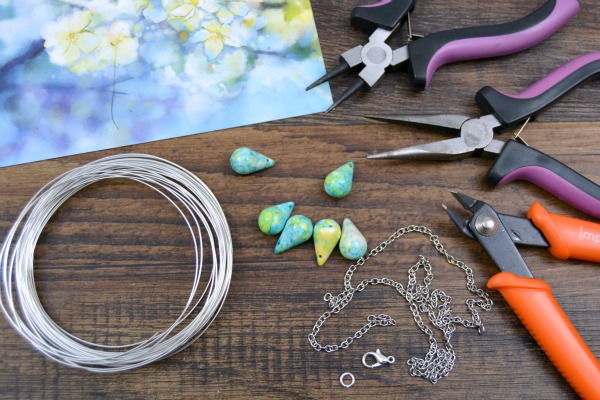
I also used the following supplies:
- 20-gauge silver plated copper wire (about 8 inches)
- Round nose pliers
- Chain nose pliers
- Wire Cutters
- 18″ chain, 2 jump rings, and a lobster clasp (or you may certainly use a finished necklace chain)
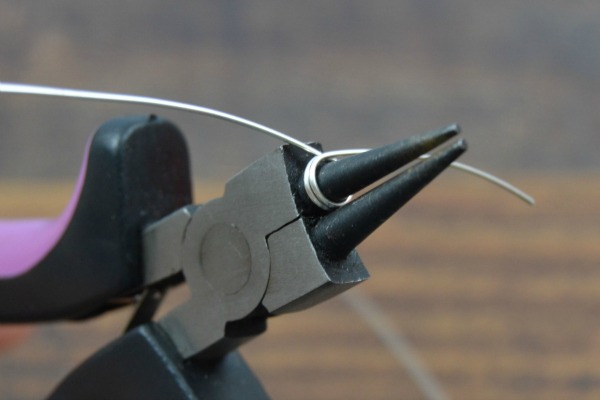
I cut about 8 inches of wire off the coil, and wrapped it around my round nose pliers to make the pendant bail. You’ll notice I formed the loops on the largest part of the pliers, and I also wrapped it twice, because 20-gauge wire is fairly soft. That makes it great for wire wrapping, but I wanted to reinforce the bail with two loops. I left about an inch “tail” on one end of the wire.

Now, add the teardrop bead onto the long end of the wire, and bring the wire up to where the loop of the bail meets the top of the bead – making sort of a figure 8.
Wrap the short end of the wire around the bottom of the bail 1-2 times, and cut off the excess wire – so that you only have the long end of the wire to work with as you wrap.

Now, wrap it starting from the top of the bead, working your way down the bead until it’s wrapped to your liking.
You can see – my wire wrapping isn’t perfect. But guess what? I still get compliments on this piece! Copper wire is really inexpensive, so if you mess up, you can cut it off (or grab a new bead) and start over to get some practice. It might take an extra try to get a feel for how to wrap it smoothly around the bead. Just keep the wraps as close together as you can. When you’re happy with your work, trim off any excess wire.
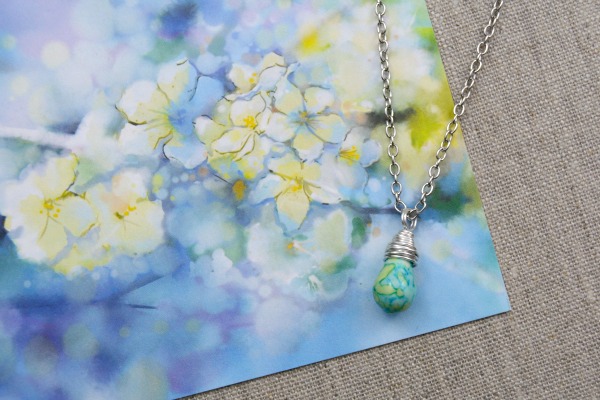
I really feel like my necklace embodies the painting on the postcard! So I achieved what I set out to do, and now I have a fin piece to wear with other necklaces or on its own.
Thanks for joining me for today’s beginner project! I’ll see you guys again soon!

i like it
nice post
wow looking good
Beautiful necklace, and I love the step by step photos. It looks like something I could actually do.
I love this post! I’m always looking for small pendant necklaces, but I’m picky about what they look like haha. Guess I’ll just start making my own!!
I love the color in this bead and he overall look of the necklace. I think this would be something my daughter would simply love!
I love pendants and this is gorgeous! I had no idea subscription boxes for jewelry making existed like this, I’m definitely going to have to check it out and subscribe!
Love the necklace and the wire wrapping technique. Is that the December or January subscription box?? I wonder if they still have any available. .
Thanks for sharing.
It’s December’s box! She does often have a few extras available in her shop, but I don’t see it loaded yet. You can check here in the next few days: http://www.blueberrycovebeads.com/product-category/past-boxes/
Because she ships internationally, she waits a couple weeks before loading the contents, just so every gets their box and gets to be surprised by it. :)
Wow! This looks really nice. Thanks for the tutorial!
WOW!! I love this! Thanks for the tutorial! I’ve always wondered how something like this was made.
Very nice!! That bead box sounds like a lot of fun for my daughter and I :)
Beautiful necklace. Not sure I could pull this off, but I may try it one day. Thanks for sharing this with us.
I think there will soon be monthly boxes for everything! I’ve never heard of Blueberry Cove bead box. How fun to get that in the mail every month. I love the teardrop creation you made!
Looks nice! I enjoy “happy mail” as well, lol. I like simple pendants like the one you made, I’m not good at making jewelry but maybe I’ll give it a try sometime. :)
Each year our kids elementary school has a craft show around Christmas for students to buy presents for their moms, dad, brothers, sisters and so on and I noticed one of the booths was selling some items that look just like this. So I guess in addition to having fun making stuff like this for yourself people can turn this hobby into a side business to earn a bit of extra income.
nice post – I always enjoy reading about your projects and though some of your examples might not be “perfect” (wiring) as you describe them they are probably a whole lot more perfect than if I’d done it LOL Looking forward to your next DIY idea – I bookmark some of the ones that might be good ones for my daughters and her friends to enjoy if we are looking for an activity for them to do.