• Skip to primary navigation
  • Skip to main content
  • Skip to primary sidebar

  • home
  • about adrianne
  • buy the books
    • DIY T-Shirt Crafts (2015)
    • DIY Stamped Metal Jewelry (2016)
    • Rock Painting for Beginners (2019)
  • videos
  • crafts
    • diy beauty projects
    • kids’ crafts
    • paper craft projects
    • polymer clay
    • sewing projects
  • jewelry
    • bracelet projects
    • earring projects
    • necklace projects
    • jewelry tools & supplies
  • metal stamping
    • beginners’ tutorial
    • video tutorial
    • project ideas
    • metal stamping supplies
  • recipes
    • cocktail recipes
    • appetizers
    • main and side dishes
    • sweets and treats
  • by season
    • birthdays
    • new year
    • valentine’s day
    • st. patrick’s day
    • easter and spring
    • mother’s day
    • patriotic
    • fall
    • halloween
    • christmas
    • thanksgiving
  • privacy

Happy Hour Projects logo

11/21/2013

Multi-Strand Statement Necklace

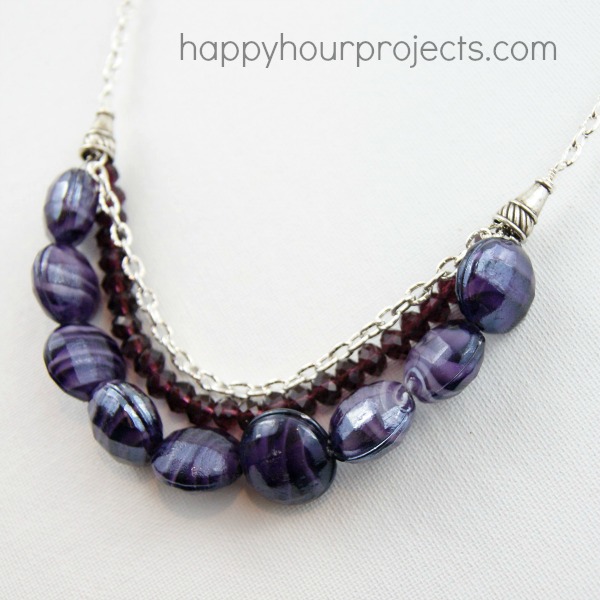
Good morning!  I made up a fun statement necklace with multiple strands that I wanted to share with you today!  I love the mixed media look with chain and beads.  I’m going to classify this one as an intermediate project – if you enjoy beading you will find it to be easy, but finishing some of the details to make it look more professional requires a couple techniques that I will show you how to do.  I’ll also give you some tips to make it beginner-friendly though!

Multi-Strand Beaded Statement Necklace at www.happyhourprojects.com

What you will need:

Multi-Strand Beaded Statement Necklace at www.happyhourprojects.com

  • Beads you love!  Choose more than one size (or color!) for variety.
  • 18 inches of chain, and a clasp
  • 20-gauge wire
  • End cones (these have a 10mm opening)
  • Beading Wire
  • Wire guards and 2mm crimp beads
  • Wire cutters
  • Round-nosed pliers
  • Jump Rings

First, you’ll need to make your connectors that you will attach your bead strands to.  I like to make a closed loop to ensure I don’t lose anything through an open jump ring later.  This will be covered by an end cone for a finished look – but if you are beginner, you can skip the end cones.  You won’t need your own connectors – you can attach your bead strands directly to the chain!


Multi-Strand Beaded Statement Necklace at www.happyhourprojects.com

To make a closed loop, cut about a 4 inch length of wire, and wrap one end of your wire around your round-nosed pliers.  Take the short end, and wrap it around the long end.  This will secure your loop.  After 2-3 wraps, you can nip off any excess.

Now, attach your wire so that you can add beads!

Multi-Strand Beaded Statement Necklace at www.happyhourprojects.com

Adding a wire guard helps your jewelry to last longer.  Beginners may skip this step if you find it difficult, but over time, bead wire is likely to fray.  Just feed your wire through a crimp bead and one end of the wire guard.  hook the wire guard onto the loop of your connector (or directly to the chain), and feed the other end through the second hole in the guard.  Now, just pass the wire back through the crimp bead, and use your pliers to crimp it tight.

Now – add your beads to the wire, and crimp the other end to your other connector.

Vary the length of your bead strands and chain so that they are slightly staggered – otherwise you wont be able to clearly see all three strands.  I cut a length of chain and connected it with a jump ring.  When the beaded bib part is dine and it’s all connected, it’s time to add your end cones (if you plan to)!

Multi-Strand Beaded Statement Necklace at www.happyhourprojects.com

Slide the cone on to cover the loop on your connector.  I like to add the chain directly onto the loop to really secure it, but if you find this difficult, you can close the loop first and then add it to the chain with a jump ring.  Just close your loop the way you did in the first step, by wrapping it over your round pliers and then wrapping the excess around the base of the loop you just made.  Cut off any excess.

Multi-Strand Beaded Statement Necklace at www.happyhourprojects.com

Now, just add your chain!  I made my finished necklace 18 inches.  That meant that I added two equal lengths of chain to the connectors, and a clasp to be able to close it.

Multi-Strand Beaded Statement Necklace at www.happyhourprojects.com

Now, I have a fun, chunky statement piece!  Perfect for adding some color to an outfit – and I’m proud to gift it, knowing it will hold up for the long-term.

Multi-Strand Beaded Statement Necklace at www.happyhourprojects.com

Adrianne Signature

Filed Under: Fashion, Jewelry, Necklaces, Tutorials Tagged With: beads, chain, mixed media, necklace

copyright policy and terms of use

I love it when you love my work! All tutorials and photos published at Happy Hour Projects are copyrighted. If you would like to feature my tutorial on your website or share it on your social media you may use one photo to feature, as long as you provide a link back to the original post.

If you feature a photo, it may not be accompanied by the project tutorial or recipe, whether in my own words as it originally appears or paraphrased by you. This also includes personal sharing on social media and Pinterest. Publishing multiple photos from a project, or including instructions with an accompanying photo are not permitted and you will be asked to remove them.

I love to share my projects, and my tutorials, recipes, and e-books are ALL free for your personal use. However, photos and ideas that are published to this site are my protected intellectual property. You may print them at home, but please do not copy or distribute them. I also allow all designs to be made and sold at fundraisers, craft fairs, etc. If you are selling a piece made from one or more of my free tutorials in your online shop, I require that you use your own, original photography, and include a link back to my website to credit me as the designer.

I hope you enjoy what you read here, and please be fair when you share!

Reader Interactions

Comments

  1. Carole G says

    09/10/2014 at 7:13 am

    Loved this necklace. I am going to be doing a couple for the gift giving season!!

    Reply
  2. Alex Cardo says

    01/14/2014 at 9:57 am

    Wow, this is fantastic quality DIY idea. This beautiful necklace you made by yourself…I think, that all jewelry shops will close in future if everyone can make the same! :-) No, I’m seriously…

    Reply
  3. Mommy Goes On says

    12/17/2013 at 2:06 pm

    What a beautiful necklace! I just got into beading, so I haven’t done anything with wire yet, but this is really inspiring!

    Reply
  4. Rebecca says

    12/02/2013 at 4:54 pm

    Ohhhh I love those chunky blue beads! Beautiful necklace :)

    Reply
  5. Crystal says

    11/22/2013 at 10:18 am

    Beautiful!!! Love it!! I love all your jewelry projects!!!

    Reply

Leave a Reply Cancel reply

Your email address will not be published. Required fields are marked *

Primary Sidebar

Hello, and welcome! I'm Adrianne, an artist, author, designer, and blogger in mid Michigan. I work from home, chase my two kids, and this once-city-girl is learning how to care for chickens and adjusting to life out in the country. I have a compulsion for daily creativity... sometimes it's jewelry-making, paper crafting, metal stamping, mixing and baking, or giving new life to recycled items. But with 2 young kids, time is short! My goal here at Happy Hour Projects is to share projects and tips that you can do in an hour or less. The ideas you find here are designed to add a little creativity in your day, no matter how much (or how little) time you have!

BUY MY BOOKS!

Copyright © 2026 Happy Hour Projects on the Brunch Pro Theme