
Okay, so I revisited making cookies using Reese’s peanut butter cups. I thought perhaps I could make things easier by using an easy cookie recipe. I tried some Cake Mix Cookies, and thought I would wrap a peanut butter cup inside.
I failed again. Well, on the putting the peanut butter cup inside part. That didn’t work at all, so I improvised. The result turned out quite excellent, though:

They did turn out delicious, but if you know me at all by now, you know nearly every cooking-and-baking venture comes with a story. So, here’s the scoop. :)
First of all – I thought I was making them wrong, because the batter is so stiff and so sticky, it was really difficult to work with! I used my mixer, and once it was well-moistened, the entire blob of dough wrapped around one of my beaters, and before I could shut it off, it started flinging chocolate strands everywhere. No, I do not have a picture of it, but I sort of wish I did. It was a race between me and the dog, to see who could clean it up first. (Fortunately, I won.)
But it was WAY too sticky to manage any rolling. Perhaps if I had chilled the dough – but I’m so impatient and I didn’t really reserve enough time to prep the dough and come back later to bake it. SO wrapping it around a candy wasn’t happening. It stuck to my fingers pretty much immediately.
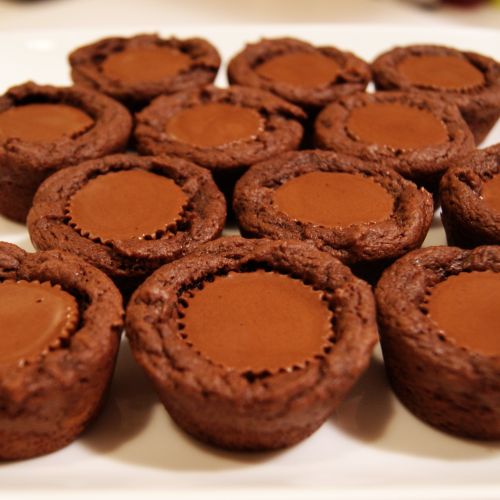
So I decided to do the mini-muffin-tin method again, as you can tell. By washing my hands every third cookie or so, so that it would stop sticking to me and get into the tins, I finally got the whole batch dropped. I don’t know how anyone uses a spoon to drop these things, unless you use like two dozen spoons? Am I the only one who finds this mix to be terribly sticky?
But, once I got them into the oven and they started smelling delicious, my memory of the fight started to fade, and I was really hopeful. I baked them for 8 minutes, and then pressed refrigerated peanut butter cups into the centers a soon as they came out of the oven.
The result? Awesome, actually. Soft and chewy, very brownie-like, with bonus peanut butter cups! Good enough I’d brave the batter again, though I think next time I’d skip the mixer and stir it with a spoon, and leave enough time to chill the dough before working with it.
If you haven’t made cake mix cookies before, the recipe is extremely simple:

1 box mix (18.75 oz.)
2 eggs
1/2 c. vegetable oil
(I of course added peanut butter cups to my version, the recipe made about 30)
Bake in a greased mini-muffin tin at 350 for 8-10 minutes. Press your peanut butter cups into the baked cookies as soon as they come out of the oven. A tip: unwrap them first, toss them back into the bag, and pop them into the frig while you prep your dough and bake. They press into the warm cookies better if they are cold.
And, tadaa. I would totally do these again, though I’m still on the hunt for that elusive peanut-butter-cup-inside-a-cookie-recipe. Please let me know if you find one!! :D
I link up to these great parties!
~ Adrianne
I make a similar cookie but instead of a cake box mix, follow the recipe on the back of a bag of chocolate chips for regular cookie dough – just don't put in the chocolate chips. Take that dough and put it in mini muffin tins (I find it best to use paper liners with them) and then bake. Once you take the cookies out, push the PB cups in to each cookie while they are still a bit soft and move to a wire rack to cool until they set. Sometimes I put them in the fridge to set faster. Fiancee and all my family LOVE them.
Yummy, I think I need one of these about now!
Your husband is one lucky guy! That kind of sounded bad, I didn't mean it that way.
Carlee
http://www.ladybirdln.com
These look absolutely delicious!
Shared this on FB I am drooling!! I may need to make a rule about no food being linked up…it is gonna ruin my diet! HA
Thanks for joining our Link It Up Thursday party. :)
These look absolutely fantastic!! I'm not a big Reese's fan and am wondering how they would work with Rolo's. Might have to try!
I LOVE your recipe! Would you come over to CAST PARTY WEDNESDAY and share this yummy recipe with us?
Thanks,
I hope to see you there!
Sheryl
http://www.ladybehindthecurtain.com/?p=23007
I LOVE cake mix cookies. The dough does always come out pretty stick. Letting them sit helps some. Or rolling them in sugar helps too. I have never tried a peanut butter cup in them. That sounds great. I think I need to run to the store and pick a few bags!
The look RIDICULOUSLY YUMMY!!!! I'm saving this recipe for sure!
Found you on The Blackberry Vine Tuesday To-Do List! Come by for a visit sometime!
Kristy @ Shona Skye Creations
http://shonaskye.blogspot.com
These look absolutely delicious! I'm at that time of day where I could eat a few of those lol.
I'm now your newest follower. If you'd like to follow back here's my link :)
lifeasweknowitbypaula.blogspot.com
Thanks!
Paula
This comment has been removed by the author.
Oh those look so good! For once I am glad I am 'baking challenged', otherwise I would be tempted to make them and there would go my good intentions for cutting back:)I hope you enjoyed them on my behalf! God bless x
i wanna lick the bowl!
visiting via lifemadelovely and invite you to my kate spade & bling giveaway:
http://www.hellolovelyinc.blogspot.com/2012/01/something-old-something-new-giveaway.html
smiles.
michele
Oh im going to try these! i make the version with peanut butter cookies all the time, but these look like a nice change up and so delicious!
You always have such an adventure. Glad this one worked out for you and I would like one right now, please. Just an aside, I always mix my batters in the sink because I ALWAYS whip batter around and make a mess, then it's a really quick clean-up. :)
These look so yummy and funny! I just picture strands of chocolate flying! I have never tried a cake box cookie, need to add that to my to-do list, my son always wants quick cookies, not the 2 or 3 day decorating thing I like to do. Btw, I cant seem to manage to drop a cookie from a spoon either, are we both just impaired or is it a joke someone puts in a recipe? Anyway your cookies look great, especially with that bit of heaven you pressed into it!
10/10/2014 made these for the first time cuz i had some reese cups ready for use. I made the first 24 placing the cups inside while hot In The pans. However, they were difficult to take out. My last 13, i took out the brownies and immediately placed the cups in the centers. Worked out perfectly, were a great hit. As far as the spoon technique, i used the small cookie scooper from walmart; cost less then $7, worked for me. One well invested cookie tool. ????
Honestly, these recipes just make my head spim! The whole chocolately-goodness of it all makes me smile. Just know I'll be trying this real soon!
Yummy! You have such a great blog! I'm now following you from Welcome Wednesday. Feel free to follow back at http://www.dandygiveaway.com. :)
Oh my that looks crazy good….I'd love for you to share this @CountryMommaCooks link party
going on now-Sunday!
Yummy! That makes me wish we had reeses and cake mixes here! Looks great!