
Fair warning, friends: I just tried adding eyelets to my jewelry projects last night. You probably know where this is going… get ready to see eyelets on all kinds of things now. Seriously, how am I just now trying this?? It’s SO easy, and it finishes punched holes in blanks such a professional-looking way! An eyelet hole is great for stringing charms and blanks onto chains, and it’s also great for the idea I’m sharing today: adding a sweet charm to a simple stamped design. I’m going to show you just how easy eyelets are today. Ready? Let’s go!

So I had to resist all temptation to call it a dangle-bangle. Because, of course, that just sounds silly. ;) But the dangling charm adds so much character to an otherwise-plain stamped bracelet. It occurs to me now that I’m sharing these photos that “passion” with a heart may be mis-read… it’s totally innocent. I was thinking of my passion for creating when it popped into my head, so I just ran with it. I figured you guys are probably getting tired of seeing my kids’ names plastered all over my stamped projects, haha.
I got the supplies for today’s project from Goody Beads, which is one of my favorite sources for my metal stamping projects. Because these are specialty supplies, I’m going to leave links below to the exact products I used. They are affiliate links, which means that if you decide to make a purchase, it does support my blog. Relationships like this keep me in supplies to keep bringing you new project ideas. ;)
So let’s get to it! Here’s what you will need:

If you’re going to get started in metal stamping, Goody Beads has a dedicated category to stamping essentials for beginners. It’s actually a list that I hand-picked. You can also learn more at my jewelry stamping for beginners post from a few years back. I’m not going to get into how to stamp today, but I really do have lots of projects on the topic that you’re welcome to check out, including a video tutorial.
Assuming you have stamping supplies, or if you skip stamping a word to your bracelet and you’re going straight for the charm, here’s what else you’ll need for the eyelet part of the project.
- Bench block and hammer
- Eyelet Setting Tool
- 3.7mm eyelets – I used a silver finish here, but you can choose a contrasting metal, too (hint, hint: I’ve got a project next week where I do exactly that!)
- 1/4 inch aluminum bracelet blank (6 inches long)
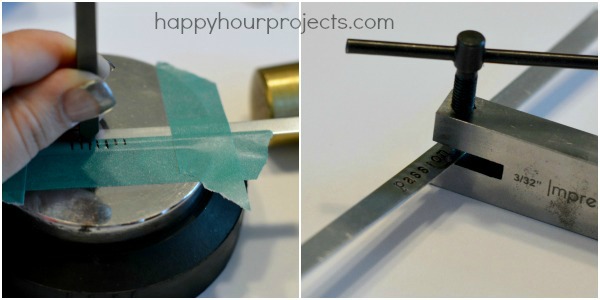
- Small 2-hole punch for a 3/32″ hole
- Bracelet Bending Pliers
- Jump rings, Jewelry pliers, and a charm you love
First, I stamped my blank, and then punched a 3/32″ hole. I made it lower-than-center, so that it would appear more that the charm was at the bottom of the bracelet, but that’s not really a critical placement. Just make sure you don’t punch off the edge of the bracelet blank.
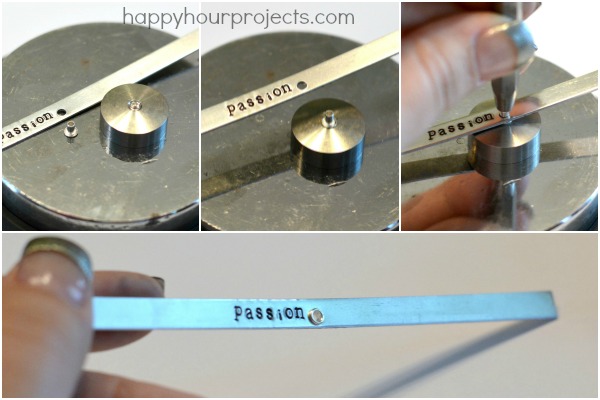
Next, I set my eyelet. Here’s how that works.
Put the base of the eyelet setter on a hard, flat surface – on your steel bench block is ideal. Putting it on a soft surface (like a wood table) is likely to mar that surface. Set the eyelet in the ring of the base. Place your blank on top so that the eyelet comes up through the hole, and then position the setter tool so that it fits into the eyelet’s grooves.
Hammer the top of the setter tool until it’s flattened down onto your piece – for me this was 6-8 taps with my hammer. I found that the front and back both looked equally good, so you can set your eyelet from either the front or the back of your blank. You’ll have a beautifully smooth finished hole!
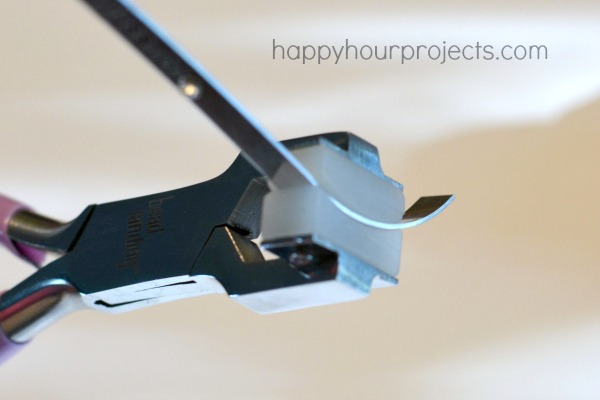
Next, you’ll need to bend your blank into a wearable curve. Some bracelet-bending pliers work great for this; just go around the bangle to create a continuous curve.
Finally, just add your charm with a jump ring to finish your piece! You may also want to use a small file and smooth the sharp edges on the blank, so that it doesn’t scratch the wearer.

What do you think? Doesn’t it look so much more professional? And for so little effort… I’m never leaving an unfinished hole again, haha. You can even stack multiple blanks together and use eyelets to secure them, just by choosing longer lengths of eyelets.

Hope you had fun with this idea – I sure did. :) Do you already add eyelets to your pieces? What other uses do you like them for?

Do you have a tutorial for adding the small stones resembling birthstones within the stamped product? I cannot find any
HI,
I love this bracelet idea! I followed your instructions and my bracelets came out
great! I made 10 of them to give to my sisters and neices for Christmas
as a memory bracelet for my sister who passed away a month
ago. When everyone tried them on I had to adjust them with the bending pliers to
help make them smaller so they wouldn’t slip off their wrists. The problem was the
fact that these are aluminum after making them smaller their becomes a small bend
in the spot where the hole is punched making it not so sturdy and if it is made smaller
or bigger it seems like the metal will weaken and may crack.
My question is do you know if a stronger metal, like maybe sterling silver would
work better to give it more strength where the hole is punched?
Or any other advice you may give me to be able to make these
last as long as possible as they are memory bracelets? I love your website and
as I am a beginner to jewelry making I appreciate any help you can give me. I
am attaching a photo of the bracelet for you. I also stamped the date of her
death on the inside of the bracelet. The charm is of an angel with the breast
ancer symbol that I found on etsy which was perfect because she
died of complications from breast cancer.
Thanks again for any help you can give me!
Sorry I wasn’t able to attach a photo. Is there a way to do this?
That’s wonderful, thanks so much! If you’re enjoying the book, I encourage you to leave a review on Amazon (even if you bought it elsewhere) because those reviews are extremely valuable to me. The more reviews I get, the more Amazon will show my book under the “recommended” category.
Thanks for your support, it’s comments like this that motivate me to share more!
I love your work … I have your book “DIY Metal Stamped Jewelry From Monogrammed Pendants to Embossed… ” and I work gradually. Thank you for sharing your talent. I love your work …
I finally gathered all supplies as mentioned and neither size hole on my cutter is big enough for the 3.7 mm eyelets I got the 1.5 and 2mm hole punch. I actually got the bigger one too but that starts at 1/8 inch which seems too big. The eyelets bag just says 1793 on it and I can’t find my statement but I ordered the ones from your link. I’m bummed! Fortune in supplies and can’t make the bracelet.
It’s a 3/32 inch size hole that fits this brand eyelets. 3/32 inches converts to is 2.38125 mm – if you can’t find the punch that measures in inches like what I’m using (ImpressArt’s punch is sized in inches, though I see it’s showing out of stock right now), then you can try any 2.5mm punch – that should be a good fit. As a work-around, you can punch the 2mm hole and use an awl to stretch it a little – that may be enough to fit the eyelet. I’m sorry you’re having trouble finding the supplies! :( :(
Yes you have to be very careful to get the right punch. That small punch that’s out of stock–I ordered it from somewhere else and it is not the right size. I tried the 1/8″ hole on the large hole punch and that’s too big. I found the 3/32 punch somewhere else and just got it today. I now can punch just about any size hole with three diff hole punches. It is confusing that some come in inches and some in mms. I didn’t think there would be that big of a difference. I’ll let you know how it turns out. I’m making a memory bracelet honoring my son who died 10 months ago today.
I’m sorry for your loss. Personalizing jewelry is a great way to keep those important people not just close to our hearts, but visible, too. Good luck!
Hi! First I have to say I love your blog and especially this post. I wanted to order from Goodybeads, but I am from Europe. Luckily my parents are going to the states! So I can finally order! But I wanted to know this one thing. I notice you used a 20 gauge bracelet. I am going to use 12 gauge I think. But will these eyelets fit? Or will the metal be to thick?
I tried to search high and low but your blog is really the only place with such a great tutorial! So I thought I’d better just ask here.
Hope you can answer my question, so I can order asap. Ofcourse through your links, a blog like this deserves support!
Okay that is tough because I haven’t worked with that gauge often enough, but I think I’d move up to the 5.3mm size. There is some give to the eyelets, because they roll down as you hammer them to set them. Thicker gauges would roll down less, but at the same time – the next size larger (the 5.3 mm) can roll down more.
The nice thing about picking up the 5.3 mm size is that if you decide later you want to rivet a metal blank onto your bracelet to attach it, you will be able to.
Here’s the link to the 5.3 mm size: https://www.goodybeads.com/store/products/TC01799.htm but if you just use the search box and type “tierracast eyelets” you’ll be able to view all the sizes and finishes.
Good luck and thanks for the note!
Thanks for your super fast reply! Will order the 5.3 mm. Thanks so much, can’t wait to start stamping!
I have been reading your tutorials for a long time. I have used eyelets the same way as rivets. I rivet 2 pieces of sheet copper together with a rivet in each corner. The back is solid and the front has the center cut out with a picture sandwiched in-between. Voila! A framed picture that makes a great pendant.
Adrianne, you always make the most amazing jewerly and yet make it look so easy! You area always inspiring me! :D
These are really nice charm bangles, they remind me of those fancy Cartier bangles – but even better!
Great tutorial, I have done meal stamping but never a bracelet. How do you round the ends of the bracelet to give it the finished look.
Thanks!
Oh, I’m sorry, I probably should clarify! It was an afterthought so I didn’t snap a photo – I just used a small file. If you want them truly rounded (and not just the corners softened so they aren’t sharp), you can nip the corner off with some wire cutters, too.
That is an awesome bracelet. I wish I could do that. Your crafts are wonderful; thanks for sharing.
Ok I really need to try stamping! Love your blog btw!!!