
So I’ve been chatting a lot with some local artists – and crafters – and there seems to be a delineation between “art” and “crafts”. I really don’t see the distinction, personally. An artist is a craftsman (or, craftswoman?), and crafting is an artistic endeavor, too. They go hand in hand, I believe. So in thinking this over, I stamped up a quick piece inspired by that idea. I’ve been wearing it the past few days – especially to the events at ArtPrize – and I’ve gotten some great compliments on it!

I got the supplies for today’s project from Goody Beads, which is one of my favorite sources for my metal stamping projects. Because these are specialty supplies, I’m going to leave links below to the exact products I used. They are affiliate links, which means that if you decide to make a purchase, it does support my blog at no cost to you. (Relationships like this keep me in supplies to keep bringing you new project ideas – but feel free to shop your own favorite sources, instead.) ;) Anway, if you’re going to get started in metal stamping, Goody Beads has a dedicated category to stamping essentials for beginners. It’s actually a list that I hand-picked. You can also learn more at my jewelry stamping for beginners post from a few years back. I’m not going to get into how to stamp today, but I really do have lots of projects on the topic that you’re welcome to check out, including a video tutorial.
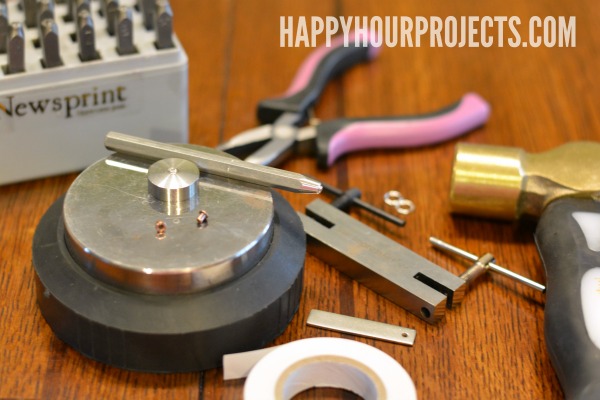
- Metal stamping supplies – I used ImpressArt’s Newsprint font
- 1.5 inch pewter bar blank (this one only has one hole, but that’s okay because punching another is easy)
- Bench block and hammer
- Eyelet Setting Tool
- 3.7mm eyelets – I used a copper finish here, but you can choose any color you like
- Small 2-hole punch for a 3/32″ hole
- 18? chain (get something around 2mm)
- 7mm (or larger) jump rings and jewelry pliers
First, you’ll need to increase the size of the existing hole on this blank slightly. Just position the 3/32 punch over the existing hole to drill it. Punch another hole on the other side.
Then, stamp! I used stamp straight tape to keep my letters straight. I often mark off the spacing, but I knew I wouldn’t have any extra space on this blank with this font, haha – so I started in the center and worked my way out, filling the whole blank. Then, I darkened it with a Sharpie marker and used a polishing pad to get rid of the excess marker. (And don’t forget, I have LOTS more info on stamping in that beginner’s metal stamping post, this is just a very quick overview.)

Next, I finished the holes with eyelets. Place the setter base on your bench block (or another hard surface – not your table! You don’t want to dent your wood). Place an eyelet in the groove, and align the hole in your blank over top of it.
Fit the setter tool into the small end of the eyelet, and tap teh end with your hammer until it flattens (it takes 4-5 taps, generally). Be sure to hold the setting tool as straight as possible – if it’s crooked, your eyelet will come out a little uneven. (While it won’t be noticeable, generally, it decreases the space you have for adding a jump ring.)

Repeat on the other hole, and add jump rings. I like adding 2 jump rings for looks and for security – a split ring would work well, or just one is fine, too!

String an 18″ chain through, for a necklace that sits close to your neck. (If you want it lower, use a longer chain.) By stringing it along the chain, the pendant can move as you do, so it won’t end up crooked on your neck if it shifts while you move. If you’re short on chain, though, you can attach it directly to the jump rings.

What are your thoughts on being an artist vs. crafter? Do you think people are just one or the other, or are they both?

This is such a beautiful necklace, Adrianne! You always make such wonderful jewelry.
We could be artycrafters or craftyartists! I love your tutorials. They inspire me.
This is adorable! It would make the perfect gift for a crafter, for sure. :)
Love this! I say both but I do know artists that would not say they are crafters. :D This really is a pretty necklace!
I agree on the “crafter” part – but art is also a craft. When people talk about a craftsman, they’re talking about someone who’s an expert in creating something, and that really sums up “art” to me.
It just makes me wonder why “crafter” is somehow less than a “craft”. Food for thought is all!
I say both!