
Today’s 20-minute stamped bracelet project has been sponsored by ImpressArt.
I love metal stamping. If you read here often, you know this is true. I have been stamping for 3 1/2 years now, and I think it’s just getting more and more fun – especially as new products and patterns are released! I spied the new pattern stamps on the ImpressArt website a couple weeks ago, and it really got me thinking outside of letters and general icons. I had the idea that I could use a big pewter blank as a tiny canvas of sorts, and stamp a whole nature scene. I love the end result, and I’ll share with you today how I made it and give you some pointers for using design stamps, too!

If you’ve been curious about how to stamp jewelry, I have a comprehensive post covering beginners’ essential tools and starter techniques in a post I wrote a few years back on how to make hand-stamped jewelry. I’ll be talking about the basics today, too, but if you find yourself curious, wanting more detail, or even wishing you could see a video, that post has even more of what you’re looking for. But back to the project at hand – let’s talk supplies! Once you’ve got your metal stamping supplies, there are only a few more jewelry components you’ll need for today’s bracelet project.

- For today’s project, I used the following:
- Bench block and 1 lb. brass stamping hammer
- ImpressArt Softstrike Pewter 1-1/2″ Oval Tag
- ImpressArt SoftStrike Pewter 1/2 Tag
- ImpressArt Lollipop font (including the 4mm flower in the set)
- ImpressArt 6mm Vertical Lines design stamp
- ImpressArt 6mm Circle design stamp
- ImpressArt 6mm Vine design stamp
- Permanent marker and polishing pad (you can use acrylic paint and/or a polishing cloth instead if you prefer)
- Washi tape to secure my work (ImpressArt makes a specialty tape for stamping, their StampStraight tape that’s great for beginners)
- 5 inches of chunky cable chain
- 1 – 12mm jump ring
- 2 or 4 – 7mm jump rings
- 2 – 4mm jump rings
- Beaded charm (make your own or find your favorite nature-themed charm)
- 15 mm lobster clasp
- Long nose pliers
- Bracelet bending pliers
- Depending on your chain, wire cutters
Design stamps can be difficult if you’ve only ever worked with letter stamps, so my solution to that is to use SoftStrike blanks. I Love, LOVE stamping on pewter. It’s got a nice weight to it, and it takes an impression SO well. It’s a nice soft metal! So if you’ve struggled in the past with designs, try pewter. I’ll walk you through the design elements below!
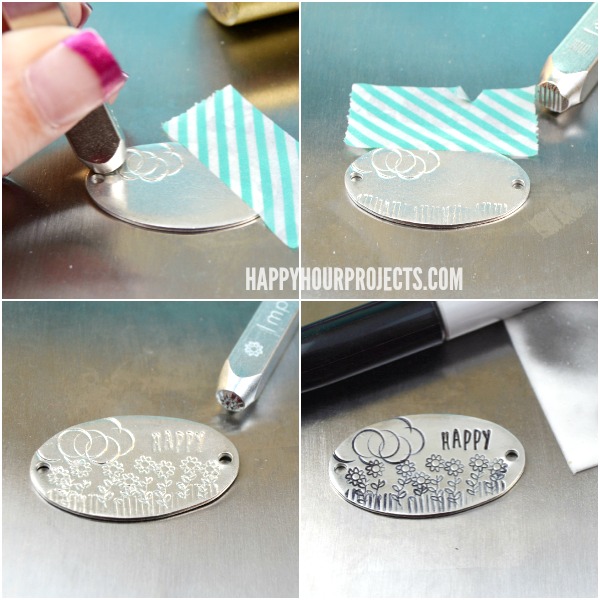
I started making the cloud by using the 6mm circle, mostly on an angle so that some edges din’t come in contact with the blank. My central circles are a little more “whole” but by the time I worked my way outward, I got the hang of it. Next, I used the vertical lines to add a grassy field along the bottom. I stamped vines coming out of the grass, and finally, topped off each with the flower from the Lollipop font set (which I also used to stamp “happy” – but of course, add whatever elements and words speak to you!) I really like the idea that individual stamp shapes can be combined to make something more organic, like this nature scene.

Next, I used my bracelet pliers to bend the blank. This step isn’t absolutely essential – you can wear the tag flat. But curving it like this lends a boutique look to it – taking it from handmade to the next level.

I finished it off by connecting the chain with jump rings along the left side. I used two jump rings to make double-sure it was secure. There are other ways of strengthening your rings, though – you can use a split ring instead, or if you’re into soldering, that would also make sure it stays put! At the end of the chain, I attached a lobster clasp. On the right side of the tag, I attached a large jump ring. Personally, I love the look of the clasp at the side like this, but if it’s not your style, you can make yours more traditional but cutting your 5 inches of chain into two pieces, and attaching the clasp at the bottom instead.
At the last minute, I decided that this bracelet needed a little something extra, so I stamped a tiny 1/2 inch pewter tag with a heart, and make a beaded charm to attach to the left side of the floral tag. (I don’t have a photo step-by-step today for charm-making, but if you’d like to learn more about that, then be sure to check out my beaded charm video tutorial!)

I feel like “happy” was really the right word for this one, because it’s such a happy piece! Keep thinking spring, everybody – it will be here in a few more days!

If the metal you are stamping on is of a soft nature, doesn’t the blank get scratched and dented from wearing.
No more than silver or aluminum. Being a bracelet, it will get a few light scratches if you wear it long enough, but that would be true of most metals. I’ve never found that any stampable metal has dented. When I say that a metal is soft, I’m talking about it as it relates to stamping, punching, riveting – that sort of thing. It’s easily manipulated with the proper tools. :)
That’s so cute! When I have done stamping, I have had problems with the Sharpie ink leaving a ghostly black residue around the lettering. Can you use liver of sulphur (sulfur?) on these types of blanks? Thank you so much. You inspire me!
I don’t think you can. When I use Sharpie, there are two things I do to make sure all the residue comes off. First, I work quickly in small areas. If the ink isn’t all the way dry ,it’s much easier to get off. I also like the white polish pads, rather than the yellow polishing cloth. They work much better in my opinion!
Another alternative idea for darkening your impressions is to use acrylic paint. I’ve used it when I have to darken a larger area, and it worked really well. I would use it on jewelry except I’m just too lazy to get out the paint and clean up afterward most of the time, haha. Since I have good luck with Sharpie that’s what I stick with, but there are definitely other ways to make it work!
Thanks Adrianne! Great suggestions. I realize now I was covering too much area at once (always in a rush, which is why I LOVE your site, quick and easy yaaaaay).
I definitely will get the white polish pads too :)
Today’s GLITTERING TUBE BEAD BRACELET is gorgeous!
Love this bracelet! Great tutorial. Is this an item you will be selling? The cost of supplies for a one time use does not work for me. Thank you, Sally