• Skip to primary navigation
  • Skip to main content
  • Skip to primary sidebar

  • home
  • about adrianne
  • buy the books
    • DIY T-Shirt Crafts (2015)
    • DIY Stamped Metal Jewelry (2016)
    • Rock Painting for Beginners (2019)
  • videos
  • crafts
    • diy beauty projects
    • kids’ crafts
    • paper craft projects
    • polymer clay
    • sewing projects
  • jewelry
    • bracelet projects
    • earring projects
    • necklace projects
    • jewelry tools & supplies
  • metal stamping
    • beginners’ tutorial
    • video tutorial
    • project ideas
    • metal stamping supplies
  • recipes
    • cocktail recipes
    • appetizers
    • main and side dishes
    • sweets and treats
  • by season
    • birthdays
    • new year
    • valentine’s day
    • st. patrick’s day
    • easter and spring
    • mother’s day
    • patriotic
    • fall
    • halloween
    • christmas
    • thanksgiving
  • privacy

Happy Hour Projects logo

04/03/2014

Beaded Bar Connector Necklace

I’m loving this necklace so much that I’ve been choosing outfits to match it so I can wear it.  Is that crazy, given how much jewelry I make??  I just love these beads, I love the colors, and I love how it came together (and in just 10 minutes).  Okay, I’ll stop gushing “love” and just let you see it for yourself:

Easy Beaded Bar Necklace at www.happyhourprojects.com

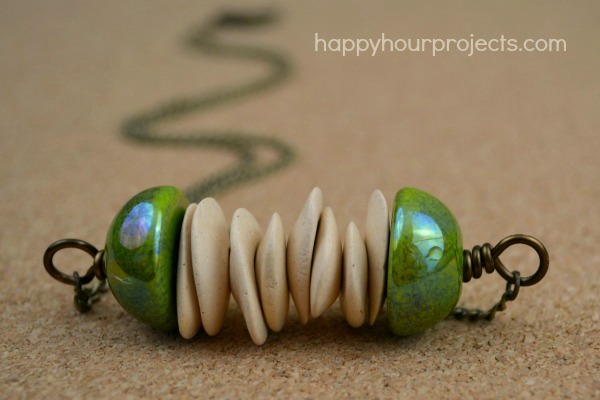
These are some of the ceramic beads from the care package that O and N Craft Supplies sent me (and if you love them too, then be sure to stop by the shopping spree giveaway they’re sponsoring before 4.10!)  I’ll show you how to make a connector out of whatever beads suit your style so you can create your own version of this easy necklace.

What you will need:

  • Beads you love.  I used two 19mm green hemispherical ceramic beads and 8 ivory pebble ceramic beads.  (The finished connector is around 3 inches wide and 3/4 inches tall.)
  • 18 gauge wire (mine is brass) – you will only need about 6-8 inches
  • 13-17 inches of chain (to suit your tastes, and depending on how large your beads are), jump rings, and a clasp
  • Round nosed pliers
  • Wire cutters

First, cut a bit of wire.  How much you will need depends on how large you plan to make your connector, but cutting off about 8 inches is usually sufficient for most sized projects.

About 1.5-2 inches from the end, bend your wire around your round pliers, forming a loop.  Then, wrap the short end of the wire around the longer end, closing the loop off.  (See the photos below for more detail.)  I wrap 2-3 times around, but that’s mainly for appearance.  Just one wrap will secure your beads.  Cut off any excess wire.

Easy Beaded Bar Necklace at www.happyhourprojects.com

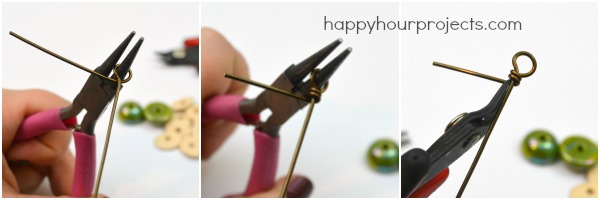
Next, just add your beads on, then create another loop just like your first to finish off the connector.  When it’s finished, decide how long you want your chain.  I found that a 16-inch length was perfect for this design – and because the connector is about 3 inches, then I cut 13 inches of chain to finish it.  You may decide you want a longer chain, or if your connector is a smaller finished size – you may want more chain than what I used.

Whatever length you settle on – cut it in two equal lengths, and attach each piece of chain to either end of your connector with jump rings.  Attach the clasp to one of the back ends, and another jump ring to finish the closure.

Easy Beaded Bar Necklace at www.happyhourprojects.com

And that’s it!  You can finish this piece in about 10 minutes.  Let me give you an idea what it looks like worn.  I totally did not bother to change to a matching shirt for one photo (come on, I’m all about fast and easy, not 10pm wardrobe changes, haha) – but you get the idea!

Easy Beaded Bar Necklace at www.happyhourprojects.com

I hope you end up liking this one as much as I do!

Adrianne Signature

Filed Under: Fashion, Jewelry, Necklaces, Tutorials Tagged With: 10-minute project, beads, connectors, necklace, wire, wire wrapping

copyright policy and terms of use

I love it when you love my work! All tutorials and photos published at Happy Hour Projects are copyrighted. If you would like to feature my tutorial on your website or share it on your social media you may use one photo to feature, as long as you provide a link back to the original post.

If you feature a photo, it may not be accompanied by the project tutorial or recipe, whether in my own words as it originally appears or paraphrased by you. This also includes personal sharing on social media and Pinterest. Publishing multiple photos from a project, or including instructions with an accompanying photo are not permitted and you will be asked to remove them.

I love to share my projects, and my tutorials, recipes, and e-books are ALL free for your personal use. However, photos and ideas that are published to this site are my protected intellectual property. You may print them at home, but please do not copy or distribute them. I also allow all designs to be made and sold at fundraisers, craft fairs, etc. If you are selling a piece made from one or more of my free tutorials in your online shop, I require that you use your own, original photography, and include a link back to my website to credit me as the designer.

I hope you enjoy what you read here, and please be fair when you share!

Reader Interactions

Comments

  1. Marilyn says

    04/24/2014 at 3:40 pm

    What a beautiful necklace…I love the beads you chose! Great color combo!

    Reply
  2. laura says

    04/04/2014 at 6:37 am

    Love it Adrienne!!! Thanks

    Reply

Leave a Reply Cancel reply

Your email address will not be published. Required fields are marked *

Primary Sidebar

Hello, and welcome! I'm Adrianne, an artist, author, designer, and blogger in mid Michigan. I work from home, chase my two kids, and this once-city-girl is learning how to care for chickens and adjusting to life out in the country. I have a compulsion for daily creativity... sometimes it's jewelry-making, paper crafting, metal stamping, mixing and baking, or giving new life to recycled items. But with 2 young kids, time is short! My goal here at Happy Hour Projects is to share projects and tips that you can do in an hour or less. The ideas you find here are designed to add a little creativity in your day, no matter how much (or how little) time you have!

BUY MY BOOKS!

Copyright © 2026 Happy Hour Projects on the Brunch Pro Theme