• Skip to primary navigation
  • Skip to main content
  • Skip to primary sidebar

Happy Hour Projects

  • home
  • about adrianne
  • buy the books
    • DIY T-Shirt Crafts (2015)
    • DIY Stamped Metal Jewelry (2016)
    • Rock Painting for Beginners (2019)
  • videos
  • crafts
    • diy beauty projects
    • kids’ crafts
    • paper craft projects
    • polymer clay
    • sewing projects
  • jewelry
    • bracelet projects
    • earring projects
    • necklace projects
    • jewelry tools & supplies
  • metal stamping
    • beginners’ tutorial
    • video tutorial
    • project ideas
    • metal stamping supplies
  • recipes
    • cocktail recipes
    • appetizers
    • main and side dishes
    • sweets and treats
  • by season
    • birthdays
    • new year
    • valentine’s day
    • st. patrick’s day
    • easter and spring
    • mother’s day
    • patriotic
    • fall
    • halloween
    • christmas
    • thanksgiving
  • privacy

Copper + Glass Artist Bracelet Tutorial

07/08/2016 by Adrianne Surian 3 Comments

Hey friends!  I’ve got an easy bracelet tutorial to share with you today that lets you express yourself in all kinds of ways.  Alphabet beads are fun for kids, but today I’ll show you how they look all grown up, with glass, copper, and metal patina paints.  Unleash your inner artist or wear your own favorite message with this easy project!

Copper & Glass Artist Bracelet Tutorial | happyhourprojects.com

These pewter beads with copper plating have a nice weight to them.  When you mix and match them with other square tabular beads from today’s post sponsor, Happy Mango Beads, you can put together a stylish stack of bracelets in no time!

Copper & Glass Artist Bracelet Tutorial | happyhourprojects.com

Happy Mango Beads has a lot of alphabet beads and charms to choose from in both ceramic and metal assortments so no matter what your style is, you can wear the words and names that mean the most to you.  For today’s project I used the following beads from Happy Mango Beads:

  • 10mm Copper Pewter Square Alphabet Beads
  • 10mm Square Tabular Czech Glass Beads (I used clear & white with Picasso finish)

(And don’t forget, you can mix and match textures and hues by adding more bracelets!)

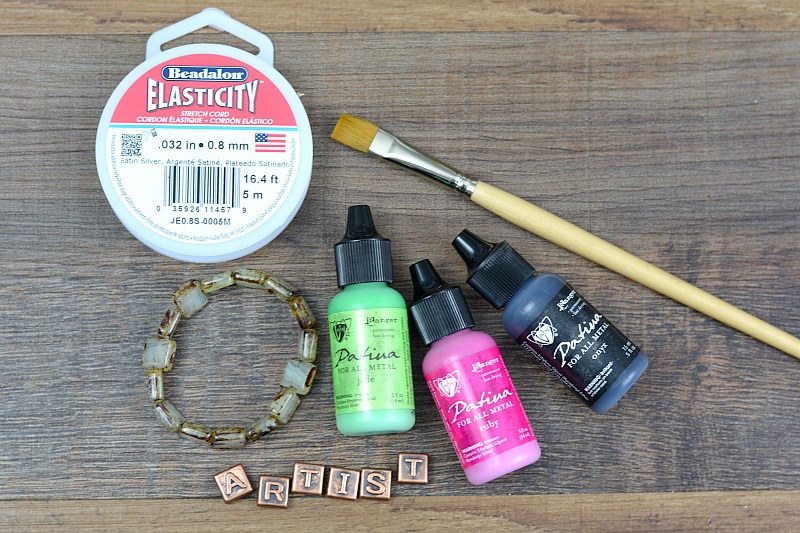
The additional supplies used are:

  • .8mm Stretch Bead Cord
  • Ranger Metal Patinas: Jade
  • Ranger Metal Patinas: Ruby
  • Ranger Metal Patinas: Onyx
  • Paintbrush

Copper & Glass Artist Bracelet Tutorial | happyhourprojects.com

Even beginning beaders will get the hang of stringing beads onto stretch cord, so there’s not much to today’s bracelet tutorial.  However, to add a bit more attitude to my artist bracelet, I used metal patinas (listed in the supplies above) to add a distressed, painted look to the letters.  Metal patinas are easy to use – just brush or drop them on – and once dry are permanent.  I painted just one side of the letters (so as the bracelet moves, more copper will show) and made sure to wipe any excess patina off the top of the letter.

Copper & Glass Artist Bracelet Tutorial | happyhourprojects.com

The beads dry quickly, so you can string your design and tie off your stretch cord.  You should aim for 7-7.5 total inches of beads for the average woman’s wrist.  You want it to stretch to go on and come off, but to lie just slack when worn.

If you’re unsure of how to get a nice secure knot in stretch cord, Beadalon prints this handy reference right on the back of their cord to show you how!

Copper & Glass Artist Bracelet Tutorial | happyhourprojects.com

Stack on as many bracelets as you like, spell as many words as you like, mix metals, play with patinas, and get creative.  The sky is the limit with this ultra-easy bracelet tutorial!

Adrianne Surian

Filed Under: Bracelets, Fashion, Jewelry, Tutorials Tagged With: artist, beads, beginner, bracelet, copper, DIY, easy, Glass, Happy Mango Beads, jewelry, patina, tutorial

copyright policy and terms of use

I love it when you love my work! All tutorials and photos published at Happy Hour Projects are copyrighted. If you would like to feature my tutorial on your website or share it on your social media you may use one photo to feature, as long as you provide a link back to the original post.

If you feature a photo, it may not be accompanied by the project tutorial or recipe, whether in my own words as it originally appears or paraphrased by you. This also includes personal sharing on social media and Pinterest. Publishing multiple photos from a project, or including instructions with an accompanying photo are not permitted and you will be asked to remove them.

I love to share my projects, and my tutorials, recipes, and e-books are ALL free for your personal use. However, photos and ideas that are published to this site are my protected intellectual property. You may print them at home, but please do not copy or distribute them. I also allow all designs to be made and sold at fundraisers, craft fairs, etc. If you are selling a piece made from one or more of my free tutorials in your online shop, I require that you use your own, original photography, and include a link back to my website to credit me as the designer.

I hope you enjoy what you read here, and please be fair when you share!
Previous Post: « Easy DIY Memory Wire Bracelet
Next Post: Easy Crystal Drop Necklace »

Reader Interactions

Comments

  1. kanchipuram sarees

    08/18/2018 at 3:33 am

    nice post

    Reply
  2. golu dolls chennai

    08/18/2018 at 3:31 am

    wow looking good

    Reply
  3. Best fashion design schools

    07/12/2016 at 2:42 am

    Amazingly Designed!

    Reply

Leave a Reply Cancel reply

Your email address will not be published. Required fields are marked *

Primary Sidebar

Hello, and welcome! I'm Adrianne, an artist, author, designer, and blogger in mid Michigan. I work from home, chase my two kids, and this once-city-girl is learning how to care for chickens and adjusting to life out in the country. I have a compulsion for daily creativity... sometimes it's jewelry-making, paper crafting, metal stamping, mixing and baking, or giving new life to recycled items. But with 2 young kids, time is short! My goal here at Happy Hour Projects is to share projects and tips that you can do in an hour or less. The ideas you find here are designed to add a little creativity in your day, no matter how much (or how little) time you have!

BUY MY BOOKS!

Copyright © 2021 Happy Hour Projects on the Foodie Pro Theme