• Skip to primary navigation
  • Skip to main content
  • Skip to primary sidebar

  • home
  • about adrianne
  • buy the books
    • DIY T-Shirt Crafts (2015)
    • DIY Stamped Metal Jewelry (2016)
    • Rock Painting for Beginners (2019)
  • videos
  • crafts
    • diy beauty projects
    • kids’ crafts
    • paper craft projects
    • polymer clay
    • sewing projects
  • jewelry
    • bracelet projects
    • earring projects
    • necklace projects
    • jewelry tools & supplies
  • metal stamping
    • beginners’ tutorial
    • video tutorial
    • project ideas
    • metal stamping supplies
  • recipes
    • cocktail recipes
    • appetizers
    • main and side dishes
    • sweets and treats
  • by season
    • birthdays
    • new year
    • valentine’s day
    • st. patrick’s day
    • easter and spring
    • mother’s day
    • patriotic
    • fall
    • halloween
    • christmas
    • thanksgiving
  • privacy

Happy Hour Projects logo

04/18/2014

Sliding Knot Adjustable Bead Bracelet

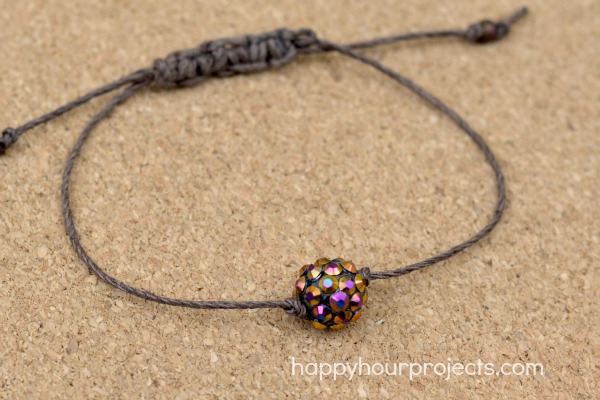
Today’s bracelet is nothing fancy, just hemp and a single, simple bead.  You can have lots of fun making up several of these once I show you how easy it is to make a macrame slider out of hemp.  This sliding knot is easy to put on and take off, and you don’t need an exact wrist size so it’s great for friendship bracelets too!

Macrame Slider Beaded Bracelet at www.happyhourprojects.com

What you will need:

Macrame Slider Beaded Bracelet at www.happyhourprojects.com

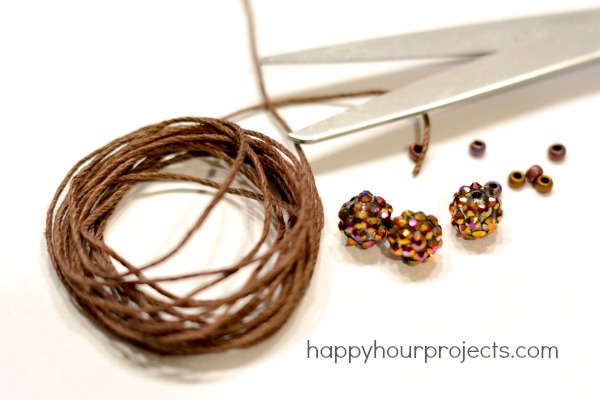
  • 24 inches of hemp (2 lengths of 12 inches)
  • A bead
  • A large-eye needle (anything that can accommodate two strands of hemp twine)
  • Scissors

First, cut 12″ of hemp.  Slide a bead onto the center of your strand, and make an overhand knot on either side of it to secure it.  Tie additional beads onto the ends.  I just used small (size 6/0) seed beads for the end stoppers, and a 15mm shamballa-style bead for the focal bead.

Macrame Slider Beaded Bracelet at www.happyhourprojects.com

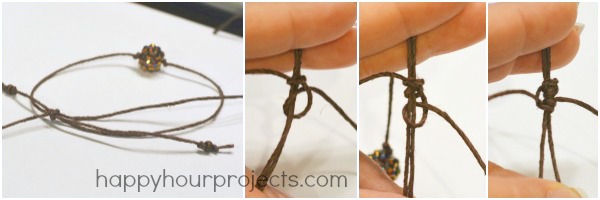
Then, lay your ends together, overlapping.  The main part of making this bracelet is the macrame slider.  Cut a second 12″ (or longer is fine) piece of hemp, and tie it around both ends of the bracelet at the center point, so you have two equal length ends to work with.  There’s no special position you have to tie it in, you’ll be able to adjust and slide the slider to wherever you need later.  It’s mainly just important to get both strands.

Now, I started knotting on the right, but you can just as easily start on the left.  For simplicity’s sake, I’m going to say “right” and “left” here.  Make a knot around BOTH strands of the bracelet with the right strand of your slider length of twine.  You don’t want it too tight; remember, your bracelet needs to be easily adjustable.

Then, make a second knot on the right side.

Then, switch to the left side and make 2 knots.  Alternate making 2 knots for a few sets (3-4 should be plenty).

Macrame Slider Beaded Bracelet at www.happyhourprojects.com

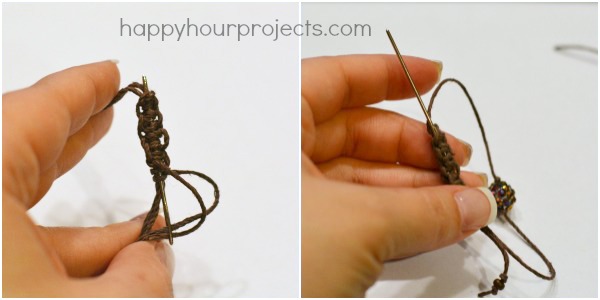
When you have a few sets of knots, thread both strands of the slider hemp through the needle, and pass it inside the slider, tucking those loose ends in.  Trim them off at the other end of the slider.

Macrame Slider Beaded Bracelet at www.happyhourprojects.com

I made this bracelet up in about 10 minutes!  If this is your first time with a macrame technique, you may need to allow for longer.  I know just how tight to make my slider knots from experience, but if you’re just beginning you may have to experiment a little to get a feel for it.  Once you do, though – you won’t be able to stop making these!! They’re a great lightweight summer bracelet, and they take next to NO supplies!

Macrame Slider Beaded Bracelet at www.happyhourprojects.com

Adrianne Signature

Filed Under: Bracelets, Fashion, Jewelry, Tutorials Tagged With: beads, hemp, knot, macrame, twine, woven

copyright policy and terms of use

I love it when you love my work! All tutorials and photos published at Happy Hour Projects are copyrighted. If you would like to feature my tutorial on your website or share it on your social media you may use one photo to feature, as long as you provide a link back to the original post.

If you feature a photo, it may not be accompanied by the project tutorial or recipe, whether in my own words as it originally appears or paraphrased by you. This also includes personal sharing on social media and Pinterest. Publishing multiple photos from a project, or including instructions with an accompanying photo are not permitted and you will be asked to remove them.

I love to share my projects, and my tutorials, recipes, and e-books are ALL free for your personal use. However, photos and ideas that are published to this site are my protected intellectual property. You may print them at home, but please do not copy or distribute them. I also allow all designs to be made and sold at fundraisers, craft fairs, etc. If you are selling a piece made from one or more of my free tutorials in your online shop, I require that you use your own, original photography, and include a link back to my website to credit me as the designer.

I hope you enjoy what you read here, and please be fair when you share!

Reader Interactions

Comments

  1. Wendy Brown says

    07/23/2015 at 2:28 pm

    Thanks for sharing! The bracelet is beautiful!!

    Reply
  2. Crystal says

    04/18/2014 at 10:42 pm

    Love the bracelet!! The bead is super cute!! Love it!!

    Reply

Trackbacks

  1. Happy Hour Projects | Pearltrees says:
    05/17/2017 at 1:14 pm

    […] to Make Wish Bracelets – Video Tutorial – Happy Hour Projects. Sliding Knot Adjustable Bead Bracelet – Happy Hour Projects. Simple Layered Leather Bracelet – Happy Hour Projects. Video Tutorial: Easy Wire-Wrapped Ring – […]

    Reply

Leave a Reply Cancel reply

Your email address will not be published. Required fields are marked *

Primary Sidebar

Hello, and welcome! I'm Adrianne, an artist, author, designer, and blogger in mid Michigan. I work from home, chase my two kids, and this once-city-girl is learning how to care for chickens and adjusting to life out in the country. I have a compulsion for daily creativity... sometimes it's jewelry-making, paper crafting, metal stamping, mixing and baking, or giving new life to recycled items. But with 2 young kids, time is short! My goal here at Happy Hour Projects is to share projects and tips that you can do in an hour or less. The ideas you find here are designed to add a little creativity in your day, no matter how much (or how little) time you have!

BUY MY BOOKS!

Copyright © 2026 Happy Hour Projects on the Brunch Pro Theme