
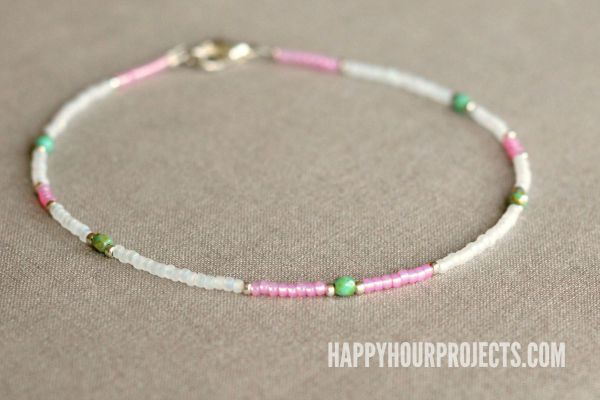
Well I was on the road last weekend all by myself – which never happens! So I brought a few supplies and tools along with me, in case I wanted to make up a little something from my hotel room. At home I’m up at 6:30 taking care of the kids, so of course on the road I was up at 5:30 with 3 hours before I needed to be somewhere… which was a perfect opportunity to do something quiet that I really enjoy. So, I made up a fun travel-friendly project – a beaded ankle bracelet. This is a really nice beginner jewelry project, and in fact, this is what I used to make when I was a beginner, so this was a fun throw-back project.
(I would really have preferred to lay in bed and read a book, but I hadn’t bought a new one yet, and 5:30 am is not the ideal time to find a book anywhere but an airport.) So I sat with my in-room coffee across from this view, and I beaded.

Beading is really calming in the same way that knitters and crocheters find yarn to be calming. It’s very mathematical, so even if you don’t feel that you’re the “creative” type – it’s counting and patterns! Yes, it involves some planning and combining colors, but when you’re talking about a piece of jewelry, typically you’ll be making it to match the colors you wear most often, or to match a certain outfit. So just pick beads that you think are pretty, and you’ll be fine. You’ll also need a few basic supplies, and if you don’t know what to buy, I’ll make it easy and post affiliate links to everything you need in the list below.
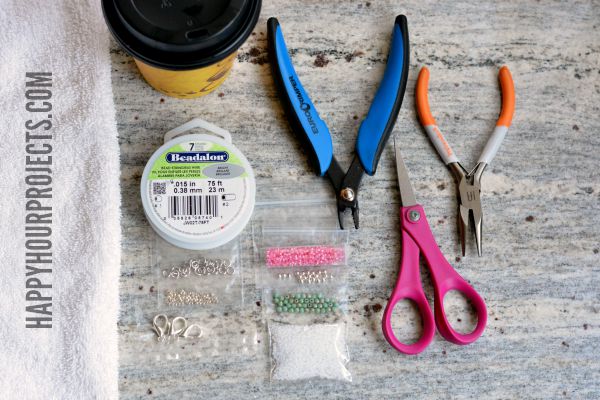
- BEADS! I’ll elaborate below.
- fine gauge nylon coated beading wire (I used .015″)
- 2mm crimp beads
- 4mm jump ring
- 7mm lobster clasp (you can also get a kit with all the findings you need)
- crimp pliers
- wire cutters (you can use scissors in a pinch, but wire is not good for scissors long-term)
- bead mat (or in my case, a hotel towel, haha) to keep your beads from rolling away
- optional but recommended: wire guards/wire protectors (included in the kit link above)
- optional: chain nose pliers (you won’t need these if your jump rings are closed to begin with)
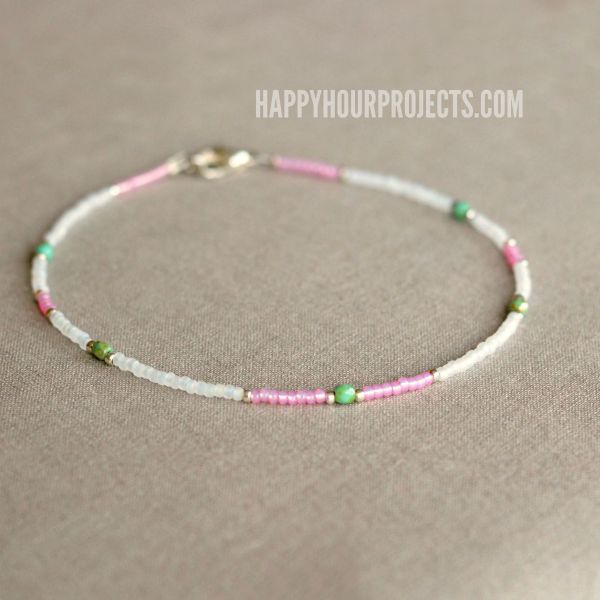
Let me first talk about beads. Here’s my “recipe” for creating a delicate-looking combination, and I’ll get into the pattern after we get the bracelet started.
- 2 colors of size 8/0 Japanese seed beads (which typically have big, uniform holes)
- 1 color 3mm crystal or faceted bead
- Small (less than 3mm) metal spacer beads (I actually just used my crimp beads as spacers)

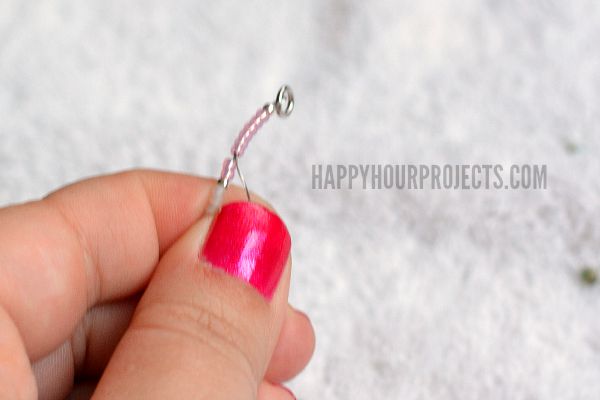
Now, to start your bracelet cut a length of wire about 15-18 inches. It’s more than you need, but it’s always easier to work with some excess, and to cut it down at the end. Feed a crimp bead onto the end of your wire, then add your lobster clasp. Then, take the small end of the wire, and feed in back through the bead, creating a wire loop.
Typically I recommend working with wire protectors, but I didn’t pack any, so they’re not shown in these photos. Wire protectors just help extend the life of your piece by protecting your wire (as the name suggests, haha). When using a wire protector, you’ll slip the wire through the guide so that your wire loop around your clasp has an extra layer of protection.
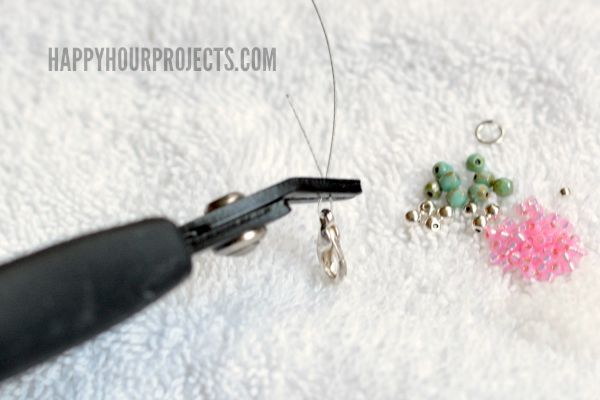
Next, use your crimp pliers to close the crimp bead around the wire. While you can use regular jewelry pliers, it’s harder to press it closed in a uniform way, which can cause the crimp to cut into your cord.
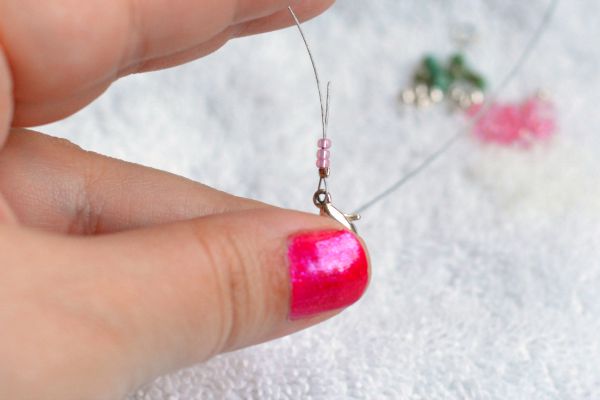
Now, begin beading. I’ve found that if you slip the first few beads over both wires, then you won’t get any poky ends when you go to wear it! once you’ve slipped a few beads on, you can trim off the excess from the short wire.
Now as far as patterns… get creative! These are the “rules” I try to follow, but keep in mind there actually aren’t any rules when it comes to creating your own patterns. Let me show you mine again:

- Separate color changes with a metal spacer. Each time I changed from pink to white, or added a green crystal bead, I added a spacer in between.
- Space larger beads the same width apart – my green beads are approximately 1.25″ apart, though I used different patterns of pink and white in-between. That means I was using the same total number of beads in between each one.
- To keep a consistent look, choose a “multiplier”. Mine was 4. I used 4, 8, 12, or 16 beads in each stretch of pink or white. You can use multiples of 3 or 5 or 2 or whatever strikes you, but I find I like the designs best when they’re balanced based on a multiplier when I first start.
You may have a specific preference for the length of your ankle bracelet, but a typical length is 10 inches total. (Aim for 7.5 for wrists!) When you’re crafting on the run like I was, I just measured it against my ankle! The beaded length should be about 1/2 inch shorter than the total length, because adding the clasp will add about 1/2 inch of length to the piece. But if you’re at home, get out your ruler, or even another bracelet that you like the length of.
To finish off your bracelet, add a crimp bead to the end, loop the wire through a small, closed jump ring, double it back through the crimp bead, and through the few beads on the end. Crimp the end bead with your crimp pliers, and then cut off the excess wire.
I had a lot of fun trying to shoot this tutorial out of my studio, so thanks for bearing with me today with the photos, haha. It was a fun challenge to play with the light and try to find backdrops and props (I ended up favoring an ironing board and a lamp, believe it or not). But for those of you who would like to bring something quiet and enjoyable on vacation, if your family typically sleeps in (or turns in early) – I highly recommend popping a few beading supplies into a plastic bag and packing them (just don’t try to carry them onto the plane, of course) – or find a local bead shop and pick up a few supplies on your first day in town. It’s relaxing, it’s not disruptive to anyone else, and it’s a way of creating a fun memento of your trip! I’m still wearing my ankle bracelet, and of course I’ll be reminded of Chicago for years to come when I see it.
Thanks for joining me today!

I absolutely love this easy beaded ankle bracelet tutorial! The colors you chose are so vibrant and perfect for summer. I can’t wait to gather my supplies and try making one for myself. Thanks for sharing such a fun and simple project!
I love this beaded ankle bracelet tutorial! The colors you chose are so vibrant and perfect for summer. I can’t wait to try making one for myself. Thanks for sharing such an easy and fun DIY project!
I absolutely love this easy beaded ankle bracelet tutorial! The step-by-step instructions are super clear, and I can’t wait to try it out for my summer outfits. The color combinations you suggested are so pretty – it’s going to be hard to choose just one! Thank you for sharing such a fun project.
Love this tutorial! The colors you used are so vibrant, and I can’t wait to try making my own beaded ankle bracelet. Perfect for summer! Thanks for sharing such an easy project!
I absolutely love this easy beaded ankle bracelet idea! The colors you chose are stunning, and I can’t wait to try making one for myself. Thanks for sharing such a fun and creative project!
I absolutely love this beaded ankle bracelet! The colors you chose are so vibrant and perfect for summer. I can’t wait to get started on making my own. Thank you for the detailed instructions and inspiration!
I absolutely love this Easy Beaded Ankle Bracelet idea! The tutorial is clear and so inspiring. I can’t wait to gather my supplies and give it a try for summer. Thanks for sharing such a fun project!
What a lovely and easy project! I can’t wait to try making this beaded ankle bracelet for my summer outings. The colors you chose are so vibrant and perfect for adding a fun touch to any outfit! Thanks for the inspiration!
This beaded ankle bracelet looks so cute and perfect for summer! I love how easy the instructions are. I can’t wait to try making one for myself and maybe even as gifts for my friends! Thanks for sharing!
I love the simplicity of this beaded ankle bracelet! The step-by-step instructions make it so easy to follow. Can’t wait to try it out for my summer outfits! Thank you for sharing such a fun project!
I absolutely love this easy beaded ankle bracelet idea! It’s perfect for summer and such a fun way to add a little bling to my outfits. Can’t wait to try out the color combinations you suggested! Thanks for sharing!
I absolutely love this easy beaded ankle bracelet idea! The colors you chose are so vibrant, and it’s perfect for summer. I can’t wait to try making one for my beach trips! Thanks for the clear instructions!
I love this idea! The beaded ankle bracelet looks so fun and perfect for summer. Your instructions are super clear, and I can’t wait to try making one myself. Thanks for sharing!
I absolutely love this beaded ankle bracelet design! The colors you chose are so vibrant and perfect for summer. I can’t wait to try making one for myself. Thanks for sharing such a fun and easy project!
I love this easy beaded ankle bracelet idea! The colors you chose are so vibrant and perfect for summer. I can’t wait to try this project during my next happy hour. Thanks for sharing such a fun and creative tutorial!
This ankle bracelet project looks super fun and easy to follow! I can’t wait to try it out with some colorful beads I have. Perfect for summer! Thanks for sharing!
I absolutely love the idea of making my own beaded ankle bracelet! The step-by-step instructions were super clear and easy to follow. Can’t wait to try out different color combinations. Thank you for such a fun project!
I love this beaded ankle bracelet project! The tutorial is so easy to follow, and I can’t wait to try it out for summer. The colors you used are so vibrant and perfect for a beach day. Thank you for sharing!
I absolutely love this DIY beaded ankle bracelet! It’s such a fun and easy project that I can’t wait to try out. The color combinations are so inspiring, and I appreciate the step-by-step instructions. Perfect for summer! Thanks for sharing!
I absolutely love this easy beaded ankle bracelet tutorial! The colors you chose are so vibrant and perfect for summer. I can’t wait to try this out during my next crafting session. Thanks for sharing such a fun and simple project!
I absolutely love this idea! The beaded ankle bracelet is such a fun project, and I can’t wait to try it in different colors. Thanks for the detailed instructions and inspiration!
That sounds like the perfect peaceful morning. I love how you turned that quiet hotel time into something creative.
Lovely post and anklets are looking so beautiful!
Hi!! I love your stuff. I make ankle bracelets all the time now because of you. I just want to know what to do about the jump rings I bought per your link. The beading wire goes through the gap in it. It is the ones you recommended. It’s there another kind you could tell me about? I will get them. Thank you.
wow nice post
wow looking good
nice post
looking good
Love this site
Thumbs up!!
I just got your book today and i love it. will be starting some projects out of it when i get back from family vacation