

I did design mine a little different, but Terry’s tutorial is spot-on, so if you like this project, be sure to go check it out. (And a little disclaimer here – the silver strand at the bottom isn’t part of my bracelet, it’s a silver bracelet my husband picked up for me as a gift that I never take off. In fact, if you look at any of my other bracelet posts, I’m sure you’ll see it every time, LOL.)
Terry used 4 strands of color-coordinated seed beads in her bracelet. There was a beautiful uniformity to it. And upon raiding my stash, I discovered… I did not have an adequate supply of seed beads for any one color scheme. In fact, what kept jumping out at me were these green stone beads that I’ve coveted in my stash for so long, I can’t even remember what kind of stone they are. So I thought, well, why not? This is as good a time as any to finally use them! I wear a lot of green anyway… much of the reason they ended up in my collection in the first place. So I started with that strand, and picked out some varying sizes and textures instead, since I knew I couldn’t match the stones. I settled on large seed beads, small seed beads, a strand of sparkly and faceted beads, and my stone beads.

I cut my bead cord twice as long as it needed to be to give me plenty of slack when I tied the clasp onto the ends. When I started a strand, I tied a small seed bead to the end of my cord so that I didn’t accidentally lose my beads while I worked!
It took me about an hour to string them. It took me another half hour to figure out how I was going to attach six strands to my clasp securely. :) So you can save yourself about twenty five minutes by following this advice: I wouldn’t try to tie more than three or four strands on at the same time.
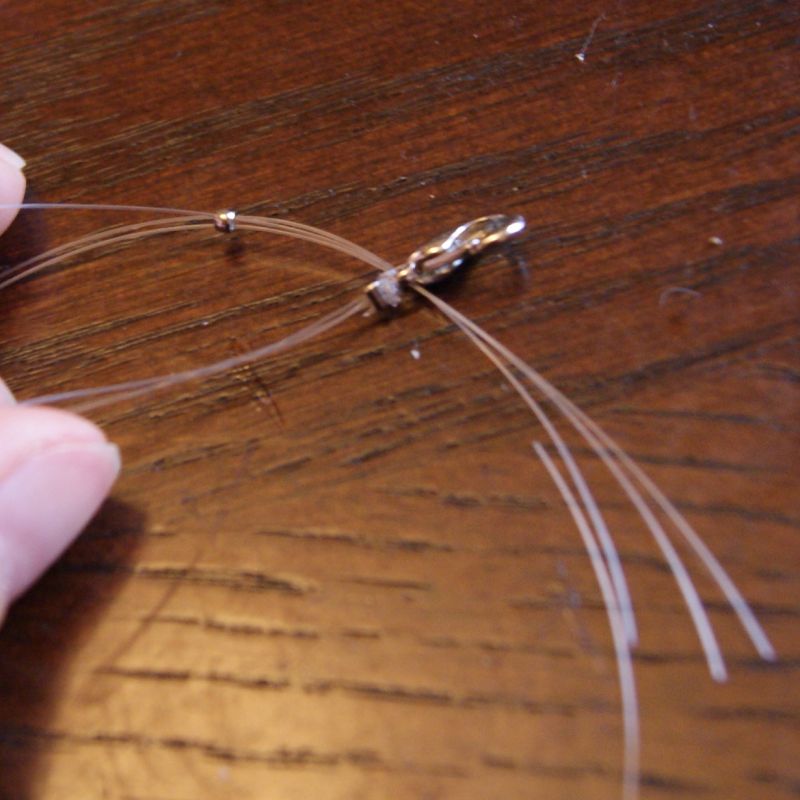
I finally ended up splitting my six strands half and half. I threaded a crimp bead onto three strands, and fed it through the eye of my clasp. I double-knotted it, fed the tail ends back through the crimp bead, and crimped it before trimming off the ends. Here you can see the first three strands attached, and I’m about to knot the second three and thread the tails back through the crimp bead, then crimped it to hold the knot in place. I used the loose end of my bead strands for this photo, because taking photos while trying not to drop your beads is tempting fate for someone clumsy like me. ;)
Finally, I got it all tied together. I didn’t worry about the strands being exactly straight, because I knew I was still going to twist the strands together anyway.

The twisting instructions seemed complicated when I first looked at them, but when I had my bracelet in my hand, it made perfect sense, and it was actually quite easy. I am not going to attempt to explain it – I think Terry said it best already, and she shows you with photos!

So now I’m feeling all fabulous with yet another stash-busting project around my wrist. My husband thinks it’s “funky”… whatever that means? Hey, he actually noticed it, which is good enough for me. What are you making from your stash lately?
I link up to these great parties!
~ Adrianne
I believe that the green and pinkish beads are Unkanite I have a few that look similar to that and that is what they are. Great tutorial thanks so much.
Indeed they are! Beautiful stone with beautiful properties <3
Hi Adrienne!
Love this design and your choices of colors and textures. I’m preparing to make one right now, also 6 strands and am experimenting with cutting just 3 LONG strands, feeding them through my connecter, adding a crimp and crimp cover and am now ready to strand. I have a customer who wants something in black and silver, so I thought this would be a great experiment. If you’re interested, I’ll be happy to photograph and show you when I’m done. THANK YOU for sharing, love this!!
Thanks for the tutorial! Those green swirly beads are autumn jasper…I covet a stash myself. ;-) one of my favorite stones! <3
BEAUTIFUL!!!!!!!!!!!!!!
can't wait to make one myself… thanks so much for the inspiration
Thanks for the reply!! Mine didnt turn out quite as lovely as yours, still pretty happy with it though. Having fun trying out all your great ideas! Thanks. :)
Good question! I didn't lose mush when I twisted it, actually. I'd say add between a half inch and an inch – but definitely no more.
Oh i just love this! One question though.. how long do i need to make the beaded part? Seeing its so twist, should i add an extra inch or two? Cant wait to try it!! :)
I would love to see it!! Would to like to post it on my facebook wall to share with everyone? http://www.facebook.com/happyhourprojects
Made this just now! Fun and awesome. I can send a picture if you want to see.
This is adorable! Thanks so much for sharing at Mix it up Monday :)
Thanks for sharing on Blog Stalking Thursday. You have been featured! Don't forget to stop by to grab your feature button and wear it proudly! Thanks again!
http://thecraftyblogstalker.blogspot.com/2012/04/blog-stalking-thursday-35.html
What a fun bracelet! I love the colors. I'd love for you to link it up with us at Crafty Cousins!
http://crafting-cousins.blogspot.com/2012/03/what-i-wore-sunday-week-10.html
~Natalie @ Crafty Cousins
I absolutely love this! I'd love for you to share it in our link party!
http://crafting-cousins.blogspot.com/2012/03/what-i-wore-sunday-week-10.html
~Natalie @ Crafty Cousins
Holla! We're your newest followers! :)
SO cute!!! Love all the different beads and colors! Thanks for sharing at Thursday's Temptation.
Jill
Nice colors!! Glad to have you at Things I've Done Thursday!
This is so cool – and I love Terry's blog, too. I have about 8,349,201 beads, so I think I can probably whip a few of these up…
Wow! I absolutely love it!
I will definitely be making one of these tonight, now I really want one and as I sit here at work Im trying to decide which beads Im going to use!!
lol, I know what he means about funky, funky is kindof my style!
As for my destashing, I have been using up a lot of my buttons ~ and have hardly made a dent using them for button mosaic frames and mirrors, they are super pretty and easy to do, providing you have a ton of buttons!
If you want to take a look, you can see them here:
http://tumblestonehandmakery.blogspot.ca/2012/03/buttons-oh-how-i-love-thee.html
Thanks for the great post, cant wait to have my own!!
I love the color combination! Beautiful!
That is gorgeous! I love it!
You and Terry are awesome!! I love both of your versions. My stash isn't any where big enough to make something like this out of it. Maybe one day. It's something to strive for.:)
This is really beautiful! Great job.
Hi Adrianne,
I love your new bracelet. It does have a funky cool feel to it. I'd wear it proudly.
Dee
LOVE! Will you make me one? :) Funky to me means….cool, hip, groovy, different than the norm. I am not sure I could do one of these, but I sure am going to go check out her post.
Oh Adrianne, I love your funky bracelet so much. When the beads were laid out they did not look as good together as they do after twisting. Isn't that weird? I mean they still looked nice together, but then you twist them and it all really pops. Anyway,…I love this so much that I want you to give it to me. You can have my attempt if that makes it more fair, lol. No really, love this look so much (did I say that?).
Both bracelets are gorgeous. Terry's blog is always inspiring as is yours. You guys are making me want to try a bracelet now. Thanks!