
Good morning, friends! Today a group of blogger friends and I teamed up to share a collection of projects with a bird theme. I’ve got a fun technique to show you for embossing metal blanks to design your own metal charms. If you thought embossing was just for paper – think again:

This two-tone metal bracelet is a fun piece for bird-loving friends – and you can change the whole look by using different shaped embossing dies!
Here’s what you will need. I’ll include a few links below for where you can find these items. I don’t make a commission off a purchase; it’s just for your convenience!

- Embossing machine, like the Sizzix Big Shot
- Vintaj DecoEmboss Die – this is Woodland Birds
- Two-hole blank, like this 34mm Vintaj Arte Metal Blank
- Two finishes of 5mm chain – about 6 inches of each. I used a silver tone and a hematite finish.
- Large lobster clasp and jump rings
- Fine-grit sandpaper (from any hardware store)
- Optional: Vintaj Pewter Bird Charm
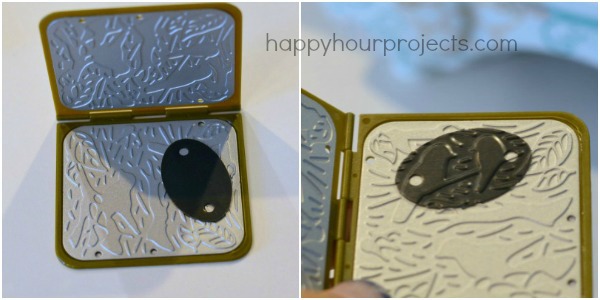
The focus on this piece is the embossed connector. Choose the placement for you blank somewhere on your die. There’s no right or wrong, here. You can get an impression of any of these bird images. (I’m showing the before and after below.) Placing your blank at a different angle or over a different bird image will give you a different result.
To get the impression, close the die, and sandwich your die between the two cutting plates on your machine. If you’re using the Sizzix Big Shot, you’ll open your platform to the #1 tab and place your embossing “sandwich” on top. Roll the whole thing through by turning the crank handle.

If you’ve embossed already, you know it’s easy. If this is a new technique for you, though, sometimes a quick video can help. Here’s a necklace I made using the embossing technique for Crafts Unleashed, the ConsumerCrafts.com blog:
There will be two sides to choose from to use. One will have the bird impression, and the other will be the reverse. You can use either! To give more contrast to your impression, you can lightly sand the surface of your blank.

Next, cut two lengths of chain about 6 inches. (This will vary with the size of your blank, and the length of your clasp, too. You’re aiming for a finished length of about 7.5 inches.) Use a jump ring to attach them both to one side of the blank, then attach a clasp to the other end of the chains. Attach a jump ring to the other hole in your connector blank.

You can add an extra bird charm if you like, and your bracelet is ready for wear! I LOVE the embossed look.

If you’re digging the bird theme, #MyFavoriteBloggers have you covered with five other bird-themed projects! Just click through the links below to get the how-to on anything that catches your eye.

10 Minute Feather Hair Band from Melanie at It Happens in a Blink | Bird Embossed Metal Bracelet from Adrianne at Happy Hour Projects | An Upcycled Birdfeeder From A Peanut Butter Jar from Tara at Suburble | Little Bird Charm Bracelet from Amy at One Artsy Mama | DIY Feather Art for the Not-So-Artistic from Bethany at Pitter and Glink | Spread Your Wings Printable from Kara at Happy Go Lucky
We also thought it would be fun to offer a great giveaway, so we all pitched in to give one lucky reader a $70 Target Gift Card (because who doesn’t love Target, right?) US and Canadian readers can enter now through 7/24/14.

Rafflecopter will walk you through how to get your entries in below. In keeping with the bird theme we’ve got going today – why not find some new bloggers to follow on Twitter? :)

I love all of Vintaj’s products. The company was founded by 2 women, everything is made in the USA, and is all nickel and lead free. I have been embossing, sanding, painting, dapping and bending — Their materials are so flexible!!!! It is great fun.
That little embossing do-dad looks awesome!
I have never embossed anything, but now I want to try! Your bracelet turned out so lovely!
I adore this bracelet!!!
So lovely, Adrianne! I’ve never used a Big Shot before, but something tells me that I really should… I love embossed things. :)