
Having a button available for others to grab is an easy and visual way to link to you. You might not think you do enough “stuff” with other bloggers to make having a button worthwhile, but chances are, there will be an occasion where you agree to do a guest post, or you link up to some sort of blog hop – and you will wish you had a button.
Buttons are also great for bloggers who like to button-swap! This is basically swapping blog ads with other bloggers for free, by agreeing to post their button on your blog too.
I also love having buttons for all my news and events (perhaps you’ve noticed). If you ever wonder what’s going on, what the current giveaway is (there’s a fun one coming up next week, so stay tuned!) what events I’m part of, or if there are any special link parties going on – you will find a button for it all at the top of my sidebar. We creative bloggers are visual, after all. We love photos and images. So it only makes sense that we represent ourselves and our activities with something visual – something we know will appeal to others who are like us!
So chalk it up to me being a button-addict, but I’m going to tell you today how to code a “grab-able” button for your blog. (You’re welcome!)
Step 1 – Make your button!
It doesn’t have to be fancy. You can do it. Even if you don’t have Photoshop.
Even though next week we lose our beloved Picnik (boo!) I’ve found that PicMonkey is also an excellent site for design without downloading any software. A great basic button is a good photo of something that really represents your blog. If you focus on recipes, use a photo of something yummy. If you quilt, showcase one of your favorites. Upload it to PicMonkey, and crop it square. Shrink it if necessary (there’s no rule for size, but I aim for somewhere between 150-200px square, for a basic button). Add your blog name to the image. Save it.
If you have a cohesive blog design already, use that as your guide. Use the same colors, patterns, and fonts. Even a basic square with text and a fun border in the colors of your blog is a good place to start!
Now, if you are planning on using an image that you didn’t create yourself, don’t just do a Google search and use the first thing that pops up. Some (many) images are copyrighted. This is part of the reason professional graphic designers legitimately charge so much. It may sound outrageous to you that they charge $15 and up for a button it took them 10 minutes to make, but they have to pay for access to all those fabulous images. But don’t get hung up on the idea that you have to have a professional graphic to create a button! You can always make a new one later. I’m constantly updating around here!
For example, this is my current button:
But want to see some of my previous buttons? Some of you may remember my neon days:
See… it’s okay to evolve, as long as you start somewhere! :)
Step 2 – Upload your image to a host site.
I love Photobucket for this. It’s fast, easy, and free for basic membership. Photobucket also has editing options, though I can’t speak to how user-friendly it is from personal experience? But if you’ve already made your button, just upload it to your Photobucket album!
Step 3 – Code it.
This is where it gets intimidating. Even if you have a basic knowledge of HTML, knowing where to put everything seems complicated. It’s not – as long as you have a basic code! This is how you code a button with a text box:
<img src="IMAGEADDRESS“/>
<a href="BLOGADDRESS” target=”blank”>
<img src="IMAGEADDRESS“/>
You will replace the red BLOGADDRESS with the address of your blog. In my case, “http://www.happyhourprojects.com” – and yes, the quotation marks are necessary.
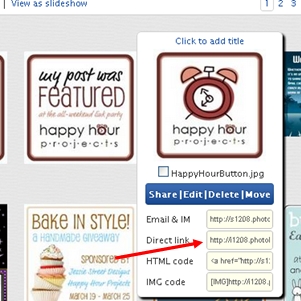
You will replace the red IMAGEADDRESS with the address of your hosted image. You can get it by copying it from your Photobucket album, just hover over your button image, and click on the “direct link” code here:
You’ll notice you’re entering each link twice. One is for the button itself, and one is for the code that will appear in the text box for other bloggers to cut and paste.
It’s also not necessary for each piece of HTML tag to be on a separate line (although it’s OK if it is). Got your code ready?
In my case, my code would look like this, once it’s all put together:
Step 4 – Add it!
These instructions are for Blogger, because that’s what I use.
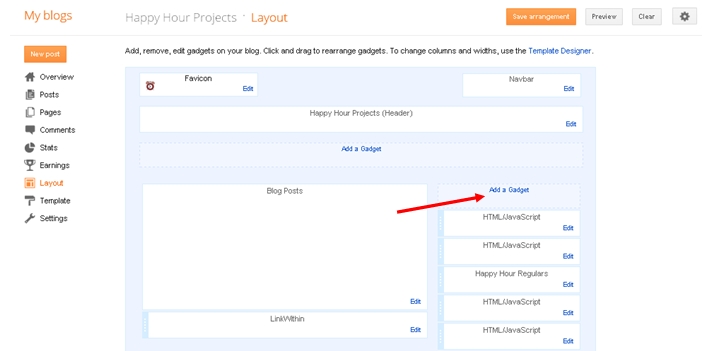
Go into the Layout area of Blogger.

And once you’re there, Add a Gadget:
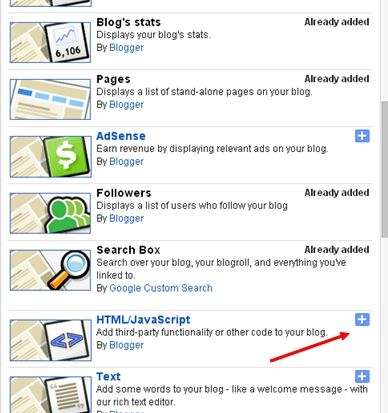
In the box that pops up, choose HTML/Javascript:
Now, just a title if you want to, and paste your code into the box. You must do this when you’re in “Edit HTML” mode. You can check that your work looks right by clicking on “Rich Text”. If your graphic isn’t visible, double-check your code. When you’re done click Save!
That’s it! You may want to arrange it to a different place in your layout. What do you think?
Now that you’re officially buttoned-up (and want a place to show off your brand-new button, of course!) I’m starting a button-swap here at Happy Hour Projects. You’ll find my friends and swaps in the sidebar, under “My Blog Friends”. Visit some of these fantastic blogs if you get a moment!
To be a part of the swap:
First – become a follower!
Second – grab my button, and post it somewhere on your blog. I will swap with you for a month, or for good… whatever you’re looking for! I’m easygoing like that. :)
Third – leave a comment or email me so that I can come out and grab your button! I’m usually able to get to all my comments within a day, sometimes less if you catch me online.
I hope you found this post helpful. If you have any questions or trouble, leave a comment or send me an email! If you’re new to blogging, you may enjoy some of my other blog tips, too!
~ Adrianne
Thank you for sharing. Your button looks great on my blog, please grab my button and maybe follow my blog ;)
http://www.rooftopfashion.blogspot.com
Megan xxx
Thanks for sharing! You button now has a new home at my blog http://www.eatloveinspire.blogspot.com I'd love if you can grab mine!
Thanks and I hope you can find some creative inspiration from my blog as well :)
Thanks for posting my button on your blog! However, I was surprised how big it was compared to your other buttons. I saw what I did wrong and where I could resize it so I did resize it. If you don't mind re-grabbing my button it should fit much better now in your sidebar. Thanks!
Amy
http://www.firehousecrafts.com
BTW This is my blog :-)
http://www.lifeofacupcakebaker.com
Thank you so much for such a great post!!
I am a complete computer idiot and am learning as I go along!! Thanks to you I have created my own grabable button! Woohoo
x Kat x
Thanks for the great post! I already did my button plus a few more that I wanted for future projects. I placed your button in my sidebar. My blog is at http://www.firehousecrafts.com. Thanks again for the great tutorial!
I did it! Thanks so much!!!!
Thanks for such a detailed post. Now I just need to be brave enough to try it :)
Here's my WDIW post:
http://collettaskitchensink.blogspot.com/2012/04/i-did-it-summer-sun-hat-with-flower.html
Colletta
What a great tutorial! Thanks so much for sharing at Mix it up Monday :)
Thanks for sharing this! I tried to figure it out on my own, but no such luck. You are a great help to blogger newbies!
Thanks for posting this! I didn't know what to do after Picnik was gone!
I just followed your instructions and I did it!!! I have a button now!! Thanks so much for the awesome tutorial, and I am following you and posted your button on my blog for a swap!
Thanks!
Shannon@www.SewSweetCottage.blogspot.com
That is an awesome Tutorial for the grab button!! Good Job! Thanks so much for sharing at Thursday's Temptation.
Jill
This is so great. Thank you for posting!! Happy Friday.
You are a blogger genius!! Thank you sweetie for explaining this! Nettie
Great easy to follow post!! I agree about paying for ad space. It is fun to swap though! BTW I am totally LOVING the new background and tabs at under your header! So cute!
Thank you for sharing this… I have read many “easy” tutorials as to how to do this but yours was by far the most understandable! Thank you, thank you, thank you!
Pinned for later I HAVE TO TRY THIS!
http://mommamadeit.blogspot.ca
Great post! PINNED! Thanks Adrianne!
Wow, thanks, Adrianne! This is such great information. I figured I would never have a button because I just don't know enough about code & stuff! I just tried PicMonkey yesterday and I like it—easy to use—although I normally use Picasa—so hopefully if I can figure out something with which to make my button, maybe I'll try it!
This is a perfect post for me right now. I do not have a blog button yet because I keep thinking I need it to be perfect and permanent and one that will not change for years to come. But now I realize I can do one now and then change it just as I have changed my blog look.
Thanks for the info. Maybe I will even have one by the time my guest post comes up. No promises though :)