
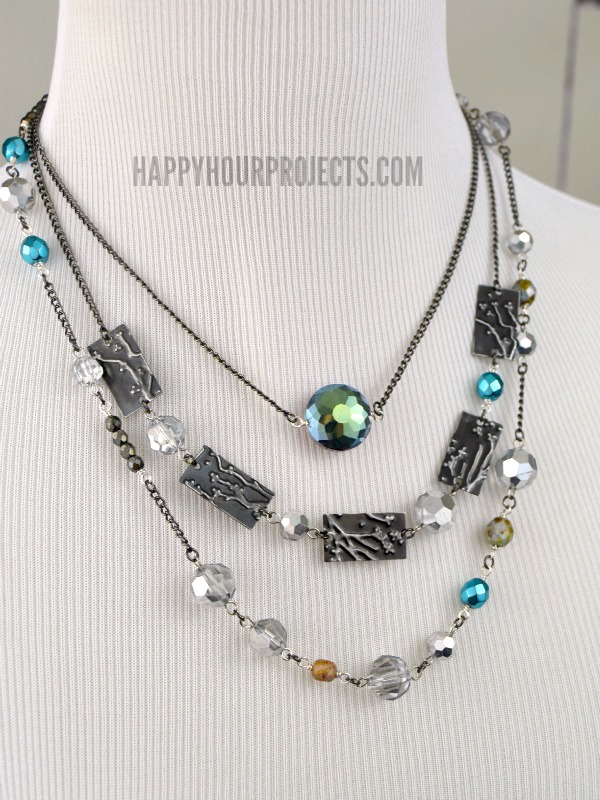
So I have been flat-out LOVING the layering trends, in case you haven’t noticed. I’ve been making layered and multi-strand bracelets for a while now, and now that I’m seeing more and more necklaces stacked and layered… oh I am ALL. OVER. IT. Today’s mixed media project has a boho feel to it, and it’s got jewels and floral-embossed metal blanks on a few strands of light chain.

Supplies for this project will vary depending on your particular style, and the colors you love. I’ll leave some links below for a few of the supplies I used, including my Sizzix supplies. I’m sharing this design as a member of the SIzzix design team – and that’s great news for you! It meas you can score an extra 15% off your purchase at Sizzix anytime by using the code SZB2015. These are all affiliate links below, so if you do find something you can’t live without, any purchase you make supports my craft addiction and all the free tutorials here at no extra cost to you.

I know, I know. It looks like a LOT of pliers. I’ll be showing you how to make your elements from scratch today, but these are the basic tools you’ll need to make most any kind of jewelry. :)
You will need:
- Sizzix Big Shot, extended platform, and standard cutting pads
- Vintaj DecoEmboss die – I’m using Cherry Blossom, but there are several beautiful dies to fit your style
- Vintaj Arte Metal 23mm rectangular blanks
- Vintaj Reliefing Block
- 18-gauge wire – I’m using a silver plated copper wire. Brass is fine too.
- 2mm chain
- Round nose pliers, Chain nose pliers, and wire cutters – (you can grab them all in a 3-pc set if you need to)
- Metal hole punch
- And possibly, nylon jaw pliers to straighten your wire
- An assortment of crystal beads – different shapes, sizes, and colors are ideal
- 4mm jump rings
- Large lobster clasp and 12 mm jump ring

There are a lot of steps today, but all are optional! You can assemble this layered necklace however you like. I will recommend that the one element you absolutely keep are the embossed blanks, because they set the tone for the whole piece. (And if you’re not a fan of black and silver, this size is also available in copper, as well).
Punch an extra hole in the opposite side of the blank (I also re-punched the original hole, so that the two holes matched in diameter), and position them on the blank where you’d like the embossed design to show.

Create your “Sizzix sandwich” by closing the die folder firmly, and placing it between a pair of acrylic cutting pads. One side will be marked “this side down”, so take note of that, and roll it through your Big Shot machine with the platform tab set to #1. Buff the embossed pieces with a reliefing block to bring out the embossed floral pattern (or whatever you’ve chosen).

Next, I’ll show you how to create beaded chain and beaded connectors. You’ll use this technique whether you are adding one bead to a length of chain, or many beads.
Using round-nosed pliers, wrap about 1 inch of wire over one side of the pliers, forming a loop. Then, take the tail end of that wire, and wrap it around the man portion of the wire. Wrap it 2-3 times, and then cut off the excess wire with wire cutters. You may find that you need to use your jewelry pliers to press the edge down fully.
Add a large bead, a small bead, or several beads, and then close the other end the same way as you created the first loop.

Connect beads together with 4mm jump rings (as I did in the longest layer), connect them to lengths of chain (as I did in the shortest layer), or connect them to embossed blanks, as I did in the center focal layer. When opening and closing jump rings, be sure to twist them open and closed, rather than pulling them apart. They will close much more securely when you twist them.

When you’re happy with your chains, connect them together at the ends with a large jump ring on one side and with a large clasp on the other side. I opted for three lengths – 16, 17.5, and 19 inches long. Feel free to experiment with other lengths to fit your frame and your style! This necklace would also look beautiful even longer, at a 24-26 inch length. (To be honest, I just didn’t have that much chain on-hand – but that’s the beauty of DIY jewelry. I can still make changes later, if I want to!)
You can also make these up as three individual necklaces, if you’re like me and you’re all over the layering trend! I just knew I’d be wearing these three together, and I wanted my carefully-random-looking pattern to stay a certain way. (Is that control freak-ish? Eh, oh well.)
Thanks for joining me today – I loved this project. If you did, too, be sure to pin it, or share it on Facebook or Twitter to show your friends!

As a 2015 Sizzix Design team member, I receive certain Sizzix products free of charge in order to share inspiration projects and tutorials. Select Vintaj dies were provided to me in order to create this tutorial. My designs and opinions are, of course, all my own.
![]()
Best seller
Lovely! I really like your blog – it’s my inspiration. Thank you!
wow.. thats awesome ^^ i like it