
So if you’ve been keeping up this week, this is the project I’ve been aiming for all week. I had a little fail making up some polymer clay buttons (though I swear, it was the oven’s fault) and I shared the button tutorial once I switched ovens and got these star-themed buttons right. I was making them as a closure for a simple braided hemp bracelet with beads, made up patriotic-style. Tadaa.

This is an easy style that adapts easily to any color theme (you can go beachy, nautical, autumn, whatever you’re into at the moment) and it’s a great mix of earthy and sparkly.

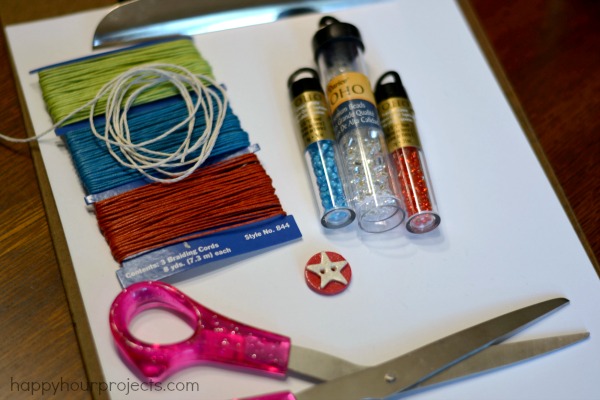
What you will need:
- Hemp or cotton cord – three cords, 24 inches long for each wrap/layer you want. Mine is a double-wrap so I used three 48 inch cords in red, white, and blue.
- Size 6/0 seed beads in coordinating colors
- A button for the closure
- Scissors and optionally, craft glue
- A clipboard or other means of securing your piece while you work
First, mix up a color scheme of beads you like. I like using at least 3 colors (which worked well for this project) but for other seasons I will use 5 or 6 colors. Take all three cords (you can use any colors, but I used one of each color) and find the center point. Tie an overhand knot at the center point, so that you have 6 equal-length strands coming off what will be your hole for your button closure. Take a moment before you continue to check that the button will fit through your loop, not too snugly or loosely.

Next, you can start braiding! You can braid your strands in any style you like, but personally, I just separate them into three parts and make a traditional braid. It works up the most quickly this way. I clip the hemp onto my clipboard to secure it while I work, and start braiding.
At random points along the braid, I take either the right-most or left-most strand, and add a bead onto it. Pus the bead snugly up the side of the braid, and continue braiding. Your beads will be secured to the outside of the braid. You can do this in a pattern, or randomly like I do. The photo below will show you how to braid beads into your bracelet.

Then, just keep working. For each wrap, you will want a braided length between 6.5 – 7 inches. (You can measure it against your wrist as you go to check the length). As you run out of space, you can move your work up the clipboard and clip it in a different spot. Once I got to 14 inches, I tied an overhand knot to finish my work.
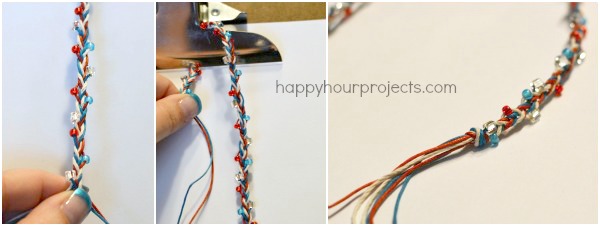
Finally, add your button closure. Depending on the size holes in your button (mine were on the small side) take one, two, or even 3 strands of hemp, and thread them up through the back of the button, loop over the front, and thread them back down to the bottom (see below). Then, take three strands of hemp, and tie them firmly to the other three, making a square knot/double knot. You can help secure these knots by adding a bit of craft glue when you tie them. Trim the ends off.

At this point, let the glue dry (if you used some) and then your bracelet is ready for wear! You just wrap it around your wrist, and loop the starting end loops over the button to close it. It’s a lightweight piece, and the button makes for a great focal point.

You can make this up in anywhere from 15-45 minutes, depending on how long you want your bracelet (how many times it will wrap around your wrist). I made this double-wrap one up in about 30 minutes – just in time for Memorial Day weekend!


Love your blog and all of your projects, but this one is super-cute! I LOVE the little button accent (and that you used clay – I’m always looking for great clay projects)! Just wanted to let you know I featured it in my roundup of my very favorite July 4th projects (it’s the recent post linked by commentluv). Feel free to check it out and hope you like it. Happy 4th of July!
-Mel the Crafty Scientist
So fun and festive! Love the buttons!
I like your blog ; funny, easy, happy ! thanks !
…. j’aime votre blog, amusant, joyeux, et facile ! merci !