• Skip to primary navigation
  • Skip to main content
  • Skip to primary sidebar

  • home
  • about adrianne
  • buy the books
    • DIY T-Shirt Crafts (2015)
    • DIY Stamped Metal Jewelry (2016)
    • Rock Painting for Beginners (2019)
  • videos
  • crafts
    • diy beauty projects
    • kids’ crafts
    • paper craft projects
    • polymer clay
    • sewing projects
  • jewelry
    • bracelet projects
    • earring projects
    • necklace projects
    • jewelry tools & supplies
  • metal stamping
    • beginners’ tutorial
    • video tutorial
    • project ideas
    • metal stamping supplies
  • recipes
    • cocktail recipes
    • appetizers
    • main and side dishes
    • sweets and treats
  • by season
    • birthdays
    • new year
    • valentine’s day
    • st. patrick’s day
    • easter and spring
    • mother’s day
    • patriotic
    • fall
    • halloween
    • christmas
    • thanksgiving
  • privacy

Happy Hour Projects logo

11/24/2017

Brass+ Coconut DIY Bead Bracelet

-Hey friends!  Ready for a fun new DIY bead bracelet design today?  I’ve got you covered!  Combine dyed coconut beads with brass accents for an earthy, organic-looking DIY bead bracelet.  It only takes a few simple supplies, and the design is so versatile that you could make it in either a single- or double-strand style.

Coconut + Brass DIY Bead Bracelet at happyhourprojects.com #DIY #jewelry #fashion #crafts #accessories

I got inspired by the selection at today’s post sponsor, Happy Mango Beads.  While I often use natural stones in my designs, I don’t often use wood or coconut.  It’s just not typically my style – but I loved the shade of these denim blue coconut beads!  Read on for how this piece came together, and you can shop the links below to make your own!  (Note: I could have sworn I got the hook and eye clasp at Happy Mango Beads once upon a time, but I’ve been shopping there for several years now, and it appears to be discontinued in the brass finish.  It is, however, available in the silver pewter finish, and the metal accents are too! You can always shop a different clasp style, or change the finish in this tutorial.)

Coconut + Brass DIY Bead Bracelet at happyhourprojects.com #DIY #jewelry #fashion #crafts #accessories

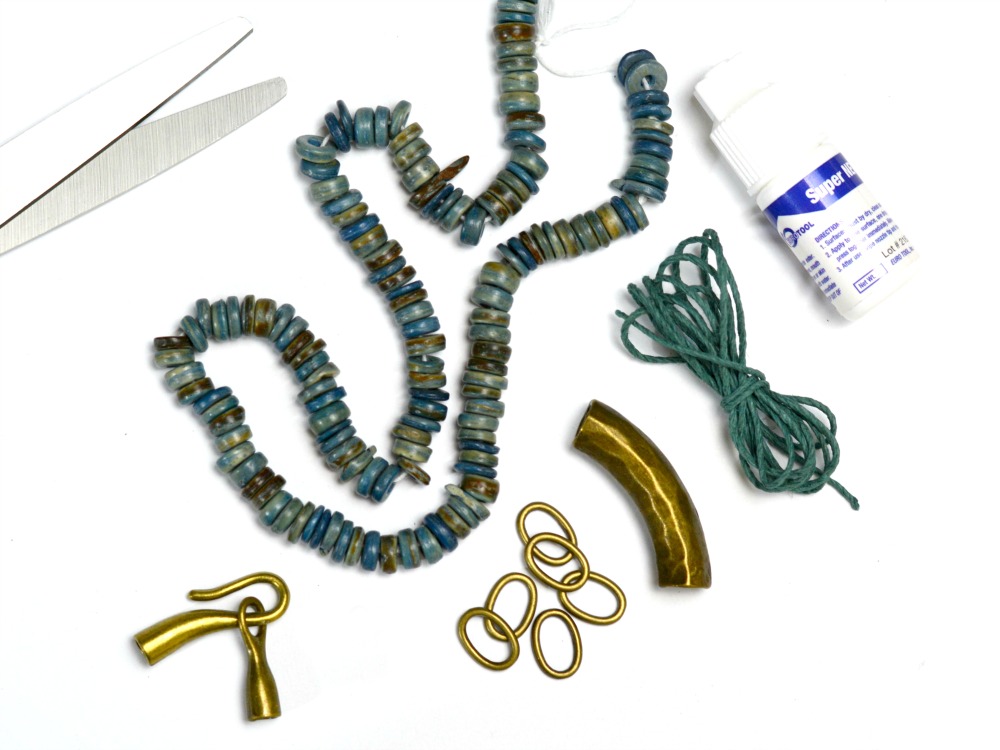
Here’s what you’ll need to make this DIY bead bracelet:

  • 8mm rondelle coconut beads (I used denim blue)
  • 41mm hammered pewter tube bead with brass finish
  • 6 – 13mm brass oval pewter beads (you may skip these if you’re making only a single-strand tube bead bracelet)
  • Coordinating 20-lb hemp cord, about 36 inches
  • Jewelry Glue (I like Super New Glue)
  • Hook and Eye clasp (you can use any clasp you like, Happy Mango Beads has some great toggle clasps)
  • Scissors

Coconut + Brass DIY Bead Bracelet at happyhourprojects.com #DIY #jewelry #fashion #crafts #accessories

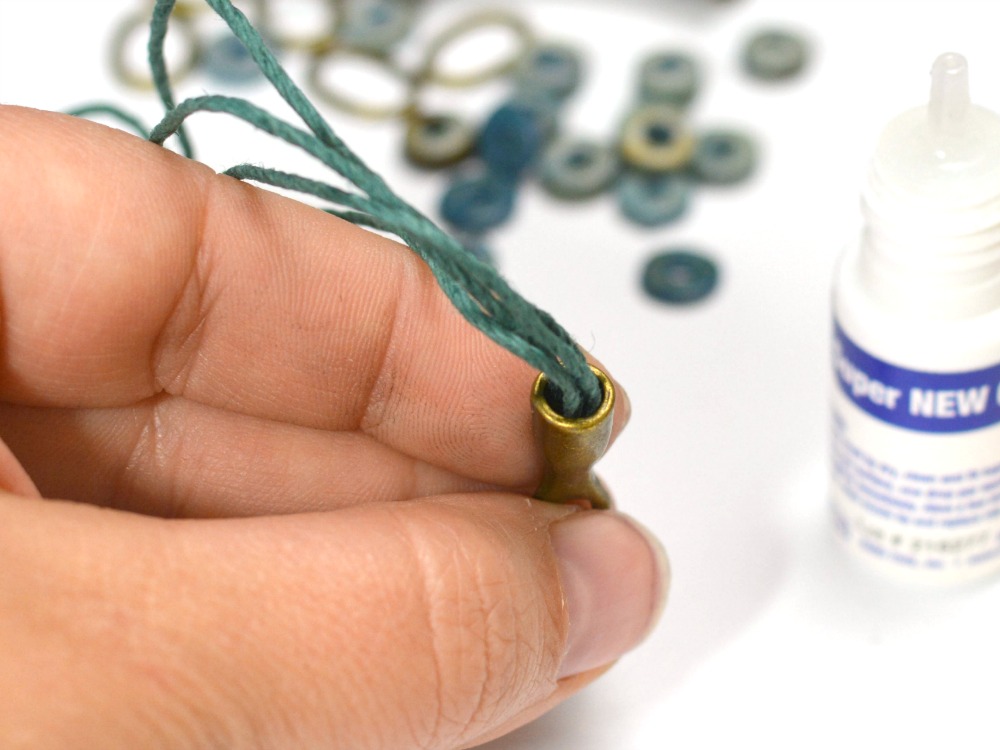
First, cut 36″ of hemp into 4 equal length (9-inch) strands.  Tie them in an overhand knot if they fit too loosely in the cap – the knot will fill the end cap completely.  This step may or may not be necessary depending on the style clasp and the weight of the hemp you’re using.  If you are using glue-on hook and eye clasps, glue the ends of your hemp into one cap with a few drops of jewelry glue.  (For a more traditional toggle-style, you can simply tie a 18-inch length of hemp through the loop.)Coconut + Brass DIY Bead Bracelet at happyhourprojects.com #DIY #jewelry #fashion #crafts #accessories

The advantage to using a double strand of hemp in the project is just to fill the glue-on end caps.  You may choose to use single strands.  But if you’re doubling them, separate them into two groups of two to string your beads.  Add approximately 1/2 – 3/4 inches of coconut beads onto each strand, and then string a 13mm oval bead onto both strands.  Then, continue stringing coconut beads on each strand.

Coconut + Brass DIY Bead Bracelet at happyhourprojects.com #DIY #jewelry #fashion #crafts #accessories

When you reach a length of 3 inches of beads + the end clasp, it’s time to add the tube bead to one strand of hemp.  Continue on the other strand with more coconut beads.  When they reach an equal length, repeat the pattern you began with of 1/2 – 3/4 inches of beads, offset by a 13mm brass oval.

Coconut + Brass DIY Bead Bracelet at happyhourprojects.com #DIY #jewelry #fashion #crafts #accessories

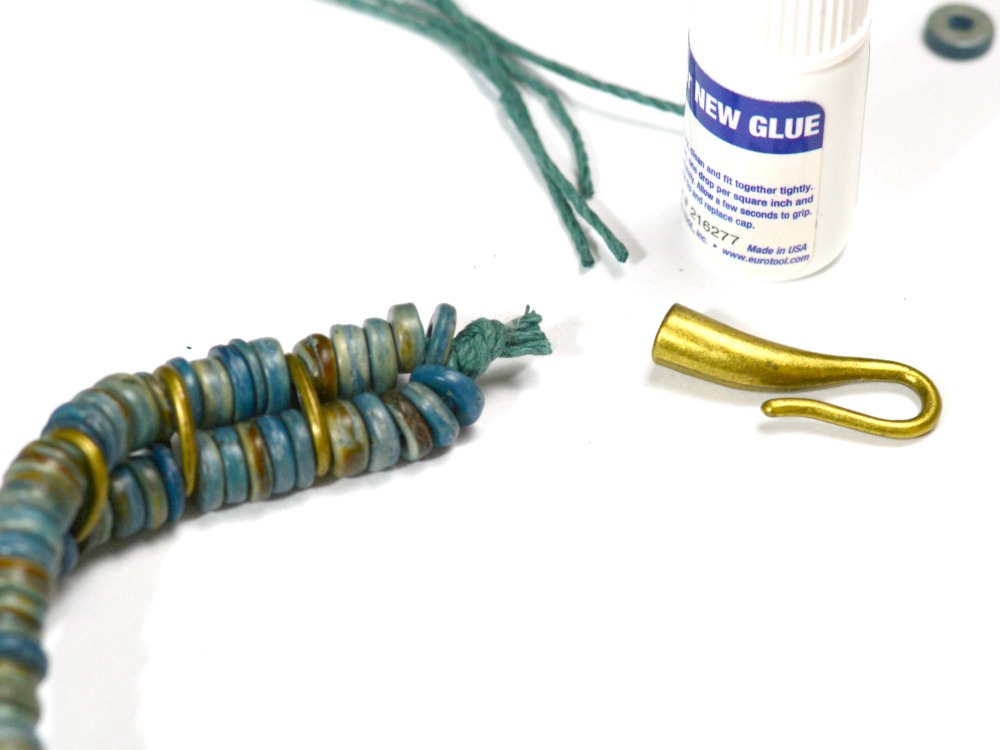
When you reach the end, tie another knot and glue the opposite end cap into place.  (For toggle clasps, tie the toggle into the knot.)  Jewelry glue dries quite quickly, so it should be ready for wear within 10-15 minutes!

Coconut + Brass DIY Bead Bracelet at happyhourprojects.com #DIY #jewelry #fashion #crafts #accessories

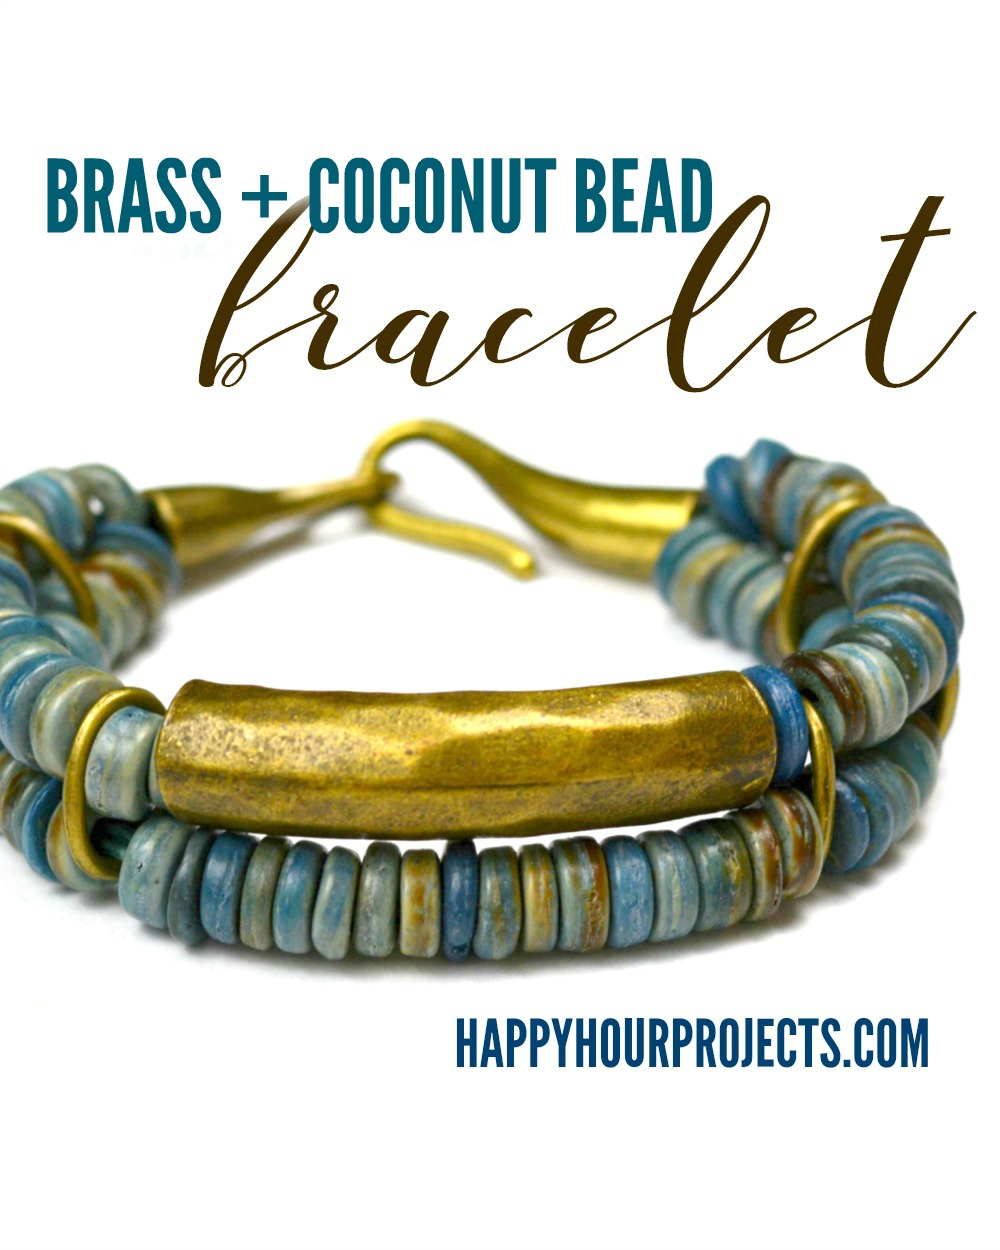
The end result is a bracelet that makes up quickly, with lots of room to modify the length and details!  Try adding a brass tube bead to both strands, or add a dangling charm!  The length can easily be adjusted of you string your beads first, and check your lengths before adding the clasps.  I typically make a 7.5-7.75 inch bracelet for myself, but you can make this design larger or smaller.

Coconut + Brass DIY Bead Bracelet at happyhourprojects.com #DIY #jewelry #fashion #crafts #accessories

Thanks for joining me for today’s DIY bead bracelet idea, and I’ll see you all again soon!

Adrianne Surian

Filed Under: Bracelets, Jewelry, Tutorials Tagged With: accessories, beads, bracelet, DIY, Happy Mango Beads, hemp, jewelry, layered, metal

copyright policy and terms of use

I love it when you love my work! All tutorials and photos published at Happy Hour Projects are copyrighted. If you would like to feature my tutorial on your website or share it on your social media you may use one photo to feature, as long as you provide a link back to the original post.

If you feature a photo, it may not be accompanied by the project tutorial or recipe, whether in my own words as it originally appears or paraphrased by you. This also includes personal sharing on social media and Pinterest. Publishing multiple photos from a project, or including instructions with an accompanying photo are not permitted and you will be asked to remove them.

I love to share my projects, and my tutorials, recipes, and e-books are ALL free for your personal use. However, photos and ideas that are published to this site are my protected intellectual property. You may print them at home, but please do not copy or distribute them. I also allow all designs to be made and sold at fundraisers, craft fairs, etc. If you are selling a piece made from one or more of my free tutorials in your online shop, I require that you use your own, original photography, and include a link back to my website to credit me as the designer.

I hope you enjoy what you read here, and please be fair when you share!

Reader Interactions

Comments

  1. EaglerCraft says

    03/27/2026 at 4:10 am

    What stands out to me is the transparency about the process, including the note about the discontinued clasp. I think that detail adds authenticity and makes the tutorial feel more approachable, as it encourages flexibility rather than perfection. It reminds me that creative work isn’t always about having the exact materials, but about adapting and making something unique with what’s available.

    Reply
  2. vex3 says

    05/14/2025 at 3:53 am

    This makes me very delighted since it has taught me an essential and useful lesson. It taught me to cherish what other people share, so I can reduce stress in my life.

    Reply
  3. pixel speedrun says

    04/22/2024 at 12:50 am

    I love your article. U are an inspiration. U have inspired me to start a small business with all my crafts.

    Reply
  4. kanchipuram sarees says

    08/16/2018 at 3:15 am

    nice post

    Reply
    • World's Hardest Game says

      02/24/2023 at 10:39 pm

      My go-to subject on this subject. The excitement we experience alway makes you feel refreshed.

      Reply
  5. golu dolls says

    08/16/2018 at 3:14 am

    looking good

    Reply
  6. Maureen says

    12/01/2017 at 5:05 pm

    Beautiful bracelet! And great tutorial, as well. Thanks for your generosity in sharing your genius with all of us.

    Reply
  7. Betty Dalton says

    12/01/2017 at 4:09 pm

    Hi. This bracelet is so pretty and looks like it’s from a boutique. I just might give it a try. Thanks for sharing.

    Reply

Leave a Reply Cancel reply

Your email address will not be published. Required fields are marked *

Primary Sidebar

Hello, and welcome! I'm Adrianne, an artist, author, designer, and blogger in mid Michigan. I work from home, chase my two kids, and this once-city-girl is learning how to care for chickens and adjusting to life out in the country. I have a compulsion for daily creativity... sometimes it's jewelry-making, paper crafting, metal stamping, mixing and baking, or giving new life to recycled items. But with 2 young kids, time is short! My goal here at Happy Hour Projects is to share projects and tips that you can do in an hour or less. The ideas you find here are designed to add a little creativity in your day, no matter how much (or how little) time you have!

BUY MY BOOKS!

Copyright © 2026 Happy Hour Projects on the Brunch Pro Theme