
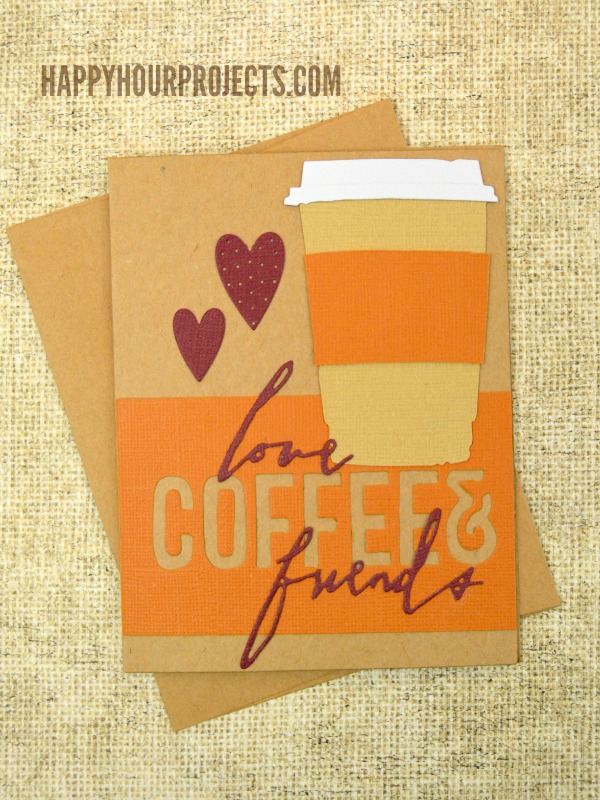
I love coffee. I love people who love coffee. I mean, I also love people who *don’t* love coffee, but there’s a certain camaraderie over a cup of joe… do you relate? If you do, then I’ve got a fun design to share with you today, a Valentine card I recently sent to one of my very best friends. If you have a coffee lover in your life and you enjoy making handmade cards, then put this project on your list – it’s even got a pocket inside to add a gift card! I also made it purposely NOT overly-girly, so it’s perfect for a practical girlfriend, boyfriend, or any kind of friend.
I used my Sizzix Big Shot to make this card, along with some BRAND spanking NEW dies from Tim Holtz. Because since joining the Sizzix design team this year, I’m becoming a total fangirl. Sigh. But back to what’s what with today’s inspiration project.
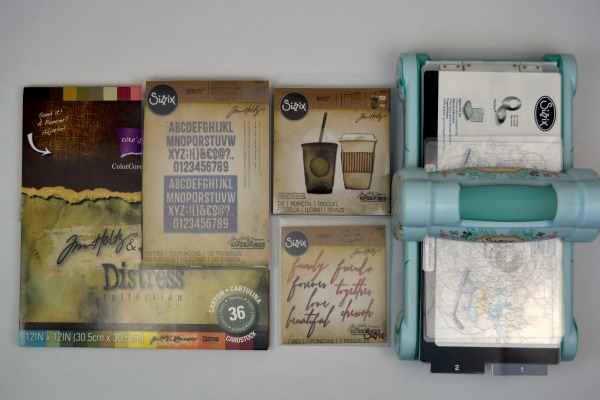
I’ll leave you links below to the products I used, in case you immediately begin drooling, like I did. Ahem. And for all of these links, you can click just to learn a little more, or if you decide to buy through these links, it does support my blog (and thank you, by the way). Here’s what I used for this card:
- Sizzix Big Shot and cutting pads
- Magnetic platform
- Fresh Brewed Bigz die
- Handwritten Love Thinlits die set
- 1″ Alphanumeric Thinlits die set
- Hearts Card Front Thinlits die set (just the hearts, you could easily use a heart-shaped punch)
- Mini Envelope & Tag Bigz die
- Core’dinations Tim Holtz and Ranger Distress Color Core Cardstock
- A2 Kraft Card & Envelope Set
- Zip Dry Paper Glue
If you’re new to using the Sizzix products, I know it can be a little overwhelming to know what to use with what, so I’ll point out how to get these looks, but don’t forget – half the fun of making your own cards is adding your own style and flair! I’m here to walk you through the technical stuff, but get creative. You will notice that my style is NOT to add a lot of ink or distressing. I like simple layers, personally, but you can totally transform the look you get with these dies by using other paper techniques.
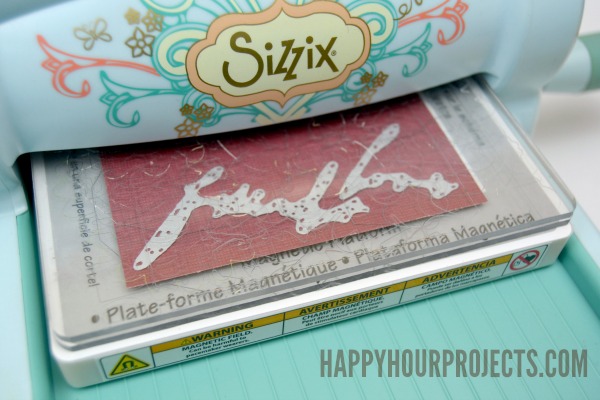
First things first: for the Thinlits dies (which I primarily used in this card) you will want to make use of the magnetic platform. They help you to position the metal exactly where you want it without it shifting around as you die-cut your papers. You’ll layer you sandwich like this: magnetic platform, bottom cutting pad, paper, Thinlits, and then the top cutting pad, and roll the whole thing through your machine for quick cuts. I die-cut “friends” and “love” with the handwritten set. to layer on top. I also cut a couple of hearts.

I utilized negative space for COFFEE – the magnetic platform was serious help for this precision spacing. You can spell out whatever you want with the individual dies in the Alphanumeric set.

Finally, I used the cutting pads alone with the Bigz dies to die-cut the coffee cup and accessories and also the envelope to go inside the card. The envelope in this set is just a tiny bit snug for a gift card; you’ll want to create a second score line about 1/16″ inch out from the original score line.

Then I just glued all the layers together to spell out “love, coffee & friends”, and I wrote my own personal message inside. And including a $5 gift card to your friend’s favorite coffee shop is a great way to make their day! This one wished my friend a happy Valentine’s Day, but the design is versatile enough that it’s a great everyday design.
Are you a fan of handmade cards? What’s your style like?

![]()
This could be new but is very useful method that we can use online.