• Skip to primary navigation
  • Skip to main content
  • Skip to primary sidebar

  • home
  • about adrianne
  • buy the books
    • DIY T-Shirt Crafts (2015)
    • DIY Stamped Metal Jewelry (2016)
    • Rock Painting for Beginners (2019)
  • videos
  • crafts
    • diy beauty projects
    • kids’ crafts
    • paper craft projects
    • polymer clay
    • sewing projects
  • jewelry
    • bracelet projects
    • earring projects
    • necklace projects
    • jewelry tools & supplies
  • metal stamping
    • beginners’ tutorial
    • video tutorial
    • project ideas
    • metal stamping supplies
  • recipes
    • cocktail recipes
    • appetizers
    • main and side dishes
    • sweets and treats
  • by season
    • birthdays
    • new year
    • valentine’s day
    • st. patrick’s day
    • easter and spring
    • mother’s day
    • patriotic
    • fall
    • halloween
    • christmas
    • thanksgiving
  • privacy

Happy Hour Projects logo

11/12/2014

Easy Leather Connector Bracelet

I’ve got another quick bracelet design to share with you today that’s easier than it looks!  You can make this boutique-style leather bracelet in 10 minutes or less, and the supplies you need are really minimal.  What’s even better is that I found the pieces to make this grouped into a kit – which means that even if you have no interest in jewelry design or learning how to make handmade jewelry, you could even pick up this kit as a gift for crafters.

Easy Leather Connector Bracelet at www.happyhourprojects.com

You don’t have to use these exact pieces, either – this is a very easy and adaptable design.  Swap out leather for jute cord, use a different style connector, change the colors, the textures – there are really endless possibilities to make it your own.  But, if you’ve got your heart set on this exact design, I’ll add links below so you can find these pieces at Goody Beads, where I found it.  Plus, if you make a purchase through any of these links, it supports my blog at no extra cost to you – which means I can keep sharing great free designs. You know, just sayin’. :)

So here’s what you will need to make this simple leather connector bracelet:

Easy Leather Connector Bracelet at www.happyhourprojects.com

  • 2 mm round leather cord – or the cord of your choice.  You need 36 total inches – the cord I linked to is 1 m (about 39 inches)
  • Focal connector, beads, and a magnetic glue-on clasp set – these are available as a complete kit
  • Super New Glue or jewelry glue of your choice
  • Optional (but helpful) – leather cutter

First, cut four lengths of leather cord 9 inches each.  (Or, if you’re using 1 m of cut cord, you can skip the measuring by cutting it into 4 equal pieces, and trim them off at the end.)  Take 2 cords, double them at the 4.5 inch point, and make a lark’s head knot.  To do this, pass the loop down through the front of your connector.  Then, take the tails, and feed them through the loop you made.  Pull it tight.  Repeat this on the other side

Easy Leather Connector Bracelet at www.happyhourprojects.com

Next, add any slider beads you like!  The kit I linked to includes 2 beads, so I slid them onto the leather, and moved them toward the knots.  Then, I trimmed about a half inch off the ends so that the total length of the bracelet (before adding the clasp) is between 7 inches and 7.25 inches (it depends whether you have smaller or larger wrists – which is the beauty of handmade.  You can make these adjustments easily).

Easy Leather Connector Bracelet at www.happyhourprojects.com

Finally, add a few drops of glue to the inside of your clasp, and glue each end on.  When you’re gluing leather to metal, it takes about one minute before it dries enough to “grab on” – you will have to hold it in place about that long until it adheres enough to let go and allow it to dry the rest of the way.  The good news is, it only takes 10-15 minutes to dry all the way, so you won’t have to wait long at all for your piece to be ready for wear.

Easy Leather Connector Bracelet at www.happyhourprojects.com

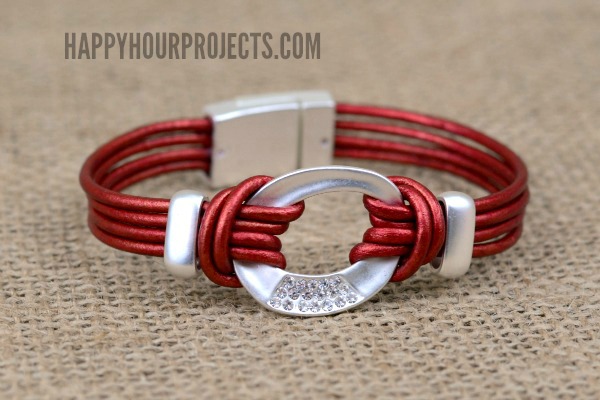
The beads will slide around a little, so if you don’t want them to move, you can add a drop of glue to hold them in place (I opted not to – but I have for other pieces).

So what do you think?  Festive?  I think so!

adrianne signature

Filed Under: Bracelets, Fashion, Featured, Jewelry, Tutorials, Uncategorized Tagged With: 10-minute project, accessories, beginner, connector, easy, fashion, gifts, knot, leather, red, stocking stuffer

copyright policy and terms of use

I love it when you love my work! All tutorials and photos published at Happy Hour Projects are copyrighted. If you would like to feature my tutorial on your website or share it on your social media you may use one photo to feature, as long as you provide a link back to the original post.

If you feature a photo, it may not be accompanied by the project tutorial or recipe, whether in my own words as it originally appears or paraphrased by you. This also includes personal sharing on social media and Pinterest. Publishing multiple photos from a project, or including instructions with an accompanying photo are not permitted and you will be asked to remove them.

I love to share my projects, and my tutorials, recipes, and e-books are ALL free for your personal use. However, photos and ideas that are published to this site are my protected intellectual property. You may print them at home, but please do not copy or distribute them. I also allow all designs to be made and sold at fundraisers, craft fairs, etc. If you are selling a piece made from one or more of my free tutorials in your online shop, I require that you use your own, original photography, and include a link back to my website to credit me as the designer.

I hope you enjoy what you read here, and please be fair when you share!

Reader Interactions

Comments

  1. Patricia V Morris says

    10/18/2019 at 4:16 pm

    Where can you purchase. The silver crimps for the leather?
    The silver accessories

    Reply
  2. Kathy says

    09/06/2016 at 6:14 am

    Thanks for this tutorial and the link to goody beads. I’ll be making one for my sister for her birthday, and one for me :)

    Reply
  3. Cricket says

    06/10/2015 at 7:43 am

    I have been looking at this bracelet on Pinterest and adoring it and now I see I can easily make it myself, thank you. Also love the Goody Bead site, I have found a wonderful place to buy leather for bracelets. I’m so happy!

    Reply
  4. Juli says

    02/19/2015 at 7:52 pm

    How do you then join the two ribbon crimps to hold the bracelet together. Would it have to be a lobster clasp or maybe an S hook? Is there anything simpler?

    Reply
  5. Juli says

    02/18/2015 at 8:27 pm

    Thanks heaps! I like the idea of the ribbon ends, but how do you clasp them together to secure the bracelet on?

    Reply
    • Adrianne says

      02/19/2015 at 4:28 pm

      Ribbon ends just crimp on and grip the leather with their little teeth. Super simple! :)

      Reply
  6. Juli says

    02/17/2015 at 1:04 am

    I’m trying to make this bracelet without using the kit set, but I’m having real difficulty finding the slider beads.
    Does anyone have a supply source?? Also, is there a suitable crimp clasp that could be used instead of the magnetic
    clasp to avoid using glue?

    Reply
    • Adrianne says

      02/17/2015 at 8:19 am

      This is the same size: https://www.goodybeads.com/store/products/A015700.htm or there are pages and pages of different styles, just look for the flat leather options: https://www.goodybeads.com/store/Beads-Charms-Sliders.htm

      You can use ribbon ends to finish this bracelet too. Here’s a nice assortment of sizes on Amazon: http://www.amazon.com/gp/product/B005CEBP08/ref=as_li_tl?ie=UTF8&camp=1789&creative=390957&creativeASIN=B005CEBP08&linkCode=as2&tag=haphoupro-20&linkId=76EOSPDTBVHW7HRX

      Reply
  7. Lorraine says

    01/25/2015 at 6:44 pm

    I always love your ideas. This is another great one !

    Reply
  8. Michelle says

    12/06/2014 at 5:50 pm

    Just got done making four of these for Christmas gifts. Thank you so much for the AWESOME ideas!! :)

    Reply
  9. Marilyn says

    11/13/2014 at 11:31 am

    Adrianne, I love the sleek lines and the festive red! Gorgeous! :)

    Reply
  10. Teresa Dalton says

    11/12/2014 at 8:33 pm

    Thank you! This bracelet is a cute and versatile design. I love it! I needed more leather ideas!
    Best regards,
    Teresa

    Reply

Trackbacks

  1. Fabriquer des bracelets 2 | Pearltrees says:
    11/15/2014 at 5:05 pm

    […] Aqua Agate Leather Cuff Bracelet. Easy Leather Connector Bracelet. Sweet Willow Designs: Polymer Clay Southwestern Enamel Look Bracelet Tutorial. Join me in my […]

    Reply
  2. CraftCrave | DigiFree | CraftCrave says:
    11/12/2014 at 7:46 pm

    […] Easy Leather Connector Bracelet – 1 freebie(s)? […]

    Reply

Leave a Reply Cancel reply

Your email address will not be published. Required fields are marked *

Primary Sidebar

Hello, and welcome! I'm Adrianne, an artist, author, designer, and blogger in mid Michigan. I work from home, chase my two kids, and this once-city-girl is learning how to care for chickens and adjusting to life out in the country. I have a compulsion for daily creativity... sometimes it's jewelry-making, paper crafting, metal stamping, mixing and baking, or giving new life to recycled items. But with 2 young kids, time is short! My goal here at Happy Hour Projects is to share projects and tips that you can do in an hour or less. The ideas you find here are designed to add a little creativity in your day, no matter how much (or how little) time you have!

BUY MY BOOKS!

Copyright © 2023 Happy Hour Projects on the Brunch Pro Theme