
So, are any of you planning a wedding this year? Or perhaps a photo shoot? We’ve got family photos for the first time *ever* as a family this weekend, so I thought it would be fun to share with you today how to make giant crepe paper flowers, which make for great photo props! Wedding season is upon us now, too, and they’re also beautiful decor for a bridal shower or a wedding – you can use the bride’s colors, or go with classic white – or add them for bright decor to any kind of party planning you’re working on for the summer.

I originally shared this tutorial over at Crafts Unleashed, the Consumer Crafts blog, but in case you didn’t catch it there, I want to share it with you all here today! I used supplies from the Consumer Crafts website, and I’ll leave links to them in the list below. (I did receive these supplies free in order to design today’s crepe paper flowers project and share it with you.)
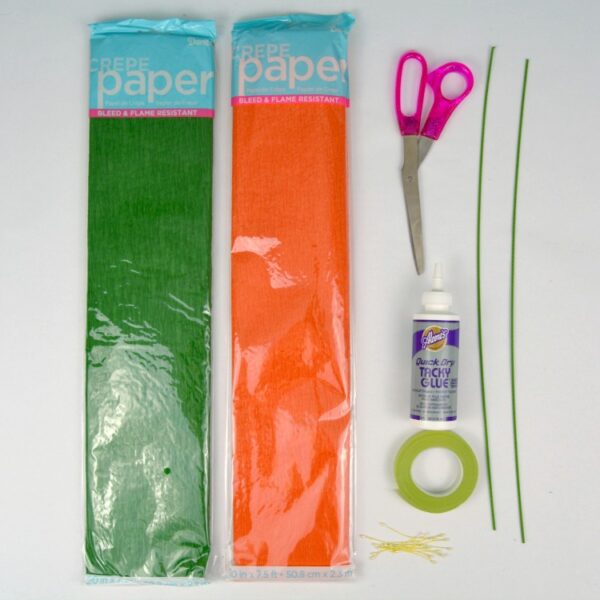
Supplies needed to make your own giant crepe paper flowers:
- Crepe Paper Sheets in Spring Colors (one full sheet for each flower)
- Green Crepe Paper Sheet (20 inches for each flower, so one sheet will make several flowers)
- Floral Tape and/or Green Washi Tape
- 16 Gauge Green Floral Wires
- Flower Stamens
- Craft Glue
- Scissors
You will need one full sheet of crepe paper (orange, pink, yellow, etc.) for each flower you plan to make. You only need 8-10 stamens for each flower, one wire from the multi-pack, and about 20 inches of green crepe. So if you’re shopping your supplies, you really just need one of everything, and you’ll be able to make at least six flowers – and if you’re making up several flowers, the cost of supplies for each one ends up being a little over a dollar each, making this a really inexpensive project!

I found that not only did I get much, much better each time I made a flower, but I also was able to complete it in far less time. My first flower took me nearly 45 minutes to complete, but by my third attempt, I finished it in just 15 minutes. I want to mention this little learning curve in case you find that on your first try, you don’t quite achieve the results you’re looking for. Trying again made all the difference in my case, and making up enough for an actual arrangement won’t be as time-consuming as you think once you get the hang of it.
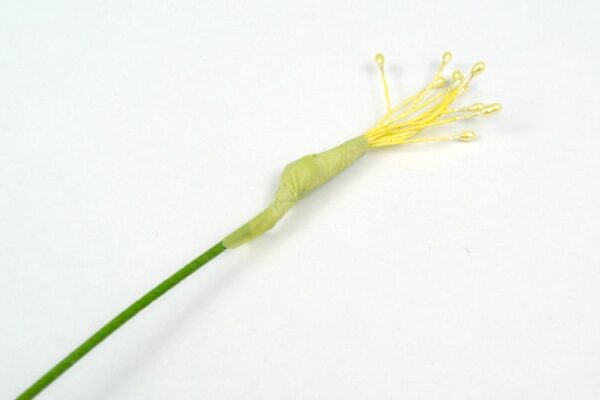
To begin, add a few stamens to the end of your wire, and wrap it tightly with floral tape. This will be the center of your crepe paper flowers, and it also helps to hold the petals in place while you work, so that they don’t slip off the stem before the glue dries.
Next, un-roll two folds of the crepe paper, so that you have a rectangular piece about 20 inches long x 4-5 inches wide. Fold it in half, lining up the short ends, then fold it in half two more times (for three times total). You are essentially folding it into a strip of eighths – from which you will cut a petal shape, and leave a strip of paper attached along one edge. Think of paper dolls for this step; you’ll be cutting four small petals, all attached by one strip of paper. (See below for a better example.) Wrap these four petals around the stamens of your flower, adding a few drops of glue at the base as you go.

Now, open the whole sheet of crepe paper and cut it lengthwise in half, creating two long strips about 7 feet long and 10 inches wide. Fold these long strips as you did in the first step, folding 5 times, until you have 16 layers of crepe. Cut a petal shape, leaving a strip of paper all connected at one end. Un-fold the paper, leaving you with a 7-foot length of petals all attached to one another. Wrap the connected strip around the base of your flower, adding drops of glue as you go.

Next, with your second sheet of 7-foot crepe, fold it 4 times, creating a set of 8 wider petals. Wrap and glue this final strip of petals onto the flower’s base.
Then, cut a 20-inch square of green crepe, and fold it into quarters, then diagonally. At the center of the square, nip off a tiny corner to create a hole in the middle. At the opposite, outer edge, trim away paper creating a leaf shape. Un-fold the leaves, add them to the base of your flower (you can secure it with glue, if you like) and then use floral tape or green washi tape to wrap all the ends at the base of your flower, covering the brightly-colored crepe and securing it to the floral wire.

I found that floral tape did not hold well enough to suit me, and I ultimately used washi tape to wrap the base because it has better hold. I have successfully used floral tape on smaller tissue paper flowers, but I think the sheer size of these calls for a heavier duty tape. But feel free to experiment!
Finally, curve the petals by stretching each one slightly, and curling it outward. Do this for each petal, and you will find that it makes your crepe paper flowers look much more realistic, as though it really bloomed!

My daughter typically can’t be bothered to pose for photos, but after seeing these giant crepe paper flowers, she was thrilled to show them off for a few shots. Props often help kids like my daughter get into a photo session that might otherwise be a struggle – not only does she have something lovely to hold, but it also helps to give you a chance to capture real smiles (not the fake camera-smiles) and natural expressions.

Aside from photo props, these would be a hit as part of any party decor. You can make a big statement with a big arrangement of crepe paper flowers!

Thanks for joining me today, and I hope you guys have a great weekend!

I see something truly special in this internet site.
Howdy very nice site!! Man .. Beautiful .. Wonderful ..
I’ll bookmark your web site and take the feeds also…I’m happy to search out so many helpful info
here within the post, we need work out extra techniques on this regard, thank you for sharing.
Hi there. Great job on the flowers! Was wondering if you’ve ever made a YouTube video of you making these step by step? That would be awesome to follow along with. Please let me know if you have already? Thanks a bunch.
Do you have a tutorial of the giant flower making instructions?
QUESTION: WHERE DO YOU GET CREPE PAPER? i: LIVE IN RURAL AREA AND WALMART IS ONLY STORE. hAVE NEVER SEEN SHEETS OF CREPE PAPER.
Wow! These are incredible! And your daughter is so pretty. :) She looks just like you!
Your daughter certainly looks just like her mommy. Raya & the flowers are both beautiful.
Your daughter and the flowers are so SWEET!
HOW COULD YOU MAKE THESE OUT OF TISSUE PAPER INSTEAD? ALSO, HOW WOULD YOU GO ABOUT MAKING SMALLER TISSUE PAPER FLOWERS FROM THIS CREPE FLOWER? THEY ARE GORGEOUS. IT’S JUST I’D LIKE TO MAKE MINE OUT OF TISSUE PAPER INSTEAD. THANKS!
Hi Barbara,
You can scale these down is size to fit a sheet of tissue paper, using all the same process. I also have a little different tutorial on tissue paper flowers you can check out here: http://happyhourprojects.com/book-page-tissue-flowers/
wow!! these are lovely!! would be great for a wedding or a birthday party