• Skip to primary navigation
  • Skip to main content
  • Skip to primary sidebar

  • home
  • about adrianne
  • buy the books
    • DIY T-Shirt Crafts (2015)
    • DIY Stamped Metal Jewelry (2016)
    • Rock Painting for Beginners (2019)
  • videos
  • crafts
    • diy beauty projects
    • kids’ crafts
    • paper craft projects
    • polymer clay
    • sewing projects
  • jewelry
    • bracelet projects
    • earring projects
    • necklace projects
    • jewelry tools & supplies
  • metal stamping
    • beginners’ tutorial
    • video tutorial
    • project ideas
    • metal stamping supplies
  • recipes
    • cocktail recipes
    • appetizers
    • main and side dishes
    • sweets and treats
  • by season
    • birthdays
    • new year
    • valentine’s day
    • st. patrick’s day
    • easter and spring
    • mother’s day
    • patriotic
    • fall
    • halloween
    • christmas
    • thanksgiving
  • privacy

Happy Hour Projects logo

10/09/2018

DIY Leather Bracelet | Pearl + Pewter Layers

Hey friends!  I have a great, easy DIY leather bracelet to show you today.  This simple design of 2 layers (or more, if you’re feeling like you want to experiment!) of leather cord with large hole potato pearls and pewter rings gives you a natural, casual look.  Plus – because it’s basically just cutting and gluing, it’s an awesome beginner’s project!

DIY Leather Bracelets | Pearl + Pewter Bead Bracelets at happyhourprojects.com

I picked up the supplies for this design at today’s post sponsor, Happy Mango Beads.  I’ll leave links in the supply list below so that you can shop or learn more.

HERE’S WHAT YOU’LL NEED TO MAKE THIS DIY LEATHER BRACELET:

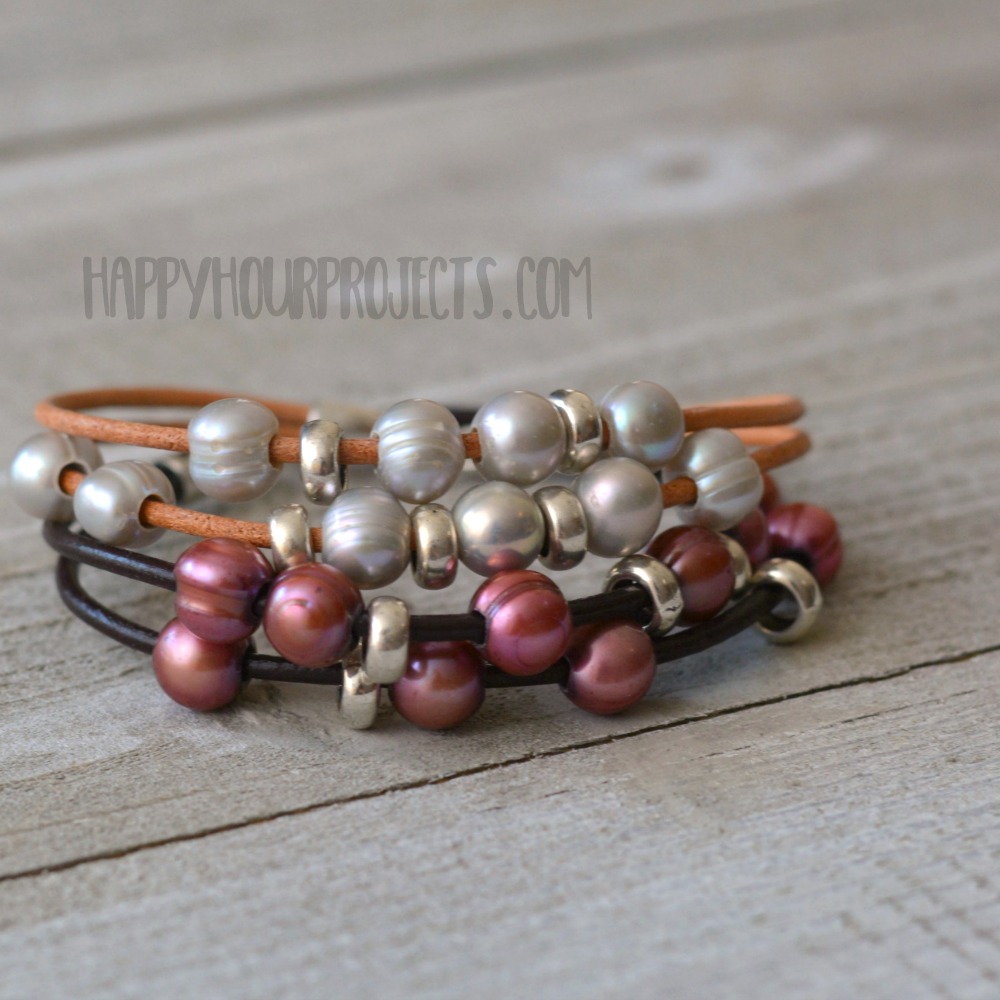
  • 1.5mm round leather cord (I’ve used tan and dark brown in the pieces pictured here)
  • Large Hole Irregular 8-9mm Potato Pearls (I’m using Ivory and Mauve today)
  • 6mm large hole pewter ring beads
  • Hook and eye glue-on clasp 16mm size
  • Jewelry glue like Super New Glue, Aleene’s, or E6000
  • Scissors

DIY Leather Bracelets | Pearl + Pewter Bead Bracelets at happyhourprojects.com

This bracelet is as simple as cut and glue!  I’m making a 7 1/4 inch bracelet for myself, so I cut 2 leather cords, 7 inches each.  (The clasp will add my last 1/4 inch.)  You can of course adjust this larger or smaller depending on your wrist size.  Add a few drops of glue into one glue on cap, and fit the leather cords into the cap.  It will be a snug fit – if your cords are larger, like 2mm, or if you want to include more layers, get the 30mm size clasp set.  For two 1.5mm cords, you’ll be fine with the smaller clasp.

DIY Leather Bracelets | Pearl + Pewter Bead Bracelets at happyhourprojects.com

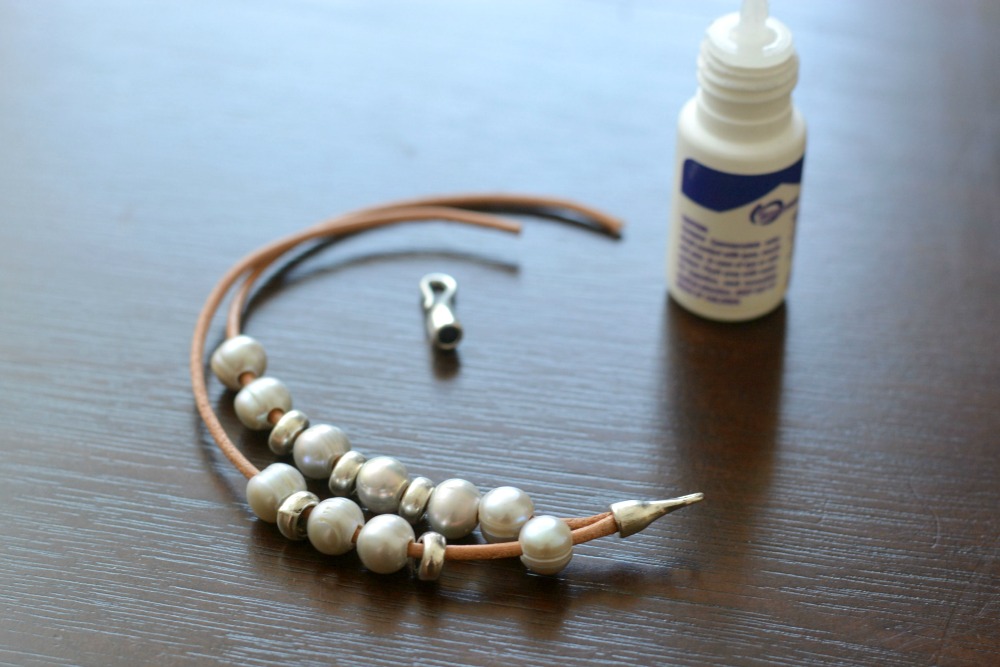
Thread on several pearls and pewter rings to get the look you want.  I added 10 pearls and 5 rings per bracelet, because I like the leather to show through!  You can add more beads to your liking.  When you’re happy with your design, glue on the second end cap to close the bracelet.  Allow your work to dry before wearing (it usually takes about 10 minutes).

DIY Leather Bracelets | Pearl + Pewter Bead Bracelets at happyhourprojects.com

That’s all it takes to make this earthy, natural DIY leather bracelet.  It’s casual enough for everyday, but the pearls add some natural shine!

DIY Leather Bracelets | Pearl + Pewter Bead Bracelets at happyhourprojects.com

I hope you enjoyed today’s project, and that you are inspired to make some of your own DIY bracelets!  Thanks for joining me, and I’ll see you again soon!

DIY Leather Bracelets | Pearl + Pewter Bead Bracelets at happyhourprojects.com

Adrianne Surian

Filed Under: Bracelets, Jewelry, Tutorials Tagged With: 10-minute project, accessories, beads, bracelet, DIY, easy, fashion, gifts, Happy Mango Beads, jewelry, layered, leather

copyright policy and terms of use

I love it when you love my work! All tutorials and photos published at Happy Hour Projects are copyrighted. If you would like to feature my tutorial on your website or share it on your social media you may use one photo to feature, as long as you provide a link back to the original post.

If you feature a photo, it may not be accompanied by the project tutorial or recipe, whether in my own words as it originally appears or paraphrased by you. This also includes personal sharing on social media and Pinterest. Publishing multiple photos from a project, or including instructions with an accompanying photo are not permitted and you will be asked to remove them.

I love to share my projects, and my tutorials, recipes, and e-books are ALL free for your personal use. However, photos and ideas that are published to this site are my protected intellectual property. You may print them at home, but please do not copy or distribute them. I also allow all designs to be made and sold at fundraisers, craft fairs, etc. If you are selling a piece made from one or more of my free tutorials in your online shop, I require that you use your own, original photography, and include a link back to my website to credit me as the designer.

I hope you enjoy what you read here, and please be fair when you share!

Reader Interactions

Comments

  1. Paper Minecraft says

    03/23/2023 at 11:55 pm

    Thanks for this great supply

    Reply
  2. Mary says

    07/28/2021 at 7:07 pm

    Love the beauty and easy tutorial thanks

    Reply
  3. Kanchipuram sarees says

    04/01/2019 at 7:55 am

    nice

    Reply
  4. Jodi Hurst says

    11/10/2018 at 1:24 am

    What a great idea for handmade Christmas presents! Each will be unique and personal. Thanks for the super simple yet nice looking craft project!

    Reply
  5. Jessica says

    11/01/2018 at 7:43 pm

    Hey, I couldn’t get the wish bracelet tutorial to let me comment, but I was wondering how do you keep your wish bracelet from unraveling before you even wear it or give away. The beads don’t stay in the braid..what am I doing wrong??? Tia. Jessica DAVIS

    Reply
  6. gmail sign up says

    10/22/2018 at 3:38 am

    A great and easy bracelet!

    Reply
  7. Annie says

    10/15/2018 at 6:01 am

    They are so cool! It looks easy i think i can try to make one! I’m going to get some supply so I can make them for my friends :) thanks for sharing!!!

    Reply
  8. Helena says

    10/11/2018 at 10:13 pm

    These are such cute bracelets! I want to make them for the girls in the Spec Ed Class at school! They would absolutely love them!

    Reply
  9. 2+2 chest of drawers says

    10/11/2018 at 6:36 am

    I just love these designs. These pictures are beautiful and classy. Thank you for sharing DIY and decorating ideas and inspiration.

    Reply
  10. Helen says

    10/10/2018 at 10:02 am

    nice post

    Reply
  11. Jen says

    10/09/2018 at 11:01 pm

    Thanks to all post.

    Reply

Leave a Reply Cancel reply

Your email address will not be published. Required fields are marked *

Primary Sidebar

Hello, and welcome! I'm Adrianne, an artist, author, designer, and blogger in mid Michigan. I work from home, chase my two kids, and this once-city-girl is learning how to care for chickens and adjusting to life out in the country. I have a compulsion for daily creativity... sometimes it's jewelry-making, paper crafting, metal stamping, mixing and baking, or giving new life to recycled items. But with 2 young kids, time is short! My goal here at Happy Hour Projects is to share projects and tips that you can do in an hour or less. The ideas you find here are designed to add a little creativity in your day, no matter how much (or how little) time you have!

BUY MY BOOKS!

Copyright © 2023 Happy Hour Projects on the Brunch Pro Theme