
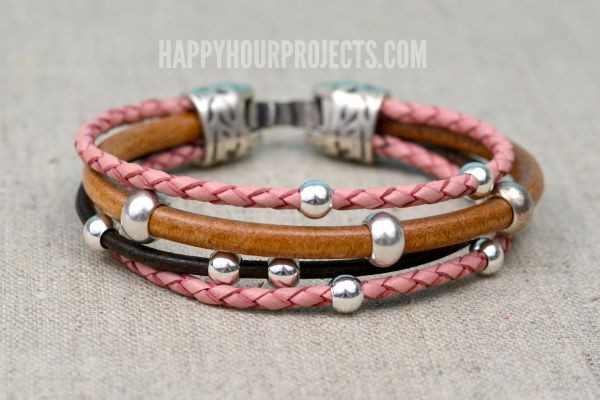
Hey guys! It’s been chaos (gosh I get tired of that being true, haha) and you know what that means if you read here often: 10-minute-or-less projects. Yeah! I still love to take a creative break, even when things get busy, and ending a quick craft session with a beautiful accessory to wear is like double-therapy. :) So I have a fast, simple layered leather design that anyone can make, even if you’re not a jewelry-making expert.

If you can measure, cut, and glue, then you can make this bracelet! Choose your own favorite colors (or switch up the silver in exchange for gorgeous gold) to personalize it for yourself, or make up a few in different colors to match different outfits. I love leather in my fall fashion designs, don’t you?
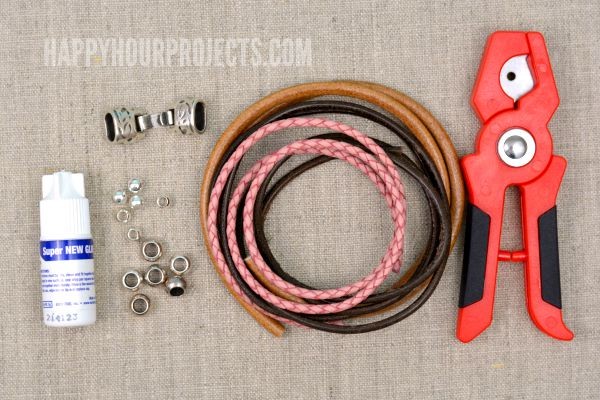
So – I’ll even include a shopping list for you below, in case you need help locating supplies. I got everything from Goody Beads (which is my favorite online retailer for leather accessories). These are affliliate links, which means if you decide to make a purchase after clicking through, then a small commission comes back to Happy Hour Projects to keep my supplies stocked for lots of hour-or-less free designs (and thank you, by the way!) Here’s what I used in today’s DIY leather bracelet:
- 14 inches of 3mm pink braided leather
- 7 inches of 3mm dark brown leather
- 7 inches of 5mm distressed brown leather
- 3 – 9mm round silver beads with a 5mm hole
- 9 – 6mm round silver beads with a 3mm hole
- Silver glue-on end clasp to fit licorice leather
- Leather cutter (or very sharp scissors)
- Super New Glue
Now, one thing to note: You can vary the size of leather that goes into these end caps. 5 pieces of 3mm leather will work, if you don’t want to use 5mm leather. You actually have all kinds of options when it comes to layered strands of leather – if it fits in the end cap, go ahead try it on your design! I’ve included 2 sizes of beads here to fit the 2 sizes of leather I used.

First things first. Add a few drops of glue to the inside of one end cap. I typically wait to cut my leather until after I glue it in so that I can cut it evenly just once – otherwise, you can cut each strand to 7 inches, and then glue all the strands in at once. Allow the glue to set for about a minute before moving on. Tip: because most leather is coiled in packaging, curve each piece in the same direction. It will sit nicely around your wrist that way.
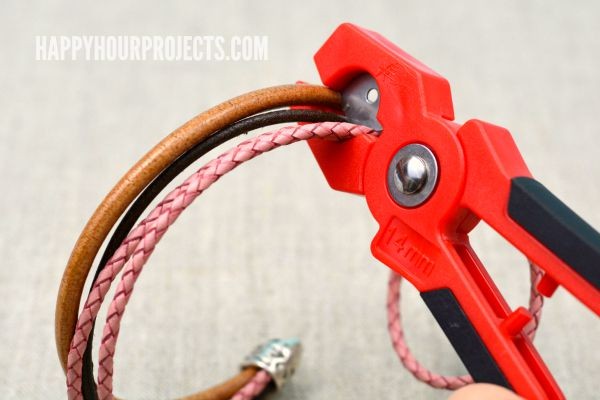
When the glue dries enough to hold your pieces (it’s quick-dry, and won’t take long at all), make sure all your strands are even, and trim them if necessary. I like using a leather cutter because it’s VERY sharp, and you can cut multiple strands at once.

Add your beads onto the leather (if it’s a tight fit, don’t get frustrated! The bright side to that is, once you get it on, they won’t slide around. They’ll stay in place.) I usually add 2-3 beads to each strand. Use more or less, as you like. Then, glue on the other end cap. Allow your bracelet to dry for at least 10 minutes before wearing it, to ensure that the glue is fully dry.

That’s it! Thanks for joining me for today’s quick project, and I’ll see you again soon!

I like the end caps you use on the leather, but is there one that can be fitted and tightened? Not many, or any sites I’ve been on show how to finish off leather bracelets.
Thank you for any suggestions.
What size is the end cap clasp?
What size is the clasp? 5mm and 3 mm leather? Some say for flat and some say for round leather on goody website.
How do I find the supplies that you used?
wow nice post
wow looking good
I loved your simple instructions!
Thank you so much
nice post
looking good
Just found this on Pinterest. How does this bracelet stay on with the glued end caps? or did I miss something like memory wire? thanks, I love your articles and added your site to my faves.
I do a lot of paper beads, have any articles?
Can I simply sayy what a relief tto discover somebody that really understands what they’re discussing onn the web.
You definitely understand howw to bring a problem to light and maake it important.
A lot more people really need to look at this and understand this side of your story.
I was surprised you aren’t more popular because you surely have the gift.
Just found you, awesome !
Having read this I thought it was really enlightening.
I appreciate you spending some time and energy to put this short article together.
I once again find myself spending a lot of time both reading and commenting.
But so what, it was still worth it!
This looks so easy – is it? Also, do you teach anywhere? If so I would love to take some classes.
This is my first time on this site.
Thank you
Fran
Hi, like this project. Can’t wait to make one. Keep the projects coming.
Hello everyone, it’s my first go to see at this site, and paragraph is in fact fruitful for
me, keep up posting such articles.
I love this website. I am just now starting to learn to make jewelry and I wanted a place where there were a lot of projects I liked all in the same place, and I found it, Happy hour projects !! I particularly love to work with leather having a background in western horseback riding and I noticed you have a lot of leather projects. I love metal stamping too, I want to learn different finishes to apply to different metals. and I love Beads too ! thank you for your website. jackie mcknight in Hendersonville NC
Thanks so much, Jackie! I’m hard at work on some metal stamped goodness right now, but I can’t wait to get back into the leather, too.
Oooh, maybe both. ;)
I love your creations, especially the bronze bracelet.
Lovely project as all you make. I’m suscribed to your blog and I have to tell you that I enjoy every post I receive. Your are very talented!
Best regards from Spain.
Sol
Thanks Adrianne I never tire of the wonderful contribution you make to this site and allowing us all to share your wonderful fresh modern ideas. They offer a lot of inspiration even if I don’t actually make them exactly to the design. Thanks again Lynne